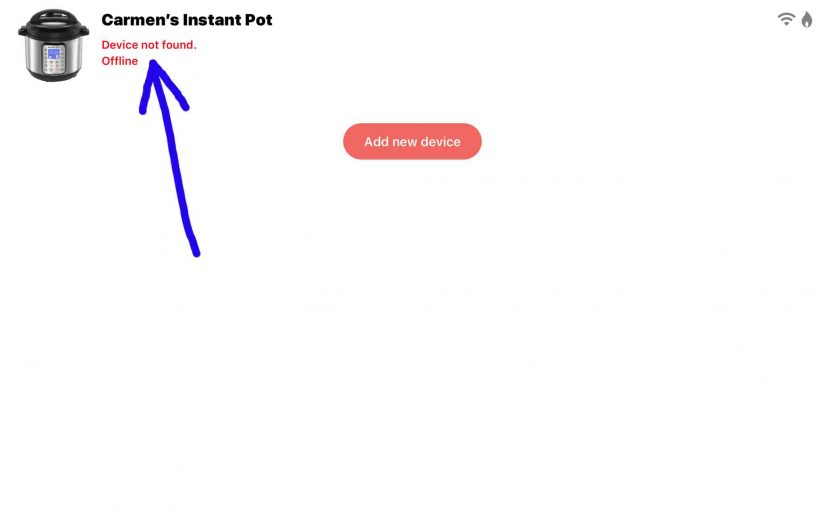
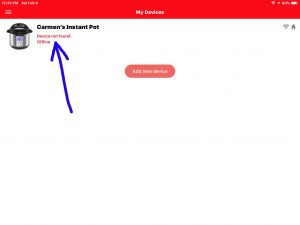
Let’s say you’ve previously set up your Instant Pot Smart WiFi pressure cooker. That is, you created an Instant Pot account through their Instant Pot app, which means that you’ve also installed that app on your mobile device. You also assigned your cooker a PIN, and it now shows up in the app’s My Devices list. But since then, you’ve changed your WiFi router or otherwise updated the network connection information such as its name or password. Now, after these changes, the smart WiFi Instant Pot no longer connects to WiFi, and appears in the app as Offline, as shown next. Plus, on the cooker itself, the WiFi symbol either blinks, or does not show up at all. Well, in this piece we show how to fix this situation and change WiFi network on Instant Pot Smart WiFi pressure cooker, to get your smart cooker back online once more.
Summary of How to Change WiFi on Instant Pot Smart WiFi Electric Pressure Cooker
- Plug in Smart Cooker to AC Power
- Discover that your Instant Pot No Longer Connects to WiFi (See last picture above for what that status looks like.)
- Connect Mobile Device to 2.4 Ghz WiFi Network with Internet Access
- Run the Instant Pot App
- Visit that app’s My Devices Page
- Press the Add Device Button
- Select your Instant Pot Model — the Smart WiFi Cooker is the Only Choice
- Assign a Name and Password to your Instant Pot
- Enter WiFi Password for the New 2.4 Ghz. WiFi Network
- Put your Instant Pot Smart WiFi into APP Mode
- Connect Mobile Device to the Pot’s Ad Hoc WiFi Network
- Return to the Instant Pot App, and Wait for Connection Successful Page
- Perform the Initial Test Run if Desired
- Check that your Cooker is Now Connected to WiFi and Ready to Cook
Before You Begin with How to Change WiFi on Instant Pot
First, be sure to plug your Instant Pot into AC power in a place that’s in range of the 2.4 Ghz. WiFi network you wish to connect it with. The pot may not connect to that WiFi if it’s too far away from its router / access point. Check that the pot is not out of range at your preferred pot location by connecting your mobile device to the same WiFi that the pot will use, at that same location. Then, see if your phone / tablet has trouble connecting. If so, then resolve the connectivity problem with your mobile device first, before trying to solve the Instant Pot issue.
How to Change WiFi on Instant Pot, Step by Step
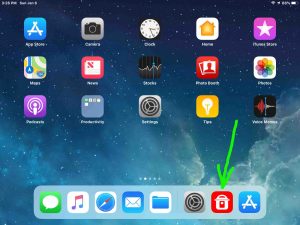
1. Run the Instant Pot Smart WFii App
First, find the app on your mobile device. In our case, we see it on the Recents bar at the bottom of the Home page, as pictured next.
The app’s Home screen then appears, as shown next.

2. Touch the Main Menu Control
To check Instant Pot status, tap the Main Menu hamburger control in the top left corner of the app’s Home page, as pointed at above by the blue arrow.
This brings up the Instant Pot Main Menu, as pictured next.
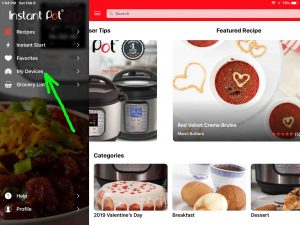
3. Visit the My Devices Page
We find the My Devices item in the Main Menu, near the left edge of the screen, about a third of the way down from the top.
Tapping this item brings up the My Devices screen, as depicted next.
4. Touch the Add Device Button to Continue with How to Change WiFi on Instant Pot
Find the Add Device button in the center of the top quarter of the screen.
Then, when you tap Add Device, you get the Select Model screen, as pictured next. However, unlike in initial setup of your Instant Pot, when you’re just changing the WiFi connection as we are here, the app lists only one Instant Pot model, that being the Smart WiFi version.
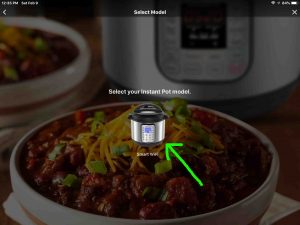
5. Tap the Smart WiFi Instant Pot Model
Finding your Smart WiFi model in the list is simple thus, as shown in the last screenshot above. Why? Because the Smart WiFi Instant Pot is the only one in the list, and is pointed at by the green arrow in that picture.
Touching the Smart WiFi model brings up the Connect Smart WiFi screen, as we show next.
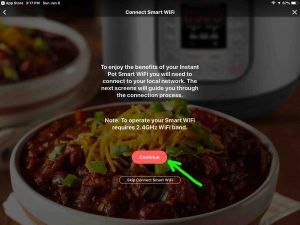
6. Touch the Continue Button
Find the Continue button near the center of the screen, but just a little closer to the bottom screen edge.
Pressing Continue then displays the Secure & Name Pot page, as shown next.
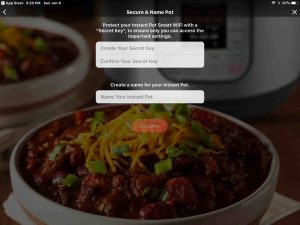
7. Type In Pot Name and Password to Continue with How to Change WiFi on the Smart Instant Pot
Make sure the pass code you enter has at least six characters. Indeed, the Continue button on this page remains grayed out (unavailable) until the password you enter meets this requirement. You won’t be able to move on until you enter a password that meets this requirement.
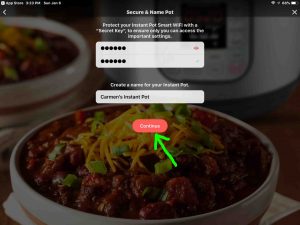
8. Touch the Continue Button
Find the Continue button right in screen center, as shown in the last picture, pointed at by the green arrow.
Tapping Continue there takes you to the WiFi Password page, as shown next.
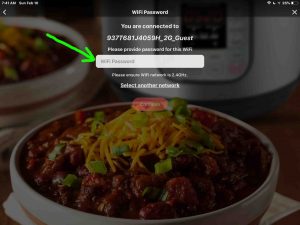
Prompting for a 2.4 Ghz. network passkey, with its password edit box highlighted.
The WiFi Password page asks you for the password of the WiFi network you want to sign your Instant Pot into. It’s also the network that your mobile device is connected to at this time. Again, this network should be a 2.4 Ghz. connection only.
9. Type in WiFi Password
The edit box you type the WiFi password into is horizontally center on the page, and vertically half way between the top of and center of the screen.
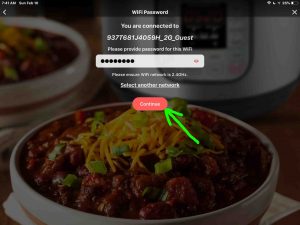
10. Touch the Continue Button to Move Forward with How to Change WiFi on the Smart WiFi Instant Pot
Again, find the Continue button exactly in the center of the page, as pointed at by the green arrow above.
Tapping Continue takes you to the AP Mode screen face, as pictured in the next photo.

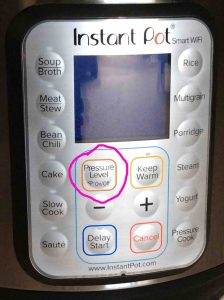
Now is the time to put your Instant Pot into APP Mode, as directed by the app. So, with the pot powered on, press and hold the Pressure Level button on the pot itself, for around ten seconds, until you hear a long beep. See this button in the next picture.
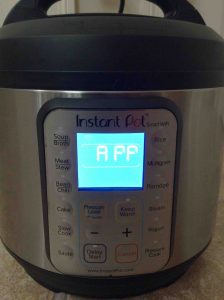
When the pot enters APP Mode, its LCD display looks as follows.
Now, go back to the Instant Pot app on your mobile device, and continue with the next step.
11. Tap the Continue Button
This time, find the Continue button near the bottom but in the center of the AP Mode screen.
Touching that button then brings up the Connect to Instant Pot page, as shown next.
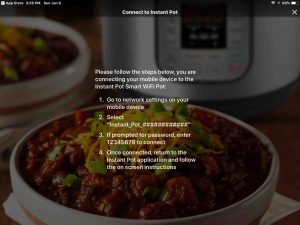
12. Connect to the Instant Pot’s Ad Hoc WiFi Network to Continue with How to Change WiFi on Instant Pot
When the Instant Pot is in APP (setup) mode, it creates an ad hoc WiFi network that you must connect to with the same mobile device you’re running the Instant Pot app on, before continuing with the next step.
In our scenario, we went to Settings->WiFi on our iPad Air, and saw the Instant Pot’s wireless network, as shown in the next screenshot. We circled that network in green. That net on our pot is named Instant_Pot_F0C9D17BEC97.
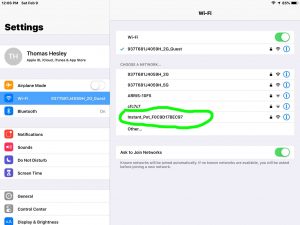
Tap this Instant Pot wireless network to connect to it. It’s unsecured, so you won’t have to type in a password.
When we tapped the Instant_Pot_F0C9D17BEC97 network on our iPad Air, the Air connected within a couple seconds, and the Wifi Settings screen changed to show this connection successfully made, as pictured next, and circled.
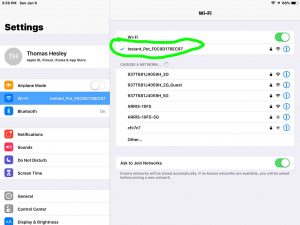
Then, go back to the Instant Pot app.
13. Wait for Instant Pot Change WiFi to Finish
Once you’ve connected your mobile device to the Instant Pot ad hoc network, close its WiFi Settings app and again bring up the Instant Pot app.
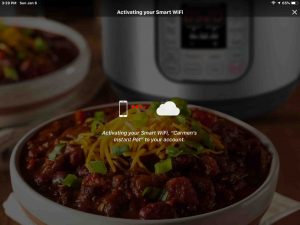
The Activating Your Smart WiFi page appears for some seconds. You’ll see the app trying to activate your Instant Pot on your Instant Pot account. See this shown next.
This page shows a mobile phone and a cloud, with a line between them, where a blip of light is running back and fourth across that line. This suggests that your mobile device, the Instant Pot, and the cloud servers at the Instant Pot company, are talking to each other, in order to establish the linkage.
Then, after a brief time, and if all goes well, the app puts up the Connection Successful page, as shown next.

14. Touch the Next Button
Find the Next button near the bottom center of the Connection Successful page, pictured in the last shot.
Tapping Next brings up the Initial Test Run screen, as shown next.
Now, if you tap Continue on this page, you’ll get directions on how to perform this test run. To the point, they ask you to put a little water in the inner pot, lock the lid, and start the Instant Pot cooking. After several minutes, the steam pressure builds up inside, and you can then see the float valve on the lid go up. This exercise gives a sense of what it’s like to cook with an electric pressure cooker, such as the Smart WiFi Instant Pot.
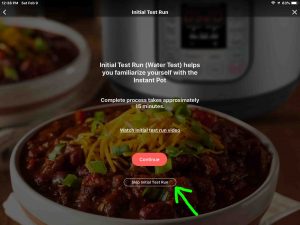
But we chose not to run through this test in this scenario, since you don’t need to do that in order to get your Instant Pot back online, which is the focus in this piece. So instead of touching Continue, we move to the next step, where we tap the Skip Initial Test Run button.
15. Touch the Skip Initial Test Run Button to Continue with How to Change WiFi on the Smart WiFi Instant Pot
We find this control near the bottom center of the page, as pointed at above with the green arrow.
Tapping Skip Initial Test Run brings up the Before You Begin page, as shown in the next screenshot. Here, you can browse through several screens that talk about how to check cooker status, along with some of the actions you can control on it via the Instant Pot app. We will not show all these windows here though.
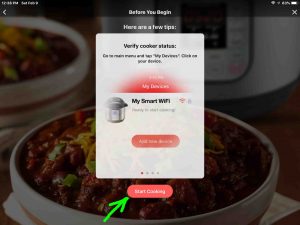
16. Touch the Start Cooking Button
Find this item near the bottom center of the screen, as shown in the last shot above.
When you tap Start Cooking, the app takes you to its Home screen, as shown next.
17. From There, Tap the Main Menu Hamburger Control
To see what the pot, now again online, is doing, tap the Main Menu hamburger control in the top left corner of the app’s Home page, as pointed at above by the blue arrow.
This brings up the main menu, as pictured next.
18. Touch the My Devices Item to Continue with How to Change WiFi on Instant Pot
We find the My Devices item near the left edge of the screen in the Main Menu, about a third of the way down from the top.
Tapping this option brings up the My Devices page, as pictured next.
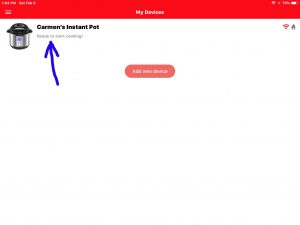
This screen lists all the Instant Pot devices that you’ve set up on your mobile device using your Instant Pot account. Our cooker, named Carmen’s Instant Pot, appears here as ready to cook.
19. Done with How to Change WiFi on Instant Pot Smart WiFi Pressure Cooker !
If you see the page shown in the last step, then your Smart WiFi Instant Pot is, once again, connected to WiFi. Thus, you can once more control and monitor it via the Instant Pot app.
Happy pressure cooking.
Related Posts to How to Change WiFi on Instant Pot
- Instant Pot WiFi Pressure Cooker Buttons Guide
- How to Set Up Instant Pot Smart WiFi Pressure Cooker Instructions
- Change WiFi on Logitech Squeezebox Boom Radio
- Reset Button on Instant Pot Smart WiFi Cooker
- Echo Spot Change WiFi Network Instructions Amazon Alexa Spot Speaker
References for How to Change WiFi on Instant Pot
Revision History
- 2019-07-16: Added more tags and links.
- 2019-05-02: Tuned the targeting for ‘Change WiFi on Instant Pot’. Updated the tags list.
- 2019-02-10: Originally published.