This piece covers how to charge the JBL Pulse 3 Bluetooth speaker. Do this simply through the USB power in port on the back. Here, we detail this charging procedure for these party ready wireless speakers. Note that you can still play your Pulse 3 while it charges.
In summary, pick a strong enough USB adapter, as no charger comes with the Pulse 3 speaker. Also note that this unit accepts a USB micro plug for recharging. But you can use either a USB-A or USB-C charger. Thats so long as you have the right cable to connect the speaker and adapter.
Now perhaps your charger provides the 5 volts at 2.3 amps (11.5 watts) power level. If so, then it really doesn’t matter whether it’s a USB-A or USB-C power supply. Indeed JBL does include an older style USB-A charger and cable with this speaker.
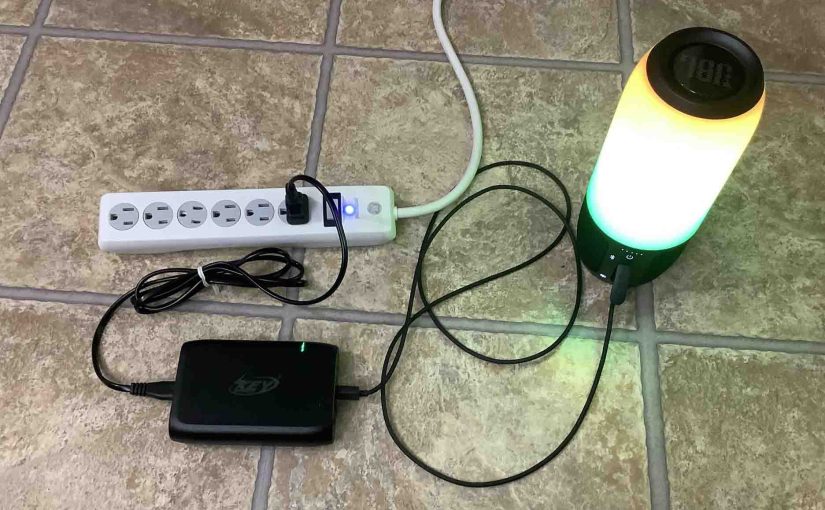
Next, with all that said, connect your cable between the speaker and that adapter. Then, plug the charger into a working wall outlet.
Finally, after four and a half (4.5) hours, your speaker completes charging. So it’s ready to play once more for up to twelve (12) hours before needing another recharge.
How to Charge JBL Pulse 3 Speaker
1. Choose Correct Size AC or Car Adapter
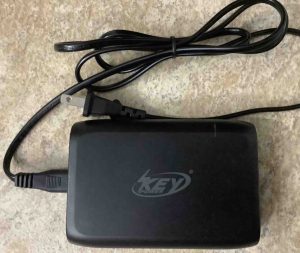
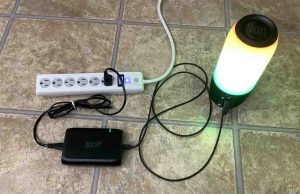
In this case, we’re charging our speaker with a Key Power USB charging station, as we picture next.
Now as mentioned earlier, the Pulse 3 needs 5 volts at 2.3 amps to recharge fully in the specified time. So this adapter outputs plenty enough current to do this job well.
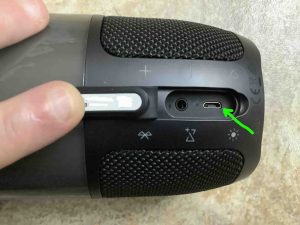
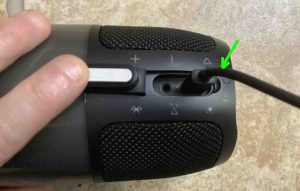
2. Find the Micro USB Port on the Speaker
Find this USB-C charging port on the left side panel, beside the carrying loop.
3. Power Off your Pulse 3 JBL Speaker (Optional)
Note that the Pulse3 still charges when powered either ON or OFF.
But how fast charging happens depends on how much above-and-beyond recharging capacity your charger delivers. Thus the speaker might charge faster when OFF, especially with lower current chargers.
4. Plug in the USB Cord to the Speaker to Continue with How to Charge the JBL Pulse 3 Speaker
Then, plug the mating end of your USB cable into the matching port on the speaker.
5. Plug the Other End of the Cable into your Adapter
Next, connect the A end of the cord to the power adapter.
6. Plug the USB Adapter into a Working Wall Receptacle
Connect the adapter to a working AC outlet, as shown next.
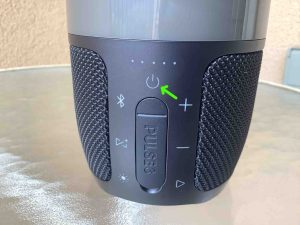
The battery gauge lights up blinking white when the speaker receives power from the adapter.
Now you may not see this meter start flashing. If not, then either you speaker is already at full charge. Or either your speaker, cable, charger, or wall outlet are defective. So troubleshoot each of these in turn to isolate and fix the problem.
7. Let the JBL Pulse 3 Charge Until the Battery Gauge Stops Blinking
Full battery charging completes when the speaker’s the battery meter shows all lamps glowing steadily, as we see next.

8. Unplug the USB Charge Cable from Speaker to Continue with How to Charge a JBL Pulse 3
After disconnecting the cord, be sure to completely close the port door on the speaker. That way, you get retain the protection against water and dampness.
9. Done with How to Charge JBL Pulse 3 !
Finally, we have now fully charged our JBL Pulse 3 portable speaker.
Repeat this charging every twelve hours of play. Doing so keeps its battery in top working condition for many years to come.