The versatile Instant Pot smart pressure cooker now has a WiFi enabled version. With this, you can control the pot remotely, from any place you have internet access. The Instant Pot app supports adjustment of some pressure cooker functions. However many others you can access only on the cooker’s front panel. So with that in mind, we offer our Instant Pot WiFi Pressure Cooker buttons guide. This gives a comprehensive list of practically all functions cooking modes that this WiFi Instant Pot does.
Instant Pot WiFi Buttons Guide: Buttons Summary
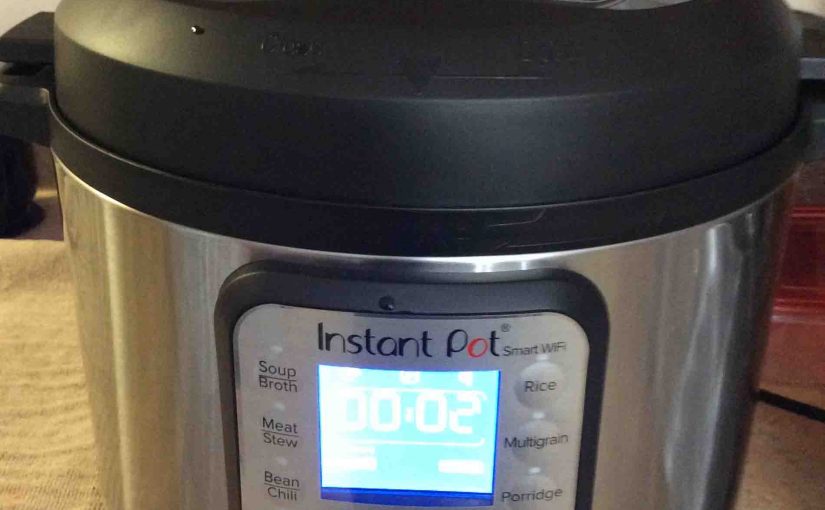
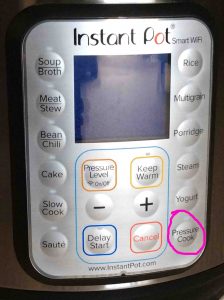
The front panel on the Instant Pot smart WiFi electric pressure cooker consists of eighteen membrane style raised controls. As such, you can easily damage them by pressing too hard. So avoid punching them too many times or with too much force. Use the Instant Pot app to save on button wear, and prevent premature button failure. In this section, we explain where to find each button. We also discuss when and how to use it, and what it does.
Instant Pot WiFi Buttons Guide: Those Not Included
Note that this WiFi pressure cooker does not have the following buttons.
-
- Egg Button
- Poultry Button
- Manual Button
- Power Button
- Timer Button
Instant Pot WiFi Buttons Guide: The Complete List
However, this smart pressure cooker does have the following controls.
-
- Soup Broth Button
- Rice Button
- Meat / Stew Button
- Multigrain Button
- Bean / Chili Button
- Porridge Button
- Cake Button
- Steam Button
- Slow Cook Button
- Yogurt Button
- Saute’ Button
- Pressure Cook Button
- Pressure Level Button
- Keep Warm Button
- UP (+) and DOWN (-) Buttons
- Delay Start Button
- Cancel Button
- Steam Release Valve
- Float Pressure Button
Built In Recipe Program Buttons
These buttons all work the same way. Specifically, when the Instant Pot is in OFF or Standby mode, press and release one of them, ONCE. This sets the pressure level, time, and keep warm settings to predefined values. These values are suitable for the type of food the button names. For example, pressing the Rice button sets the cook time to twelve minutes. This is the normal amount of time for pressure cooking rice. It also sets the low pressure option, and turns the Keep Warm setting on. We give the specific cooking parameter values for each pre programmed cooking button below.
Furthermore, you can opt to slightly increase the cooking time above its ‘normal’ value. Do that by pressing and releasing these buttons a second time. This lengthens the cook time a little more. For slightly less cooking time, press the button a third time. Finally, pressing the button a fourth time sets the cooking time back to the ‘normal’ value.
Furthermore, after you press these, you can adjust the cooking time more finely by using the Down (-) and Up (+) keys. This indeed works for all except the Rice button, which defaults to twelve minutes cook time.
Finally, you only have about ten seconds since the last key press. So be sure to make any adjustments to the cooking program before then.
Now here’s the list of these pre-programmed cooking buttons.
-
- Soup Broth Button
- Rice Button
- Meat / Stew Button
- Multigrain Button
- Bean / Chili Button
- Porridge Button
- Cake Button
- Steam Button
- Slow Cook Button
- Yogurt Button
- Saute’ Button
- Pressure Cook Button
Instant Pot WiFi Buttons Guide: Detailed Descriptions of the Buttons
In this section, we describe each button and control on the WiFi instant Pot pressure cooker. We give its location on the device for our vision impaired and blind readers. And we also talk about how the button works, what it does, and when and how to use it.
Note that these instructions are very rough estimates about how most foods cook. So follow the directions in your recipe first. Now perhaps your recipe is unclear about how exactly to cook a particular food. If so, then start with these guidelines and tweak as you find necessary.
The Top Row Buttons
The Soup / Broth Button
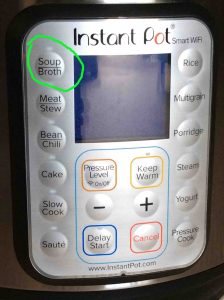
Soup / Broth Button Location
The Soup Broth button is the leftmost one in the first row of two buttons. So it’s to the right of the upper left corner of the control panel. Furthermore, find it above the Meat / Stew button, and to the left of the LCD screen. Finally there are no buttons above this one, and none to its left.
How to Use
-
- Start with a cold Instant Pot in OFF mode.
- Then load it up with the ingredients of your favorite soup or broth.
- Lock the lid.
- Then press the Soup / Broth button.
- Wait for cooking to finish.
- Quickly or gradually release the pressure, according to your recipe.
Default Soup / Broth Button Cooking Values
-
- Normal Cooking Time: 30 minutes. More: 4 hours (yes, HOURS). Less: 20 minutes.
- Keep Warm: Yes
- Pressure to Use: High
The Rice Button
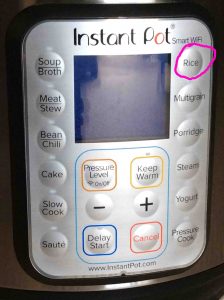
Rice Button Location
The Rice button is also in the topmost buttons row. Find it to the left of the upper right corner of the control panel. It’s above the Multigrain button, and to the right of the LCD screen. Again, no buttons are above this one, and none are to the right.
How to Use
-
- Begin with a cold Instant Pot in OFF mode.
- Then fill it with rice, water, spices, and or sauces as called for in the recipe you’re making.
- Lock the lid, close the steam release valve.
- Then press the Rice button.
- Wait for cooking to complete.
- Finally, quickly or gradually release the pressure, as the recipe calls for.
Default Rice Button Cooking Values
-
- Normal Cooking Time: 12 minutes. More: 15 minutes. Less: 8 minutes.
- Keep Warm: Yes
- Pressure to Use: High
The Second Row Buttons
The Meat / Stew Button

Meat / Stew Button Location
The Meat / Stew button is in the second row of two buttons. It’s to the left of the LCD screen, near the left edge of the buttons panel. Find it just above the Bean / Chili button, and just below the Soup / Broth button. No buttons are to the left of this button. And the Multigrain button is to the right, on the other side of the display.
How to Use
-
- Start with a cold Instant Pot in OFF mode.
- Then add the ingredients of your favorite stew or meat recipe.
- Lock the lid.
- Then press the Meat / Stew button.
- Wait for cooking to end with some beeps.
- Finally, release the pressure quickly or slowly, according to your recipe.
Default Meat / Stew Button Cooking Values
-
- Normal Cooking Time: 35 minutes. More: 45 minutes. Less: 20 minutes.
- Keep Warm: Yes
- Pressure to Use: High
The Multigrain Button
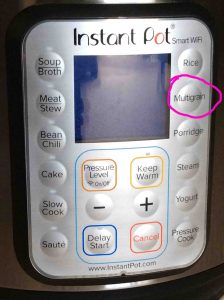
Multigrain Button Location
The Multigrain button, also in the second buttons row, is the right of the LCD screen. Thus find it near the right edge of the control panel. Also, it’s in the row above the Porridge button, and the row beneath the Rice button. Finally, no buttons to the right, and the Meat / Stew button is to the left.
How to Use
-
- Start with a cold Instant Pot.
- Fill it with the grain, water, spices, and or sauces the recipe specifies.
- Then Lock the lid.
- Close the steam release valve.
- Then press the Multigrain button.
- Wait for cooking to finish.
- Finally, quickly or gradually let out the pressure, as the recipe says.
Default Multigrain Button Cooking Values
-
- Normal Cooking Time: 40 minutes. More: 1 hour. Less: 20 minutes.
- Keep Warm: Yes
- Pressure to Use: High
Instant Pot WiFi Buttons Guide: The Third Row
The Bean / Chili Button
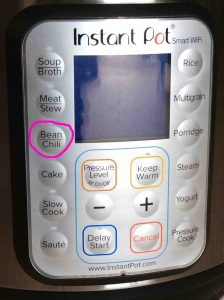
Bean / Chili Button Location
The Bean / Chili button in this third row of two buttons, to the left of the LCD screen. It’s also near the left edge of the control panel. Also, find it just above the Cake button, and just below the Meat / Stew button. No buttons are to the left of this Bean / Chili button. Plus, the Porridge button is to the right, on the other side of the display screen.
How to Use
In a cold Instant Pot, fill with the the beans, spices, and or sauces as called for in your recipe. Lock the lid, close the steam release valve, and then press the Bean / Chili button. Then wait for cooking to finish. When the pot shuts down, quickly or slowly bleed off the pressure, as the recipe says.
Default Bean / Chili Button Cooking Values
-
- Normal Cooking Time: 40 minutes. More: 1 hour. Less: 20 minutes.
- Keep Warm: Yes
- Pressure to Use: High
The Porridge Button
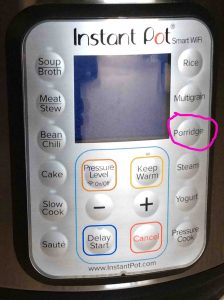
Porridge Button Location
The Porridge button, also in the third buttons row, is again just right of the LCD screen. It’s nearest to the right edge of the buttons control panel. It’s also just above the Steam button, and just below the Multigrain button. No buttons to its right, and the Bean / Chili button is to the left of the screen.
How to Use
In a cold Instant Pot, fill with the the porridge ingredients as called for in your recipe. Lock the lid, close the steam release valve, and then press the Porridge button. Then wait for cooking to conclude. When the Instant Pot stops, quickly or slowly let off the pressure, as the recipe should say.
Default Porridge Button Cooking Values
-
- Normal Cooking Time: 20 minutes. More: 30 minutes. Less: 5 minutes.
- Keep Warm: Yes
- Pressure to Use: High
Instant Pot WiFi Buttons Guide: The Fourth Row Buttons
This row is just underneath the LCD display screen.
The Cake Button
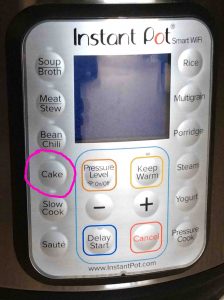
Cake Button Location
Find the Cake button in this first row of four buttons. So it’s in the fourth buttons row to the left of the LCD screen and one row below. Furthermore, it’s near the left edge of the control panel. Also, find it just above the Slow Cook button, and just below the Bean / Chili button. Finally, no buttons are to the left of this Cake button. Plus, the Steam button is to the right, on the other side of the screen.
How to Use
-
- Start with a cold cooker in OFF mode.
- Then fill it with the ingredients for the cake to bake.
- Lock the lid.
- Then press the Cake button.
- When the Instant Pot beeps, cooking is complete.
- So quickly or slowly let off the pressure, if the recipe says to do so.
Default Baking Values
-
- Normal Cooking Time: 40 minutes. More: 50 minutes. Less: 25 minutes.
- Keep Warm: Yes
- Pressure to Use: High
The Pressure Level / WiFi ON OFF Button
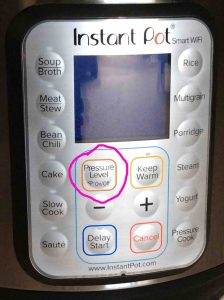
Pressure Level / WiFi On Off Button Location
This button is the second one in this first row of four buttons. It’s the fourth row from the top, just under the LCD screen. It’s one to the right of the Cake button, and just above the Down button. Also, no buttons are above this Pressure Level / WiFi ON OFF button. And the Keep Warm button is one position to the right.
How to Use The Pressure Level Button
-
- Punch in a particular cooking program,
- But before the pressure cooker starts heating, change the cooking pressure that program will use. You have ten seconds to do this.
- Press and release this button to adjust. This pressure setting can be either low or high. Most of these programs start off with high pressure. Pressing this button once changes it to low. Pressing it a second time changes the pressure setting back to high.
How to Turn WiFi On or Off
Note that the Pressure Level button doubles as a WiFi On Off control. Which function the button performs depends on the state your Instant Pot is in when you press it.
When the pot is in OFF mode, this button toggles its WiFi on and off. WiFi is ON by default. But you may wish to disable WiFi for security reasons. Disabling WiFi keeps someone from changing settings via the Instant Pot app while you’re using it. So to turn WiFi OFF, press this button once. Note that you cannot switch ON and OFF WiFi while cooking, or any time a program is on the screen.
Press a particular preset cooking button. This brings up its parameters on the LCD display. Then this button then adjusts the pressure level. Furthermore, you may adjust this now, or at any time during cooking.
This button also switches between hour and minute fields when setting up a Delayed Start routine.
The Keep Warm Button
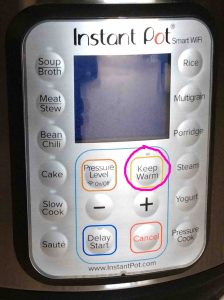
Keep Warm Button Location
This button is the third in this first row of four controls. So it’s in the fourth row from the top), again, just under the LCD screen. Also, it’s one to the right of the Pressure Level button, and just above the Up control. Furthermore, no buttons are above this button, and the Steam button is one spot to the right.
How to Use
The Keep Warm button sets the pressure cooker to very low heat. It also keeps the pot running that way for up to ten hours. When you press this button, you can then use the Up (+) and Down (-) buttons to adjust the keep-warm time. You can adjust this time once warming begins as well. You might start a Keep Warm cycle after food finishes cooking. Or do it when you use the pot to keep cheese hot at a party.
Default Warming Values
-
- Keep Warm Time: 10 hours. No more or less values for this setting.
- Keep Warm: Yes
- Pressure to Use: None
The Steam Button
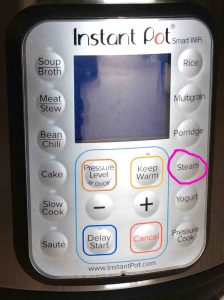
Steam Button Location
Find the Steam button, also in the fourth line of buttons. It is one row below and to the right of the LCD screen. Again, it’s near to the right side of the control panel, in the row above the Yogurt button. Finally, find it in the row below the Porridge button with the Keep Warm button to its left.
How to Use
-
- Start off with a clean and cool Instant Pot.
- Load a strainer basket with vegetables or anything else you wish to steam.
- Add some water to the inner pot.
- Place the strainer with the veggies in.
- Close and lock the lid.
- Close the Steam Release valve.
- Then press the Steam button.
- Wait for the Instant Pot to beep.
- Then steaming is complete. So quickly or slowly release the pressure, as the recipe says.
Default Steaming Values
-
- Steam Time: Normal: 10 minutes. More: 15 minutes. Less: 3 minutes.
- Keep Warm: Yes
- Pressure to Use: High
Instant Pot WiFi Buttons Guide: The Fifth Row of Buttons
The Slow Cook Button
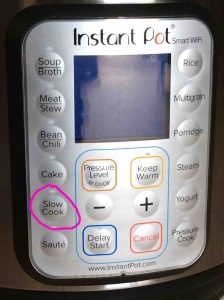
Slow Cook Button Location
Find the Slow Cook button in this second row of four buttons. It’s the fifth button row underneath the top. Also it’s to the left of the Down (-) button. It’s near the left edge of the control panel, two rows below the LCD display. Finally, find it just above the Saute’ button, and just below the Cake button.
How to Use
In a cold Instant Pot, fill with meat, vegetables, soups, sauces, grains, et al, as called for in your recipe. Lock the lid, close the steam release valve, and then press the Slow Cook button. Use the Up (+) and Down )-) keys to add or subtract time in half-hour increments from the default slow cooking time. Then wait for cooking to wrap up. When the Instant Pot stops, quickly or slowly let off the steam. Your recipe might specify whether to open the pressure release valve or not after cooking.
Default Slow Cooking Values
-
- Slow Cooking Time: 4 hours. No more or less default time values for this setting.
- Keep Warm: Yes
- Pressure to Use: High
The Down (-) and Up (+) Buttons
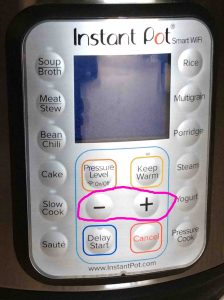
Up and Down Buttons Locations
We see these adjustments in the second and third positions. Find them in the second row of four buttons. This is the fifth row below the top). Plus, they are two rows below the LCD screen and plum underneath it.
Find the Down button just to the right of the Slow Cook button. It is just to the left of the Up button. Also, it’s just above Delay Start, and just below Pressure Level.
Find the Up (+) button just to the right of the Down (-) button. Keep Warm is above it, and Cancel is under it, and the Yogurt button is one position to the right.
How to Use
These adjustments work with most of the built in cooking program buttons. When you press the program you want, its default cooking time appears on the LCD screen. Then you can customize this time. For that, press the Up (+) button to add more minutes, or the Down (-) button to subtract minutes. For some of the programs, the time amount changes by single minutes per press. But for others, it moves in half-hour increments. At any rate though, once the amount of cooking time you want displays, stop pressing these buttons. The cooking with your customized time amount will start in ten seconds.
The Yogurt Button
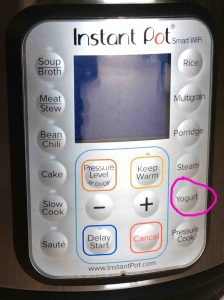
Yogurt Button Location
The Yogurt button, is in the fifth buttons row. So it is two rows below and one to the right of the LCD screen. Furthermore, find it near to the right edge of the control panel. Plus, this button is just above the Pressure Cook button, and just below the Steam button. Finally, the Up button is one position to the left.
How to Use
-
- Load a cool Instant pot with milk.
- Then put the lid on. No need though to close the steam release valve.
- Press the Yogurt button one or more times, to put the pot in ‘boil’ mode.
- Then, allow the cooker to heat the milk until it beeps.
- Next, let the milk cool down to around 110 degrees.
- Then add a small amount of yogurt with active cultures to the warm milk in the pot.
- Next, press the Yogurt button again repeatedly until you see the eight hour time appear on the display.
- Then, allow the Instant Pot to incubate the yogurt solution for eight hours.
- Finally, when it completes, you should have a pot full of yogurt!
Again, this is a very simple description of how to use the Yogurt button. But be sure to follow professionally created recipes for more precise yogurt consistencies and flavors. So to that end, see the How to Make Yogurt in an Instant Pot article. This is from the Super Healthy Kids web site, and we find this to be a pretty decent yogurt recipe.
Default Yogurt Making Values
-
- Incubating Time (normal): 8 hours. More: Boil. less: 24 hours.
- Keep Warm: No
- Pressure to Use: None
Instant Pot WiFi Buttons Guide: The Sixth Row Buttons
The Saute’ Button
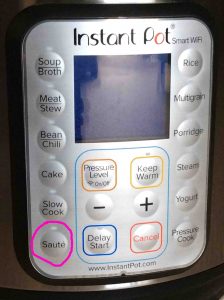
Saute’ Button Location
Find the Saute’ button in this final row of four buttons. It’s in the sixth row, the bottom one. Find it to the left of the Delay Start button, near the left edge of the control panel. It’s also just above the bottom of the buttons panel, and just below the Slow Cook control. No buttons are to the left. In fact, find the Saute’ button in the lower left hand corner of the control panel.
How to Use
Dump some veggies and / or meat into the Instant Pot. Then press the Saute’ button. Adjust the time you want with the Up (+) and Down (-) buttons. Put the lid on if you wish. But people usually leave the lid off and stir fry the food in the open top cooker. This way, they can stir the food as it sautés. Cook and stir until until the food has the right consistency. Finally, press the Cancel button to end the cooking.
Default Saute’ Values
-
- Saute’ Time: 30 minutes maximum. Adjustable with the Down (-) and Up (+) buttons.
- Keep Warm: No.
- Pressure to Use: None.
The Delay Start Button
This button allows you to program the Instant Pot to start cooking at a later time. Up to twenty four hours later in fact, following the cooking program you choose.
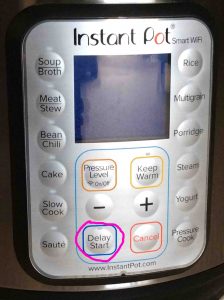
Delay Start Button Location
This button is the second one in its row of four controls (the sixth row from the top). So it’s just under the Down (-) adjustment, and three rows plum underneath the LCD screen. Furthermore, it’s one to the right of the Saute’ button, and just above bottom edge of the control panel. Lastly, no buttons are below it, and the Cancel button is one position to the right.
How to Use
Press the one of the cooking mode buttons (Soup / Broth, Meat / Stew, et al). Customize any cooking parameters you want for this mode. Then press and release the Delay Start button.
Then enter the time of day that you want your selected cooking operation to begin. Use the Up (+) and Down (-) buttons to change those values. Press the Pressure Level button to move the cursor from the hours to minutes field and back again.
Once you set the correct delay start time for timer 1, move on to setting timer 2 . Do this by pressing the Delay Start button once more. Then set timer 2 in the same way you did timer 1.
Finally, when one or both timers have the correct times, just wait, without pressing any more buttons. After perhaps ten seconds, the pot beeps three times. This tells you that the cooking program along with the delay start times will run at those times.
You can always bail out of a Delay Start program by pressing the Cancel button. This purges the program from the system and returns the Instant Pot to Standby / Off mode.
The Cancel Button
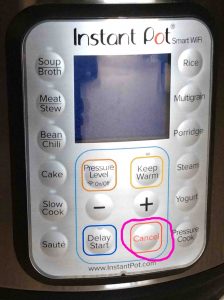
Cancel Button Location
This button is the third in its row of four controls. This is the sixth row from the top). So it is just under the Up (+) adjustment, and again, three rows plum beneath the LCD screen. It’s one position to the right of the Delay Start button, and just above bottom edge of the front panel. No buttons are under it though, and the Pressure Cook control is one position to the right.
How and When to Use
Press the Cancel button to stop all cooking operations in their tracks. Note that the lid will not come off until any built up pressure inside leaves.
Finally, the Cancel button returns the Instant Pot to ready / stand by mode.
The Pressure Cook Button
This button allows you to manually set cooking parameters to build a customized cooking program, from the ground up. It replaces the Manual button on found on some other electric pressure cookers.
Pressure Cook Button Location
The Pressure Cook button, in the bottom buttons row. Firstly, it is three rows below and one to the right of the LCD display. So find it close to the right edge of the control panel, just below the Yogurt button. Furthermore, no buttons are below this one, and the Cancel control is just to its left. Finally, this control is nearest to the bottom right hand corner of the buttons panel.
How to Use
Start off with a clean and cool Instant Pot.
-
- Load the pot with whatever you wish to pressure cook.
- Then lock the lid shut.
- Close the Steam Release valve.
- Then adjust the cook times, food type you’re cooking, and any other settings that apply.
- Then, press the Pressure Cook button.
- Next, you wait for your food to cook.
- Then when the Instant Pot beeps, cooking is complete.
- Finally, quickly or slowly release the steam pressure, according to the recipe.
Default Pressure Cook Values
-
- Pressure Cook Time: 10 minutes (normal). 45 minutes (more). 20 minutes (less).
- Keep Warm: Yes.
- Pressure to Use: High.
The Controls on the Lid
The Steam Release Valve
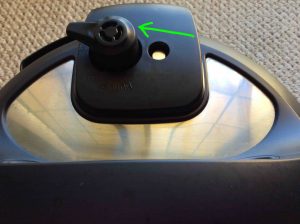
Steam Release Valve Location
This control is on the Instant Pot lid, near the back, on the top. Furthermore, it’s to the left of the steam pressure float button. Also, it’s behind the lid handle, at roughly the eleven o’clock position,
When to Use the Steam Release Valve
After any cooking cycle finishes, open this valve to let out built up steam pressure inside. But the pressure gradually dissipates anyway, even when you do not open the Steam Release nozzle. But many recipes call for quick pressure release. So rapid depressurization requires this option. Why? Because it stops the cooking process more abruptly than the gradual leaking out of steam after the cook cycle completes.
How to Use
Prior to starting pressurized cooking, whether high or low pressure mode, you must close this valve. Do that by rotating it counter clockwise (turn it left) all the way, until it stops. Once you lock the lid closed, the cooker is now ready for pressure cooking.
Then, once cooking finishes, then turn this valve clockwise until it stops. Furthermore, rotating it to the right opens the Steam Release valve, and allows the steam to rush out. Do this when you need to depressurize the pot quickly.
Be careful of your hands when releasing the pressure. Why? Because steam is quite hot and can severely burn you. We suggest wearing elbow length oven mitts when opening this valve.
The Float Valve Button
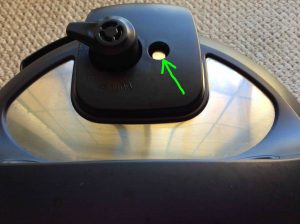
Float Valve Location
This control, again, we find on the Instant Pot lid, near the back, on the top. So it’s to the right of the steam pressure release valve. Furthermore, it is behind the lid handle, at roughly the one o’clock position,
How to Use
You really don’t do anything to this control except clean it and watch it. The Float Valve is in the down position when the cooker is not operating. However, it pops up during pressure cooking cycles. This occurs when the steam pressure inside reaches significant levels. Thus among its purposes, this valve lets you know if true pressure cooking is happening yet. When it’s up, it has. When down, no.
Also, the Float Valve helps to regulate the pressure inside. This allows it to build to nominal values but not exceed them by very much. So it’s important to clean this assembly periodically, to ensure proper float operation.