
Sony XB 20 Buttons Explained: Summary
The Sony XB 20 Bluetooth Extra Bass speaker has seven buttons across its top panel. E.g. Including the EXTRA BASS, PHONE-BATT, Play-Pause, ADD, Volume UP and DOWN, and Power-Pairing buttons. Knowing how to use these allows you to fully enjoy the many advanced features of this wireless speaker. So here we give our version of these Sony XB 20 buttons explained. For each button, we tell what it does along with how and when to press it to do the things that most people want to do with a portable speaker.
Summary of the Ports on the Sony XB 20
In the port panel, sealed with a semi flexible cover, we find the micro USB charging port only. There is no auxiliary (AUX) input port. Furthermore, since this is not a power bank speaker, we find no USB-A style output port for that. Nor are there any controls hidden within this compartment.
Summary of the Lights on the Sony XB 20
Additionally, there are six lights in the button area. These lamps tell you what the speaker is doing as you work each of the buttons, as follows.
-
- The EXTRA BASS lamp glows white when this speaker is in Extra Bass Mode. But we’ll discuss in more detail all these lights below.
- The L and R lamps, found just above the ADD button, glow white when the XB 20 is in WPC or Stereo Pair mode and is thus, part of a speaker group. These lights stay dark when the speaker is not participating in said group.
- The Pairing Status lamp, found immediately to the left of the Power button, flashes or glows solid white to tell of the speaker’s connection status.
- The Power lamp inside the button of the same name, lights solid white, to show that the speaker is ON. It also flashes when you change the volume.
- The CHARGE lamp, found just above the Power button near the right edge of the buttons panel, glows orange when the speaker is recharging. Plus, this same light flashes orange when you’re not charging. This pulsing signal indicates that the battery is pretty low and that you should charge the unit shortly. Note though that when you have a power cord connected, this lamp only glows steadily when the speaker is OFF. The light goes out, regardless of charge status, any time you power on the XB 20.
Sony XB 20 Buttons Explained: Purpose, Function, How to Use
First, all the buttons have a round shape. E.g. See these buttons with their icon pictures in the next picture. Unfortunately, it’s hard to feel the embossments on the buttons. However, the Play-Pause and Volume UP buttons have a single raised dot at the twelve o’clock position that makes it easier to orient yourself to the speaker controls when in the dark.

The EXTRA BASS-LIGHT Button
This button controls how the speaker sounds, as well as whether the blue party lights on the front of the unit are ON or OFF.
How to Switch Extra Bass OFF and ON
Press and release quickly the EXTRA BASS-LIGHT button. You should immediately hear the sound change to a less bassy timbre. Then, the normally lighted button goes dark. In this mode, the battery generally lasts longer per charge.
To return the XB 20 to Extra Bass mode, just press and release the EXTRA BASS-LIGHT button once again. Then the button lamp lights up and this mode is active once more.
Note that this Extra Bass mode is switched ON by default.
How to Turn the Party Lights OFF and ON
As mentioned, this speaker has two bright blue LEDs on its front, at the left and right edges that normally glow, pulsate, brighten and dim along with the music coming through the speaker, as we see next.
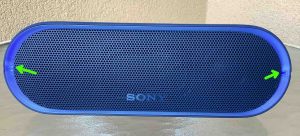
You can turn these off with the EXTRA BASS-LIGHT button by pressing and holding that control until the lamps turn off.
To turn them on again, you do the same thing, and press and hold the EXTRA BASS-LIGHT pushbutton until the lights come back on.
Note that these operate by default. So you must explicitly turn them off if you so desire.
The PHONE-BATT Button
This button causes the speaker to announce the amount of charge left in the battery in a percentage number. It also lets you answer and disconnect incoming calls. Find this control just to the right of the EXTRA BASS button and just left of the Play-Pause button. It’s the second button from the left on the buttons panel.
How to Use the PHONE-BATT Button to Answer a Call on the XB 20
If you have your 20 paired with your phone, and a call comes in, you can pick it up on this speaker by quickly pressing and releasing this button once. Detail: The phone ringing sound comes through the XB 20 and the program you were playing pauses.
The XB 20 then turns into a speakerphone. I.e. You’ll hear callers on the speaker, and they will hear you via the built in mic. See the location of this tiny condenser microphone in the next picture. It’s in the front, near speaker top.

How to Hear the Battery Percentage Remaining Announcement
Press and hold the PHONE-BATT button any time the speaker is ON, until you hear the unit speak the percentage number of battery power left to you in a female voice. Release it at that time.
Sony XB 20 Buttons Explained: The Play-Pause / Voice Assistant Button
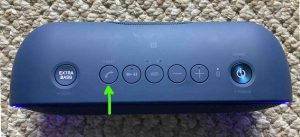
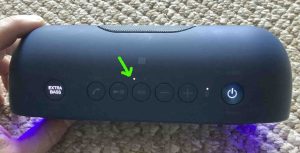
The multifunction Play / Pause / Voice Assistant button looks like a right-pointing arrow / triangle with two vertical lines to the right of that. It is the third button from the left edge of the button panel. Furthermore, it’s immediately to the right of the PHONE-BATT button, and just to the left of the ADD button. E.g. We point out with the green arrow in the next picture. It lets you move around in playlists, get a voice assistant’s attention, and stop and start the music.
How to Use This Button to Stop and Start Program Play
Press and release the Play-Pause / Voice Assistant button quickly to pause audio play. Rapidly press it again to reverse the pause action, and resume playback.
Note that this button is not a mute button. That is, pausing play in this way halts playback on the source Bluetooth device to which this speaker is currently paired. It does not merely cut the speaker volume while the stream continues going. If streaming an audio file, the play stops. So, you won’t miss any content when you pause the speaker, as the source device (your phone, tablet, or computer) remembers where the content was paused. Then it picks up playback where it left off, when you press the play pause button. Note though that pausing a live stream generally results in loss of program content, just like if you walk away from a live radio broadcast. When you return, you can’t hear what you missed unless you have other equipment.
How to Use the Play-Pause / Voice Assistant Button to Change Songs
To skip ahead to the next song in the playlist you’re listening to, quickly press and release the Play-Pause / Voice Assistant button two times.
To start the currently-playing song over again, quickly press and release this button three times.
If you want to skip backward in the playlist to the start of the previous song, get to the beginning of the current song. Again, to do that, press the Play-Pause / Voice Assistant button three times. Then as soon as the song starts over, quickly press and release this button again three times.
How to Use the Play-Pause / Voice Assistant Button to Call Up a Voice Assistant
When paired with an Apple device, you may press and hold the Play-Pause / Voice Assistant button on the XB 20 to get Siri’s attention. Note that you must first enable Siri on the source device (phone, tablet) to get her attention this way. Note though that this may not work if you pair more than one device with the speaker at the same time.
The ADD Button
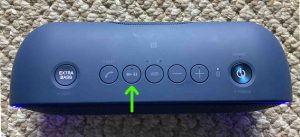
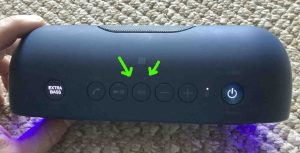
This function lets you join from two to ten compatible speakers such that both play the same program in Wireless Party Chain (WPC) mode. The ADD button also joins two XB 20s for Stereo or Double modes. It’s the fourth button from the left edge of the buttons panel, just to the right of the PLAY-PAUSE button, and just to the left of the Volume DOWN button.

How to Set Up WPC Mode with the ADD Button
Why use WPC mode? Because, as with the Connect Plus and Party Boost feature on popular JBL speakers for example, you get a wider coverage area when you have more than one speaker in sync, than when just one is playing. So you get more volume to spread around bigger party areas. So Sony designed this speaker with the same idea in mind.
Now to create a party group, you can use any combination of XB 20, XB30, and XB40 models. Moreover, in WPC mode, unlike with stereo pairing, you can indeed mix and match different speaker models, so long as you do it with only the models listed here.
To form a WPC group of speakers, do as follows.
Get the Speakers Together
- Position all speakers you wish to add within 3.2 feet, or 1 meter, of your phone or tablet from which you’ll be playing the music.
Start WPC Mode on Speaker One
-
- Power up the first speaker. We’ll call this one Speaker One.
- Pair Speaker One with your source Bluetooth device.
- Press the ADD and Volume UP buttons on Speaker One for three seconds. The L and R lights swill start blinking. E.g. See these lights in the next picture. Then after a few seconds, both lights stop flashing, and begin glowing a solid white.
Start WPC Mode on Speaker Two
-
- Next, turn on the second speaker. I.e. Speaker Two.
- As you did on Speaker One, press and hold the ADD button on Speaker Two for three seconds. The L and R light begins flashing on that speaker for six seconds. Then they glow white steadily. Also, the Bluetooth lamp on Speaker Two goes dark. At this point, you have successfully created a party connect link between these two speakers. Note that once you initiate WPC on Speaker One, you have just one minute to finish making the connection on Speaker Two. If you do not, the waiting Speaker One times out, and returns to normal single-speaker Bluetooth operation.
- Finally, once you connect to the new WPC group, you can start playing music on that device. Then it will stream to that speaker group, and you’ll hear the program on both speakers.
- Now to add other speakers to the group, repeat steps 1 through 2 on the speaker you’re adding. Note that after adding the last speaker to the group, you have thirty seconds to add another if you so desire. Otherwise, the group becomes closed to adding more speakers.
How to End WPC Mode
When you’re ready to completely break the party connect link, simply press and hold the ADD button on Speaker One for three seconds. A tone then sounds and the L and R lights goes out, meaning that the link is now broken, and all the other speakers in the group stop playing as well.
But if you remove one of the other speakers in the group in this way, the group remains. I.e. the speakers left in the group keep playing.
How to Set Up a Stereo Pair with the ADD Button
The Stereo Pairing function lets you join two XB 20s such that one plays the left channel of the stereo program, while the other plays the right channel. Now to create a stereo pair, you need two XB 20s. Pairing the 20 with speakers other than an identical model did not work in our tests, and the Sony documentation states that you must have two of the same model in Bluetooth range of each other for connecting the two as a stereo pair to work.
Setting Up XB 20 Stereo Pair Mode with the ADD Button
When stereo mode is active, one or the other of the L and R lamps glows, depending on which channel the speaker is set up to play. On the speaker that plays the left stereo channel, the L lamp glows and the R lamp is dark. On the right speaker, the R lamp glows and L lamp is dark.
Now To form a stereo pair of two XB 20 speakers, do as follows.
-
- Power up the first speaker. We’ll call this XB 20 Speaker One.
- Press the ADD button on Speaker One for three seconds. The L and R lights will start blinking white. E.g. See these lights in the last picture above. After a few seconds, these lamps stops flashing, and begin glowing a solid white.
- Next, turn on the second XB 20. I.e. Speaker Two.
- As you did on Speaker One, press and hold the ADD button on Speaker Two for three seconds. The L and R lights will begin flashing on that speaker just as they did on the first one. And again, they assume a solid white glow after several seconds.
- No go to your Bluetooth source device, and connect it to the speaker pair, called “SRS-XB20”. If you do not see this device, the move your phone / tablet closer to the speakers.
- Finally, once you connect to the new stereo pair, you can start playing music on that device. Then it will stream to that speaker pair, and you’ll hear the program in STEREO!
Reversing Stereo Channels with the ADD Button
When in Stereo Pair mode, each speaker is assigned one of the two stereo channels (either L or R). On each speaker, one or the other of the L and R lamps lights to tell you which channel that particular speaker is playing. Now drawing on our example above, let’s say that Speaker One is playing the left channel, and Speaker Two is playing the right. In that case, the L lamp on Speaker One glows while the R lamp is dark, as we see in the next picture.
Conversely on Speaker Two, the L lamp is dark while the R lamp glows, as shown in the next photo.
With the ADD button, you can reverse these assignments such that Speaker One plays the right channel while Speaker Two plays the left. To do that, simply press and release the ADD button repeatedly on either speaker until the L and R lights on each speaker display the channel assignment you desire.
Ending Stereo Pair Mode
When you’re ready to break the stereo pairing, simply press and hold the ADD button on one of the speakers for three seconds. A tone then sounds and the L and R lights go out, indicating that the pairing is now broken.
Setting Up XB 20 Double Mode with the ADD Button
When two XB 20 speaker operate in Double Mode, both speakers play a monaural version of the music. I.e. They both play the sum (L + R) of the left and right stereo channels.
To establish Double Mode, you set up the two speakers just like you did for stereo mode. Then, press and release the ADD button on one of the speakers, until the L and R lamps both light up on both speakers.
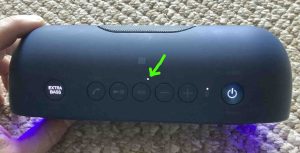
Sony XB 20 Buttons Explained: The Volume DOWN and Volume UP Buttons
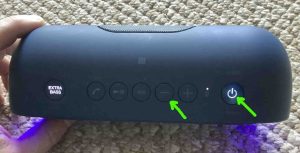
The XB 20 also offers Volume Controls. Find them in the right half of the button panel, just to the right of the ADD button, and just to the left of the Power-Pairing button, the Volume buttons have minus and plus symbols embossed in their centers, and we point them out in the next picture. When you count buttons from the left side of the XB 20, these are buttons 5 and 6.

When pressed, these lower and raise the output volume respectively, by reducing or increasing the volume setting on the paired source device. Moreover, you have roughly 50 volume level steps on this unit.
Note that you can also change speaker volume by adjusting the volume on your source BT device. Plus you can also do it from within the Sony Music Center app as well.
No other accessibility sounds play when you adjust volume on the XB 20. But the white Power lamp normally blinks once for each time you press and release these controls. This lets you know that your button press registered with the speaker. However this lamp quickly pulses several times when the speaker is at maximum volume and you press the Volume UP button to raise the sound level further. Also, the Power light does this when the speaker is already at its lowest volume, and you try to turn it down further by pressing the Volume DOWN button.
How to Raise (Turn Up) and Lower (Turn Down) Sony XB 20 Volume
With the speaker paired and playing, press and release the Volume DOWN button to decrease its audio output level by one step. Press the Volume UP button to increase audio output. Or, you can press and hold the buttons to rapidly raise and lower the volume. The source device generally displays a moving volume control so you can see the effects of pressing these buttons.
Note that these loudness controls affect the volume level setting whether the unit is paired or not. Also, the volume setting may change from paired device to paired device. That is, each paired device remembers its own volume setting. So you might need to re set the sound output when you unpair the speaker from one source device and pair it to another.
Sony XB 20 Buttons Explained: The Power-Pairing Button
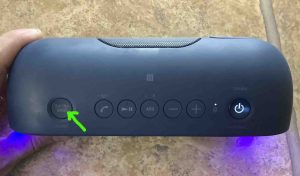
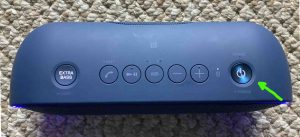
Lastly, we have the Power-Pairing button, at the far right edge of buttons panel. E.g. We point it out with the green arrow in the next picture. Note the round power symbol shape with the plum line passing through its top that they emboss on the button.
Turning the XB 20 ON and OFF
The first purpose for the Power-Pairing button is to power UP and DOWN the speaker. To do that, Press and release the Power button when the speaker is OFF. Press and release it again, to turn it back OFF. The Power lamp lights up when the speaker boots, as we show in the next picture.

The speaker makes no sound when you turn it on or off. But during turn-on, it might make noises if it automatically pairs with a device. In that case, you hear a ding-dong sound, and the unit announces, “Bluetooth connected.”
So, to know for sure that this speaker is indeed OFF, you must check the Power status lamp, mentioned above. When the speaker is OFF, all lamps should be dark, unless you’re charging the unit. In that case, the CHARGE lamp still glows solid orange while the battery is still taking a charge. You could also press the Pairing button, and if the speaker is OFF, you’ll get no response.
Starting XB 20 Pairing Mode with the Power / Pairing Button
This function is essential when you want to connect the 20 to a source device, and then stream music on that device to this speaker.
With the speaker powered ON, you press and hold in the Power / Pairing button, until you hear a rising-pitch set of beeps and the speaker says, “Bluetooth pairing.” This means that the speaker is now in pairing mode, and you may now release the button.
You must do this anytime you pair the Sony XB 20 with any source device that you’ve never paired with this speaker since the last hard factory reset.
When in pairing mode, the Pairing Status lamp blinks in a fast-flash pattern. And while that’s going on, the XB 20 sends out its name and other connection handle info over the Bluetooth frequencies. Then, this allows nearby BT devices to find and sync to it.
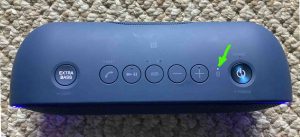
When a device subsequently connects to the XB 20, the pairing status lamp stops blinking, and starts glowing a steady white.
Furthermore, this button also provides a handy way for the vision impaired and blind folks to check that the speaker is OFF. If the speaker is ON and you press this button, you’ll hear a voice announcement about Bluetooth pairing. If you hear nothing, then the speaker is in all likelihood, OFF.
Sony XB 20 Buttons Explained: Combinations, Codes
Sony XB 20 Reset Button Code Combination
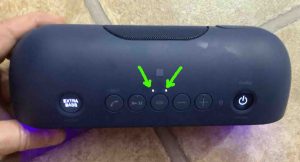
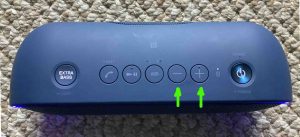
You can reset the XB 20 to factory default settings and state. To do that, turn on the speaker. Then press and hold the Power / Pairing and Volume DOWN buttons. Find these in the fifth and seventh button positions from the left. Hold them in at the same time until all lights on the unit go dark. See these buttons pointed at by the green arrows in the next picture.
You may wish to reset the speaker to fix any unexpected behaviors you notice from it such as failing to pair, sound distortion, cutting out, failing to power OFF when you press the Power button, and so on.
Note that resetting makes stale any saved connection info about this speaker on your source Bluetooth devices. So you’ll have to forget those connections on said source devices, and re pair the speaker after a reset in order to play your audio content through it from those devices once again.
The WPC Buttons Combination
As described above, you use the ADD and Volume UP buttons together to create a Wireless Party Chain (WPC) speaker group. See that section for more details.
The Auto Power OFF / Standby Button Combination
Th speaker by default automatically shuts itself OFF after fifteen (15) minutes of inactivity. Inactivity means no button presses on the unit, and no audio coming from the paired device. This feature conserves battery power. Thus this feature does not work when speaker is running on external power. You only get this capability when powering it from the internal battery.
To switch this setting OFF or ON, you must first connect the speaker to external power. Plus, the speaker must be powered OFF to make this change. The speaker is OFF when all lights except for possibly the CHARGE lamp are dark.
To Disable Auto Power OFF
1. Press and hold the Volume Down and Volume Up Buttons
Hold them in at the same time for approximately five (5) seconds, until the Bluetooth light flashes three (3) times.
To Enable Auto Power OFF
1. Press and hold the Volume Down and Volume Up Buttons
Hold them in at the same time for approximately five (5) seconds, until the Bluetooth light flashes two (2) times.
Sony XB 20 Buttons Explained: Final Comments
Note that you can control many of these XB 20 functions from your phone or tablet, instead of using the buttons on the speaker directly. For that, you need the Sony Music Center app. In that app, you can adjust speaker volume, turn it off, update its firmware, use a simple audio equalizer to tailor its sound to your individual tastes, and other actions. But how to use that app is beyond the scope of this post, though if enough of you want that information, we may develop a piece that describes that later.
Other Sony XB 20 Posts
Related Posts to Sony XB 20 Buttons Explained
References
Revision History
-
- 2023-04-14: First published.