Denon S-32 Internet Radio, successfully playing an audio stream.
Now and then, you must change the default WiFi network on the Denon S-32. Why? Because perhaps your WiFi network has changed SSID names or passwords. Or, your office IT expert asks you to move your S-32 to a less busy network. Or, perhaps you were connecting to a city Wi-Fi hotspot that has since gone silent. In any case, setting the saved network is simple. We’ll walk through How to Reconnect WiFi on Denon S 32. Plus, we also include pictures of the radio’s screen faces, as seen during this task.
You can switch from a still-working network, or from a broken one. In either case, the WiFi setup routine stays the same. Here, we detail the case where the system fails to connect to a WiFi network that worked before. We then show how to set a new, in-range network.
Note that reconnect WiFi does not erase any settings you programmed into your unit at the Denon Internet Radio Portal. Once you reconnect WiFi, your stations once more appear on the unit.
Before starting, make sure your desired WiFi network is on the air. Then, attach the included WiFi antenna to the antenna port on S-32 back. Point it straight up. If you’re not sure about the network, test it first with another WiFi device.
When you tap the power button, you’ll see the “Please Wait” message. The bottom line, shows several status messages as the S-32 powers up. In the next picture, the “Checking function…,” message displays.
After some seconds, that message goes away. The system then flashes the, “Please Wait,” message. It gives no detail about what’s happening, as shown next. Just that message.
The “Please Wait” message blinks for up to a minute. A long message display time here shows that S-32 cannot connect to the previously used Wi-Fi network. However, if linking had succeeded, the unit would play the last played station. However, when the “Server Error” message discussed next appears, the connection failed. The system could not reach the saved WiFi network. So read on to find out how to change that saved WiFi network.
The S-32 can take many seconds while connecting. But after that long “Please wait,” message as shown above, it gives up trying. Then, you set the “Server error,” text, as pictured next.
This message stays onscreen for up to ten seconds. Then, a kind of “Idle” screen replaces it, shown next. This screen normally displays when a station stream is playing. It shows the station name, the percent fullness of the buffer, and how long the stream has been playing. When a blank screen shows, you know it’s time to reconnect WiFi.
Press the Source button when the radio is on, as pictured below. This brings up the Sources Selection menu.
Then, press and release the Source button, and the Source Selection menu displays, as pictured next.
Rotate the volume knob left one notch. Find the volume knob near the top front right corner of the S-32, as shown next.
This selects the Setup menu item. It’s the screwdriver and wrench icon on the screen, as shown next.
With the wrench-and-screwdriver item highlighted as shown above, press and release the volume knob. The radio then displays that menu as follows.
Turn the Volume knob until the Network Setting menu item appears in black-on-white, as shown next.
Press and quickly release the Volume knob.
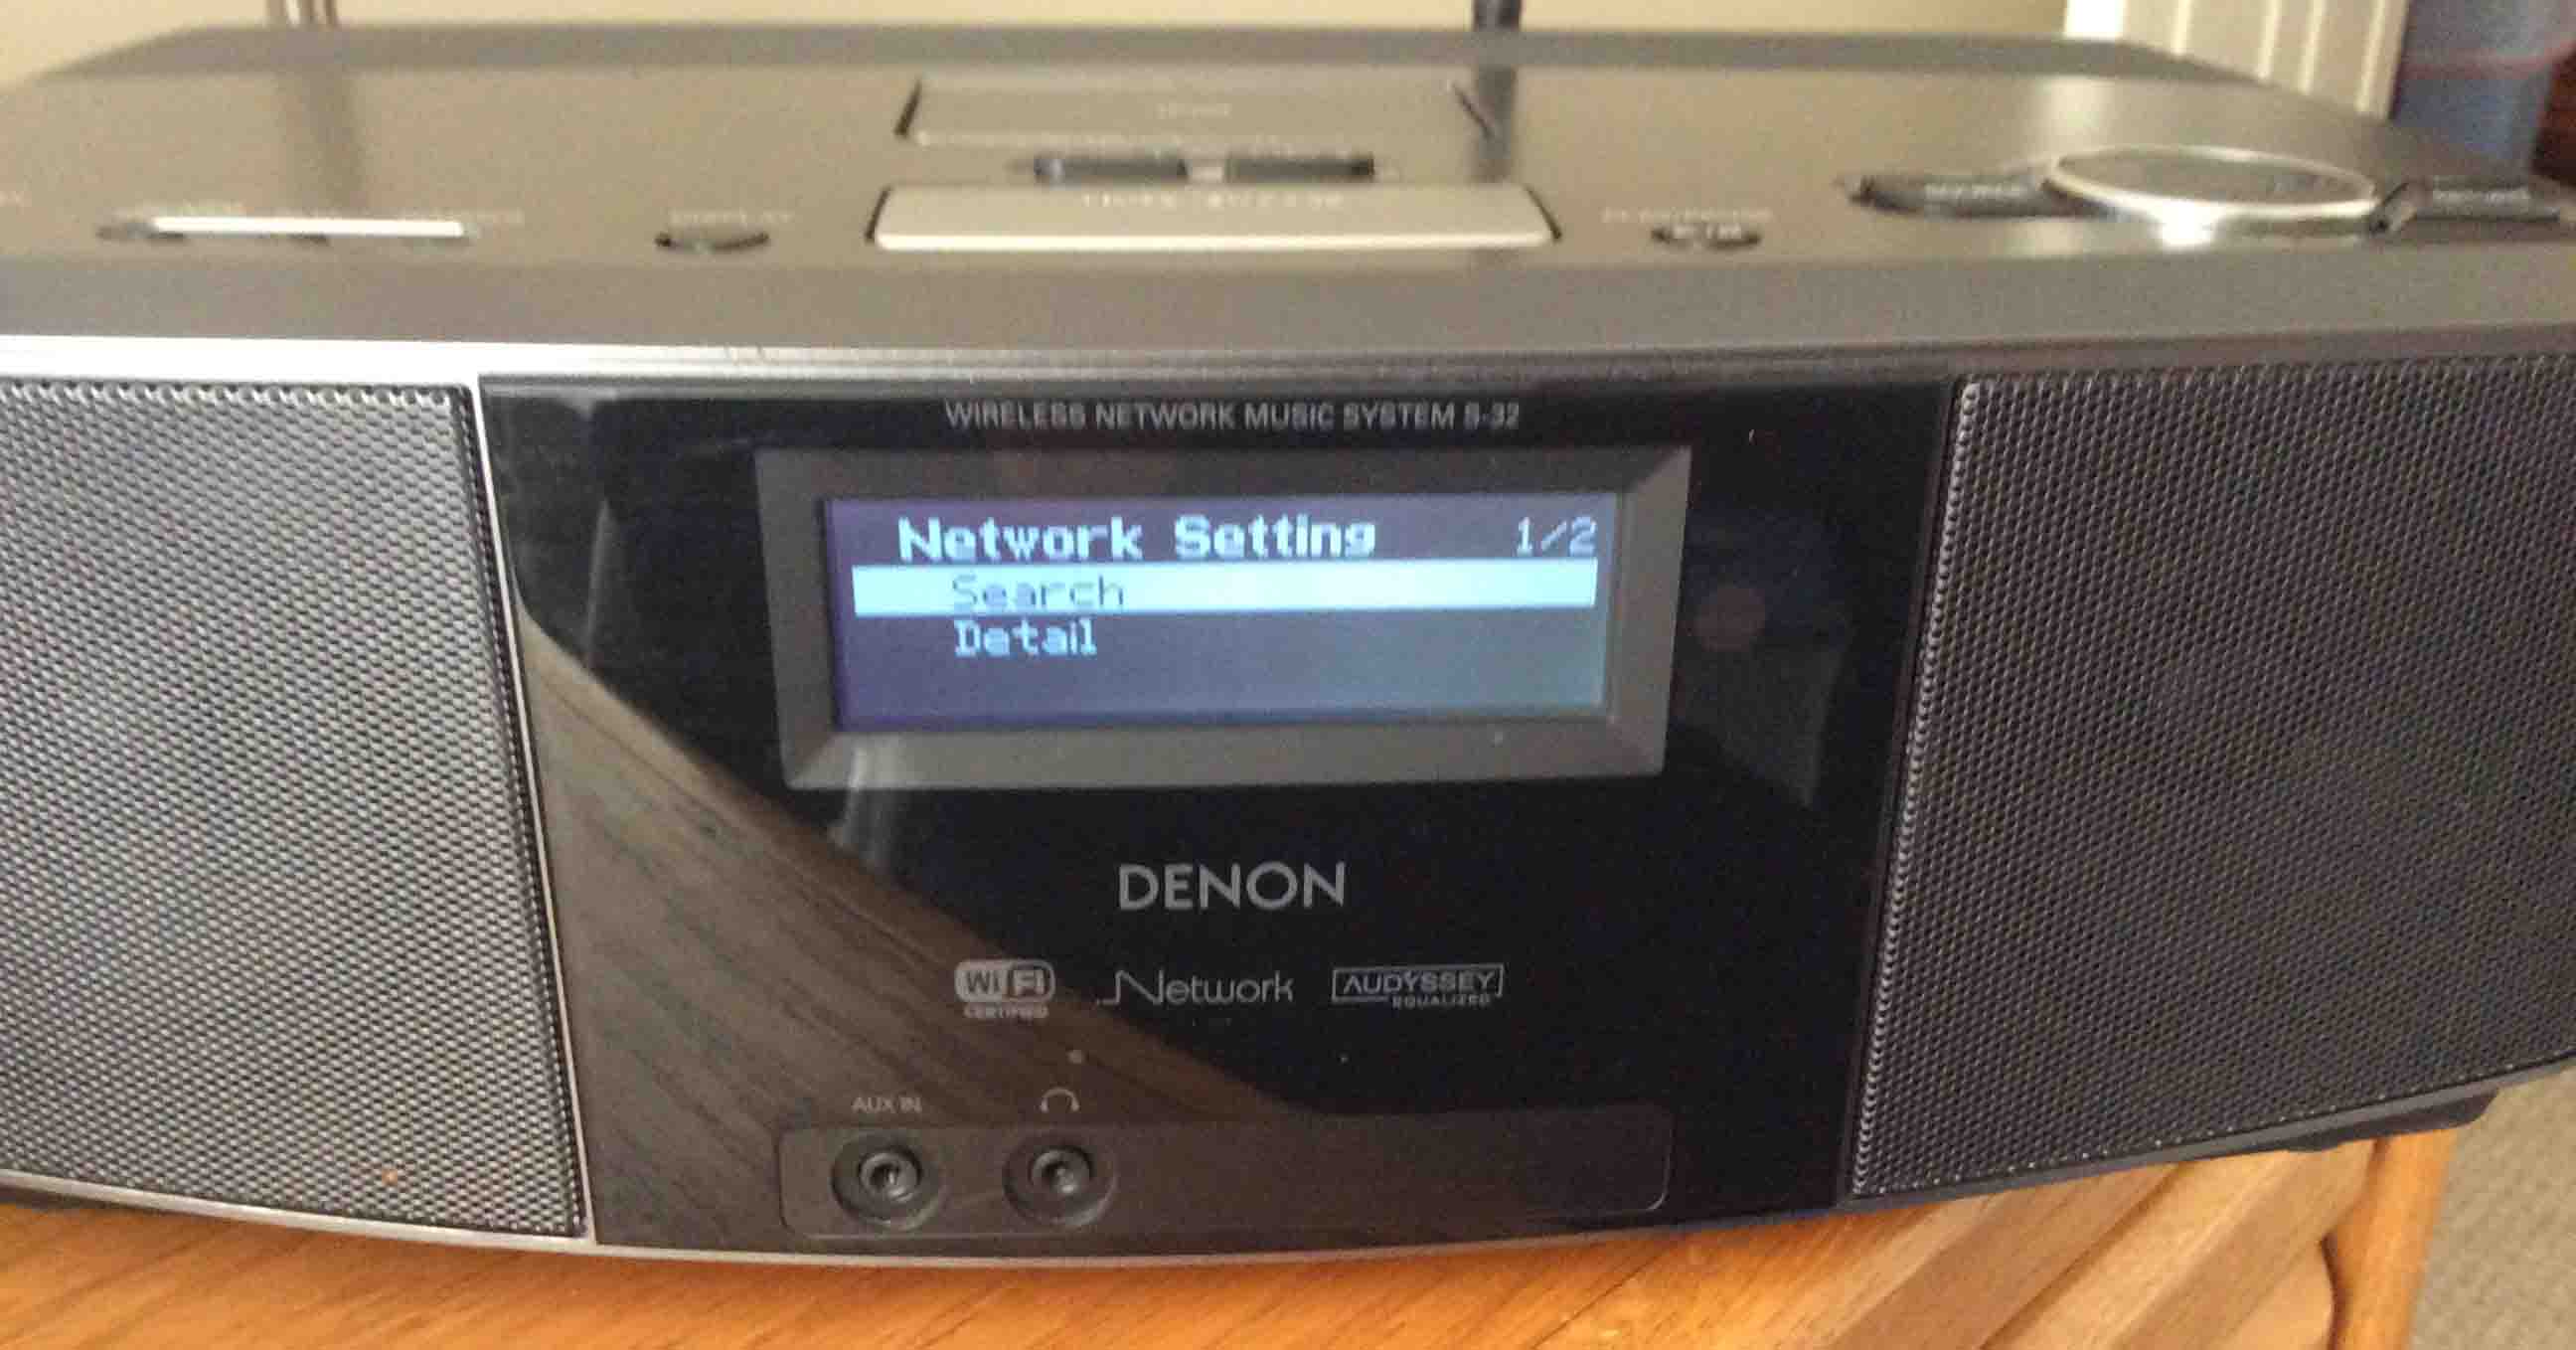
This brings up the Network Setup menu, as shown next.
Select the Search menu item by turning the Volume knob, as shown in the last picture. Then, quickly press and release the Volume knob.
This starts a 2.4 Ghz. band scan for in-range WiFi b/g networks. During this scan, the S-32 displays three dots that flash on and off.
This scanning screen appears in the next picture.
The radio sees neither Wireless N nor Wireless AC access points. Nor will it see any network that broadcasts on the 5 Ghz. band. Therefore, to play this radio via WiFi, you’ll need an in-range 2.4 Ghz. 802.11 b/g router / access point.
After some seconds, the net scan completes.
Then, the S-32 lists the in-range WiFi networks it found. These appear on the Select the AP screen, as shown next. AP is short for WiFi Access Point.
Turn the Volume knob left and right, until you highlight the WiFi network you want. How do you select a network? Spin the Volume knob. This moves the highlight bar around through the list. Then, stop when the selection bar rests on the network you want. Here, we picked the 937T681J4059H_2G WiFi network. This is the first one on the list. So, the S-32 selects it by default.
Then, quickly press and release the Volume knob.
The radio then displays the Connecting to network message.
Next, after a pause, the system displays the Enter Security Key screen, as shown next.
When that network shows as open, the streamer connects to it without password prompting. But we strongly suggest that you secure your WiFi access points with WPA2 AES.
When the Input Security Key screen displays, it may show one or more letters hidden by stars (*). See this in the last picture. This means that someone connected successfully with this password for the last WiFi network. With a successful connection, the console stores this password, and you see it here. Skip ahead to the next step if the password for your new WiFi network matches this one. Otherwise, read on.
If the password for your new network differs from the old one, then erase it. E.g. Press and release, the Minus / Rewind key once for each letter you wish to delete.
When you finish, find the Minus key near the Volume knob. Press and release the Minus key until all the stars disappear.
The Enter Security Key screen then looks as follows, with a blank password field.
First, enter each password character. To do that, turn the Volume knob left and right to get each character you want. When that character appears at the insert point, stop turning the Volume knob.
Next, press the Plus / Forward key to place that character into the password buffer. This also moves the cursor to the next character position to fill.
Repeat this process for each character you wish to enter.
Then after we entered all our password characters, the Input Security Key screen looked as follows.
When you enter the last character of the security key, do not press the Plus / Forward key after. See above, how the last password character entered, the ‘1’, still shows. Instead, when done, quickly tap the Volume knob. This ends password entry.
Then, the unit submits that password to the network. More details in next step.
When you press the Volume knob here, you’ll then see the Detail Setting screen appear, as shown next.
Spin the Volume knob until you select the Connection menu item, as shown next.
Then, quickly tap the Volume knob.
The S-32 then tries to log into the new WiFi network. It puts up the following screen, that says, Wireless Setup, Connecting, Please Wait. This screen also provides status text on the bottom line. In detail, these show connect process status.
Meanwhile, you may see other status updates too, such as Assigning Network, Checking Information, and Setting Parameter.
Around fifteen seconds later, the unit completes the S 32 connect to WiFi process.
Typically, the S 32 reconnect WiFi process takes a long time. Why? Because besides connecting WiFi, the S 32 also talks to the Radio Demon cloud servers. Normally, these respond slowly. So this lengthens this process a bit.
But soon, the S-32 displays the Connection succeeded screen, shown next.
After a few seconds, the S-32 returns you to the Network Setting menu. The unit selects the Exit menu item by default in this menu. Now, you could go to the Detail item to view the details about the new WiFi connection. But we leave this as an exercise for our readers.
Instead, we just press the Volume knob on Exit.
The S-32 then takes you to its main menu. Once there, you can choose from your favorites groups, and play your added stations.
If this menu displays, as shown next, then the connect WiFi task on the S 32 is complete.
Finally, check that the streamer correctly plays an internet audio stream. To explain, we first went into Favorites. Then, we found the KYW News Radio 1060 stream. Then, we pressed the Volume knob to play it.
To conclude, the connect WiFi process worked if the stream plays.
Done!
Now and then, you must change the default WiFi network on the Denon S-32 internet…
You might factory reset your Echo Spot to fix faulty behavior, put it on a…
Explains the Reset Honeywell Thermostat Settings procedure. This works on many Honeywell smart thermostats including…
You might need to Change Honeywell Thermostat WiFi. Why? Perhaps you moved it, and the…
Many Honeywell smart thermostats have a lock screen mode. This keeps anyone from messing with…
Many Honeywell WiFi thermostats have a lock screen mode. This keeps anyone from messing with…