The JBL Charge 5 has six buttons and a few lamps across its top. There’s also a battery gauge light strip. The Power button lights in white to show that the speaker is ON or OFF. The Bluetooth lamp blinks or glows solid to show the speaker’s pairing status. And, there’s also a port access panel on the back near the bottom of the unit. This protects the USB charge output port. Interestingly, the USB-C charging input port is outside of this protected area. Nonetheless, here, we offer our JBL Charge 4 buttons guide. This shows where the control buttons are on the speaker. Furthermore, it explains what each button does, tells when to press them, and how to use them in general.
JBL Charge 5 Buttons: Functions, Descriptions, and Locations
The JBL Connect+ Button
You use the Connect Plus button to connect two or more JBL Connect+ compatible speakers together. In this “party mode”, they all play the same audio content. Like speakers joined in Amazon’s multi room music groups. All speakers linked via Connect+ sync with each other.

Note that you also press this button when setting up a stereo pairing. This involves exactly two speakers that are the same model.
How to Use the Connect Plus Button
For party mode, power up and pair the first speaker in your group to the source device. Then press this button on each speaker to add to the Connect+ group. Then shortly after, they all begin playing the same program.
The picture above shows the JBL Charge 4 not joined in Connect+, because the Connect+ oval ring is dark. But, this ring lights when you connect the speaker to a Connect+ group.
For stereo, you do likewise. But use only two speakers that are both the same model. That is, they both must be JBL Charge 5 units. But you also need the JBL Connect app for stereo pairing instead of party mode.
The Volume Down and Volume Up Buttons
The JBL Charge 5 has two volume controls on its top. There’s one on each side of speaker center, near the Bluetooth and Power buttons. The volume buttons are in the shapes of the minus and plus symbols.
When pressed, these lower and raise the sound output. They do this by reducing or increasing the volume setting on the source device.
How to Use the Volume Buttons
With the JBL Charge 5 paired and playing, press the minus button to decrease volume. Furthermore, press the plus button to increase volume. Note though that these controls have no effect when the speaker is not in a pairing session.
Also, the volume setting may change from paired device to paired device. That is, each device remembers its own volume setting. So you may have to readjust the volume when you pair to another device.
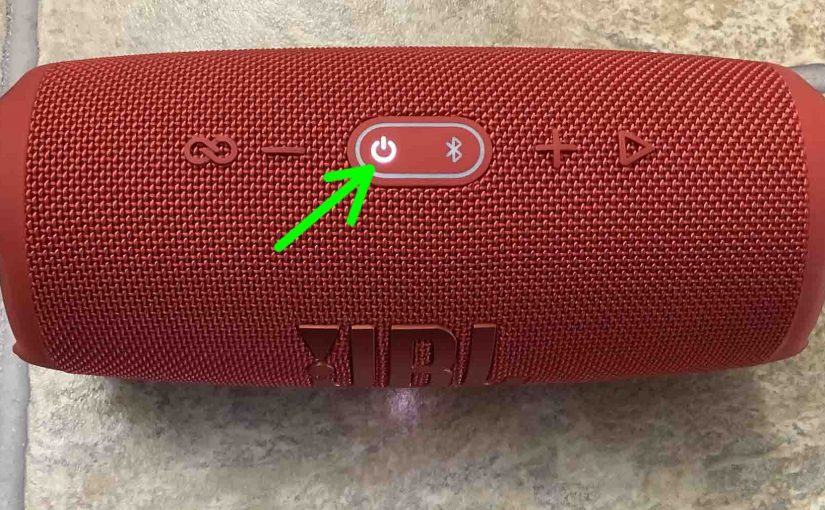
The Power Button
This button switches the Charge 5 on and off.

How to Use the Power Button
Quickly press and release the Power button to turn the speaker ON or OFF.
This button glows solid white any time the speaker is ON. See it glowing white in the last picture above. Plus, the button goes dark when the speaker is off, as shown next.

The Bluetooth Discovery Mode Button
There is one row of buttons on the JBL Charge 5. Four of the six buttons in that row has a very pronounced tactile shape. The two buttons in the middle you can still feel but not as easily. But of the two in the center, one of those is the Bluetooth button. It’s to the right of the Power button, as pointed at by the green arrow in the next picture.
How to Use the Bluetooth Button
You’ll use this button anytime you’re pairing the JBL Charge 5 with a never-before-paired BT device. So, with this speaker powered on, press and release the Bluetooth button to place the Charge 5 into discovery mode. When in discovery / pairing mode, the speaker transmits its name and other connection information over the Bluetooth airwaves. This allows nearby Bluetooth devices to discover and connect to it.
The Play Pause Button
This button looks like a right-pointing arrow. We find it on the top, nearest to the right edge of the Charge 5.

How to Use the Play-Pause Button
Press and release this quickly, once, to pause audio play. Press and release again, and again quickly, to resume audio play.
Note that this is not a mute button. That is, pausing play in this way stops media playback on the source device. If streaming, the stream pauses. So, you won’t miss any content when you pause the speaker. This is because the source device remembers where you stopped play. So it resumes at that spot when you press the play pause button again.
Move Ahead in a Playlist with the Play / Pause Button
Finally, you can skip forward to the next song in a playlist with the Play-Pause button on the Charge 5. As the song plays, do the following…
-
-
- To advance to the next song, quickly press and release the Play-Pause button twice. Upon doing that, your source device advances to the next song in the current playlist.
-
The Reset Button Combination
You can reset the JBL Charge 5 to factory default settings by pressing the Volume UP and Play-Pause buttons together. Then hold them in until the reset begins.

You may wish to reset the speaker to correct any unusual behaviors you see. These can include failing to pair, sound distortion, failure to power OFF, and so on. Note that resetting seems to invalidate any saved connection information to this speaker on your source Bluetooth devices. So you’ll have to forget those connections. Then re pair the speaker after a reset to play your music through it again.
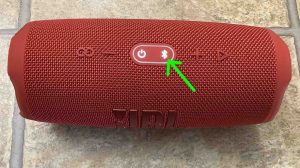
The Service Mode Button Combination
First, in this mode, the Charge 5 does not power ON without the charger. Thus, it will not run on the battery while in Service Mode. Furthermore, when you do connect the charger, it powers up without pressing the Power button.
Further, you cannot turn off the Charge 5 while it is in Service mode. Not unless you disconnect the charger. And then, it powers off without pressing the Power button.

How to Turn On Service Mode on the JBL Charge 5
To turn on this Service mode, power on the speaker first. Then press the Bluetooth and Play-Pause buttons at the same time. Hold them in until the unit powers OFF, which takes ten seconds or so.
Find these buttons pointed out in the last picture. Note that you can enter this mode as long as the speaker is ON. So it doesn’t matter whether the charger is present or not.
How to Turn Off Service Mode
Now you can restore proper speaker operation by disabling this mode. But note that in Service mode, to switch it back off, you must connect the charger. Why? Because when in Service mode, the JBL Charge 5 won’t come on without outside power. But you can’t change modes without powering up the unit first. Thus, you need the power adapter to make this fix.
-
- So, connect your speaker to AC power and turn on the speaker.
- Then, with the unit Power button glowing, press the Bluetooth and Play-Pause button combo. Then hold for ten seconds or so, until the unit powers off.
- Then, normal speaker operation returns.
Finally, at this point, the Power button should turn the JBL Charge 5 on again. And that’s either with or without the charger.
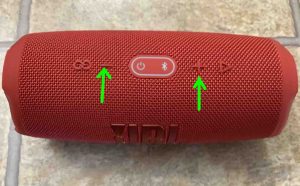
JBL Charge 5 Lock Mode Button Combination
Entering this mode powers down the speaker. It also disables the buttons, except for the one you need to exit this mode. If running on AC power or battery, the button lamps may all glow in this mode.
How to Enter Lock Mode
To turn on Lock mode, power up the Charge 5 first. And then press and hold in the Pairing and Volume UP (+) buttons at the same time. Hold them in until the Charge 5 powers OFF, which usually takes ten seconds or so.
Find these buttons pointed out in the next picture. Note that you can enter this mode as long as the speaker is ON. Note that it doesn’t matter whether the unit has connection to external power. But remember that unlike in Service mode, you don’t need to connect the AC adapter. This is true as long as the battery has enough juice to power up the Charge 5.

How to Exit Lock mode
Again, you can restore correct operation by cancelling this mode. But note that when Lock mode is active, you can switch it back off without connecting the charger. That is as long as the battery is not completely dead. But if you don’t know battery status, then be sure that you can boot the 5 after you exit Lock. So just go ahead and connect external power anyway.
-
- Connect the speaker to AC power.
- Then, press and hold the Power button for ten seconds. Then release.
- Wait two seconds.
- Finally, press and release the Power button. The speaker should then boot up normally, with proper operation returning after that.
The JBL Charge 5 Battery Status Lights Gauge
This speaker also has a light strip on the front. This shows the amount of charge currently in the power bank battery.
How to Read the Battery Status Gauge
When the internal battery is full, this entire strip lights up white. And as the power bank discharges, more of the strip goes dark. In the next picture, the speaker is at full charge. The entire bar glows in this case.

As the battery further discharges, more strip goes dark, until the charge amount reaches between 0 and 20 percent. In this case, only the very bottom of the bar glows.
Finally, when the battery discharges to critically low levels, the bottom of the strip blinks. Speaker shutdown will come soon when this occurs. So, recharge it right away for continued musical enjoyment.