Alexa Echo Sub with a pair of Amazon Echo 2nd gen smart speakers.
This piece gives Alexa Echo Subwoofer setup instructions. Note that this sub woofer does not operate in stand-alone mode. In fact, to make it play, you must pair it with at least one, or preferably two, compatible Amazon Echo speakers. These include the Echo Dot 2nd and 3rd generation models along with the 2nd Gen Echo tower. Here, we show how to set up the Alexa subwoofer with a pair of Echo 2 tower speakers.
You need to secure the following items before begging Echo Sub setup…
The Echo Sub has no RJ45 Ethernet connection. So, you may only link it to the Alexa service via your WiFi network. That network must have internet access. It will not work otherwise.
Also, this WiFi network should be the same one that the Echo speaker(s) you must pair with the sub are connected.
If you do not already have an Amazon account, one way to get one is to visit https://amazon.com/ . Follow the prompts there to set one up.
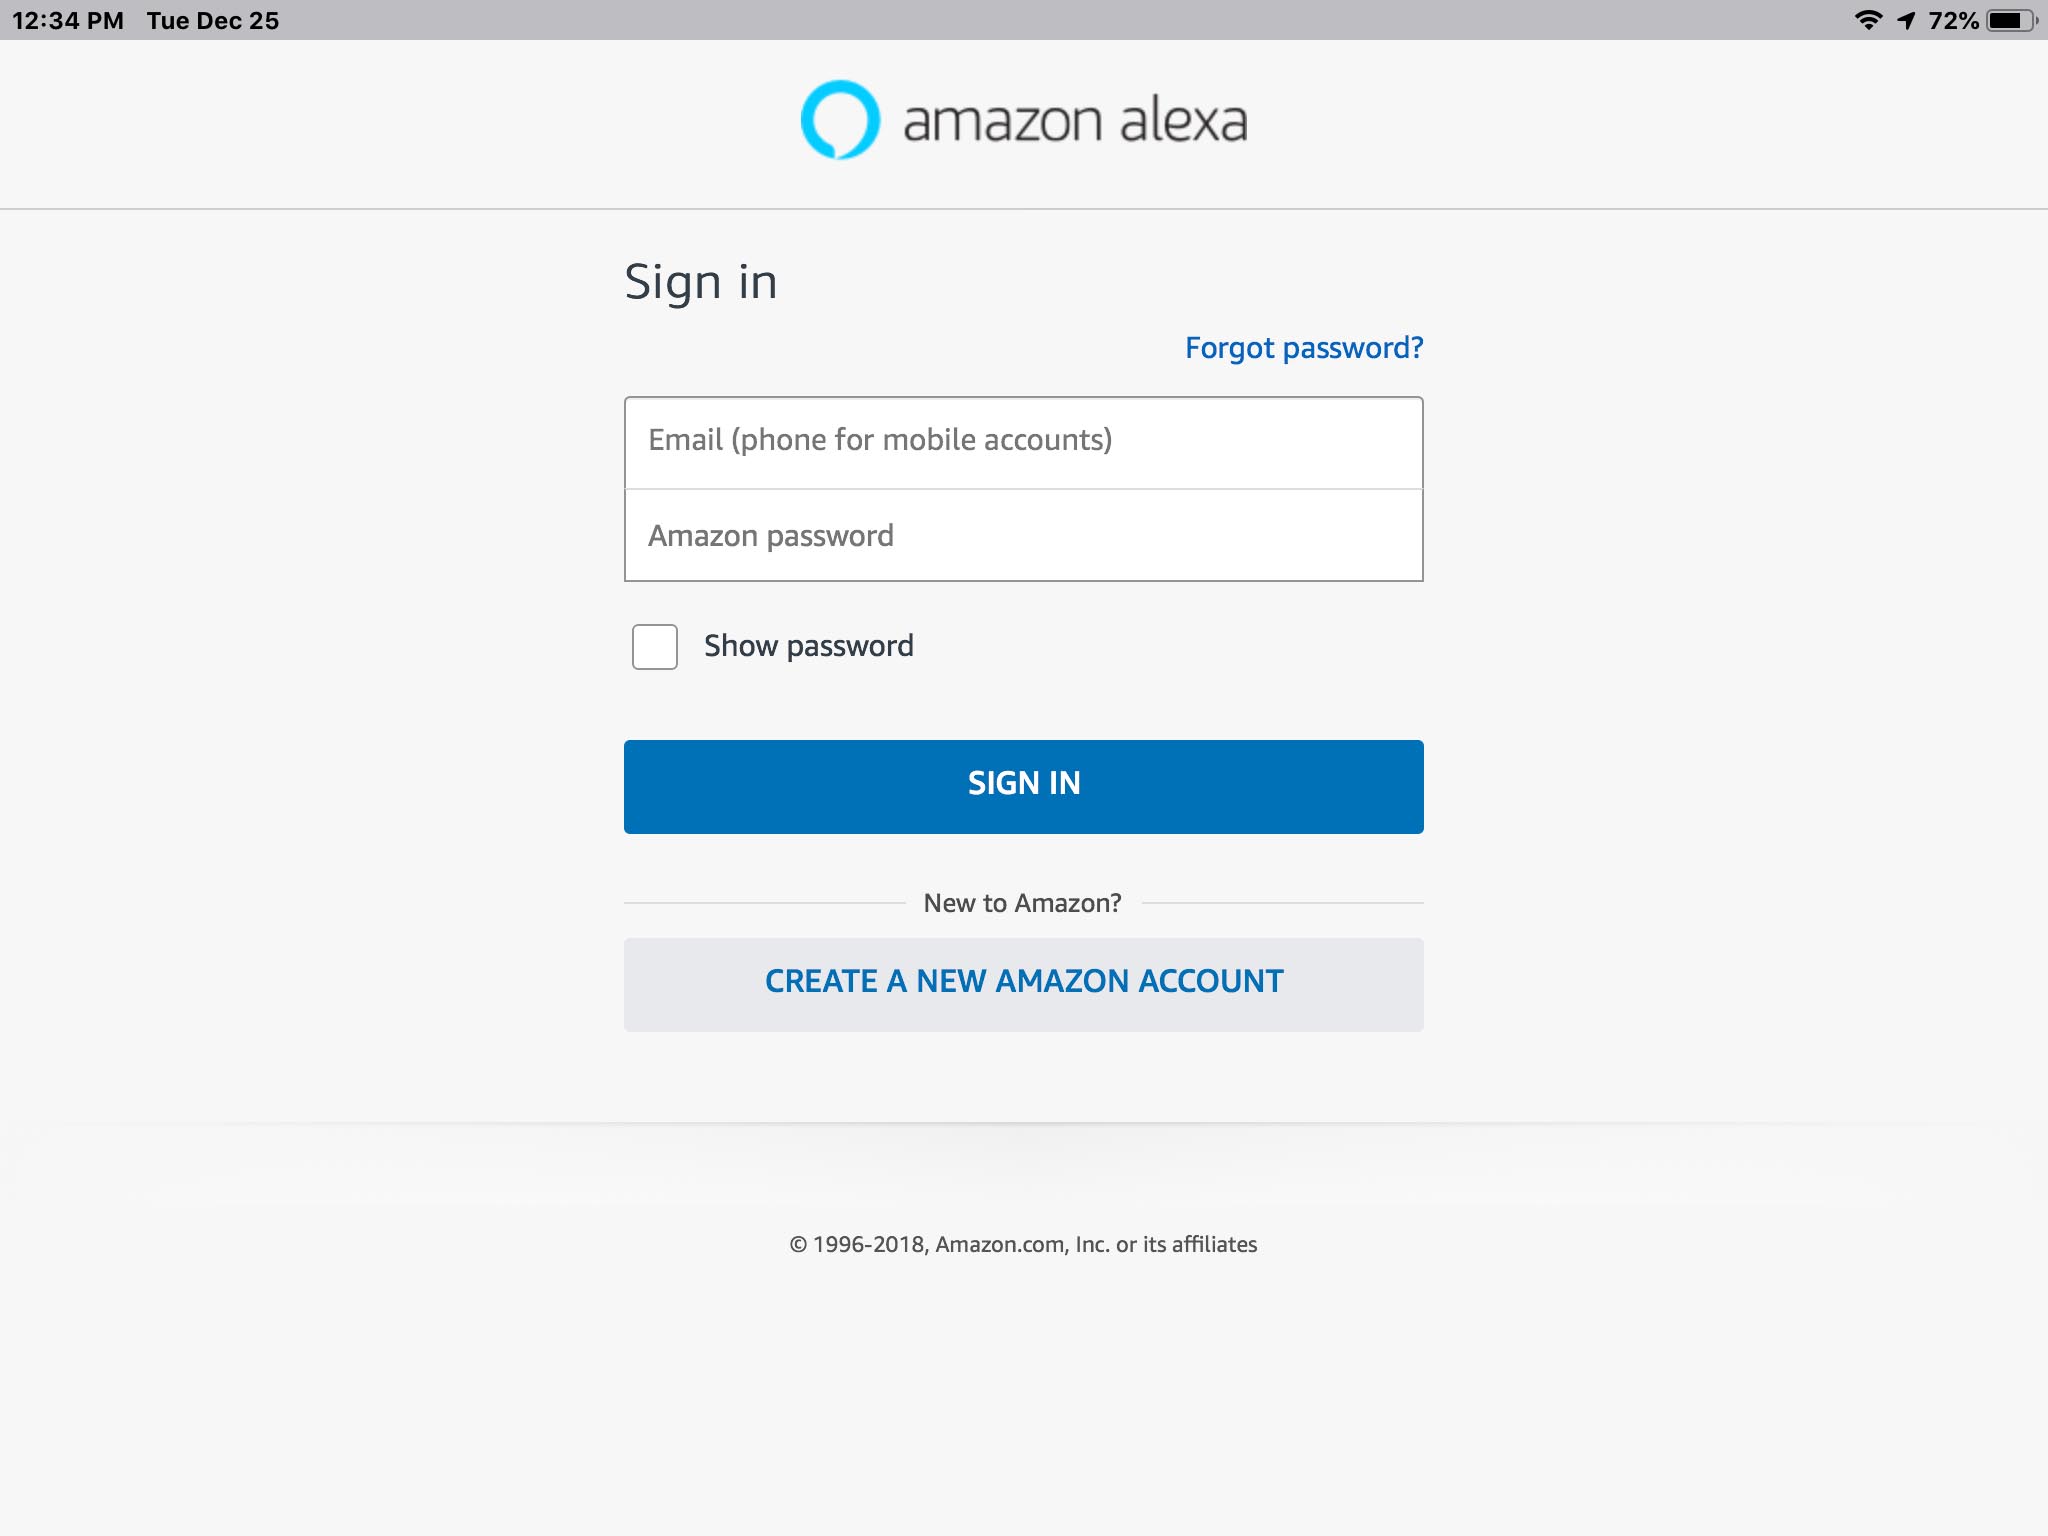
Or, when you run the Alexa app in Step 2 in the Alexa Subwoofer Setup Step-by-Step Instructions below, and you’ve never signed into the app with a valid account, the app asks you to sign in, as shown next.
There, Amazon allows you to set up a new account if you do not have one already. If so, press the Create a New Amazon Account button in the lower center portion of the login screen. Then, the app walks you through that account setup steps Be sure to successfully create an Amazon account before proceeding.
You’ must run the Alexa app on a mobile phone or tablet computer. For this demonstration, we’re using our iPad Air iOS tablet.
Install the Alexa app from the Google Play (Android) store, or the App Store (iOS). Download and install the appropriate version on your tablet, and log into it with your Amazon account credentials.
Be sure to enable Bluetooth on your mobile device. The Alexa app uses Bluetooth to detect nearby Amazon Echo speakers in some situations. So, turn on Bluetooth on this device on when setting up an Echo Sub.
Skip ahead to the next step if you already unboxed your Echo Dot 3.
Now the Alexa Subwoofer comes in a large blue box, as pictured in the last shot. For new subs, the carton itself arrives in a clear plastic bag. Remove that outer bag, and slit the tape securing the box top closed with a sharp knife.
Open the box lid, take out all contents and spread them on a suitable table or floor. You should have the Amazon Sub, the power cord, and a little documentation.
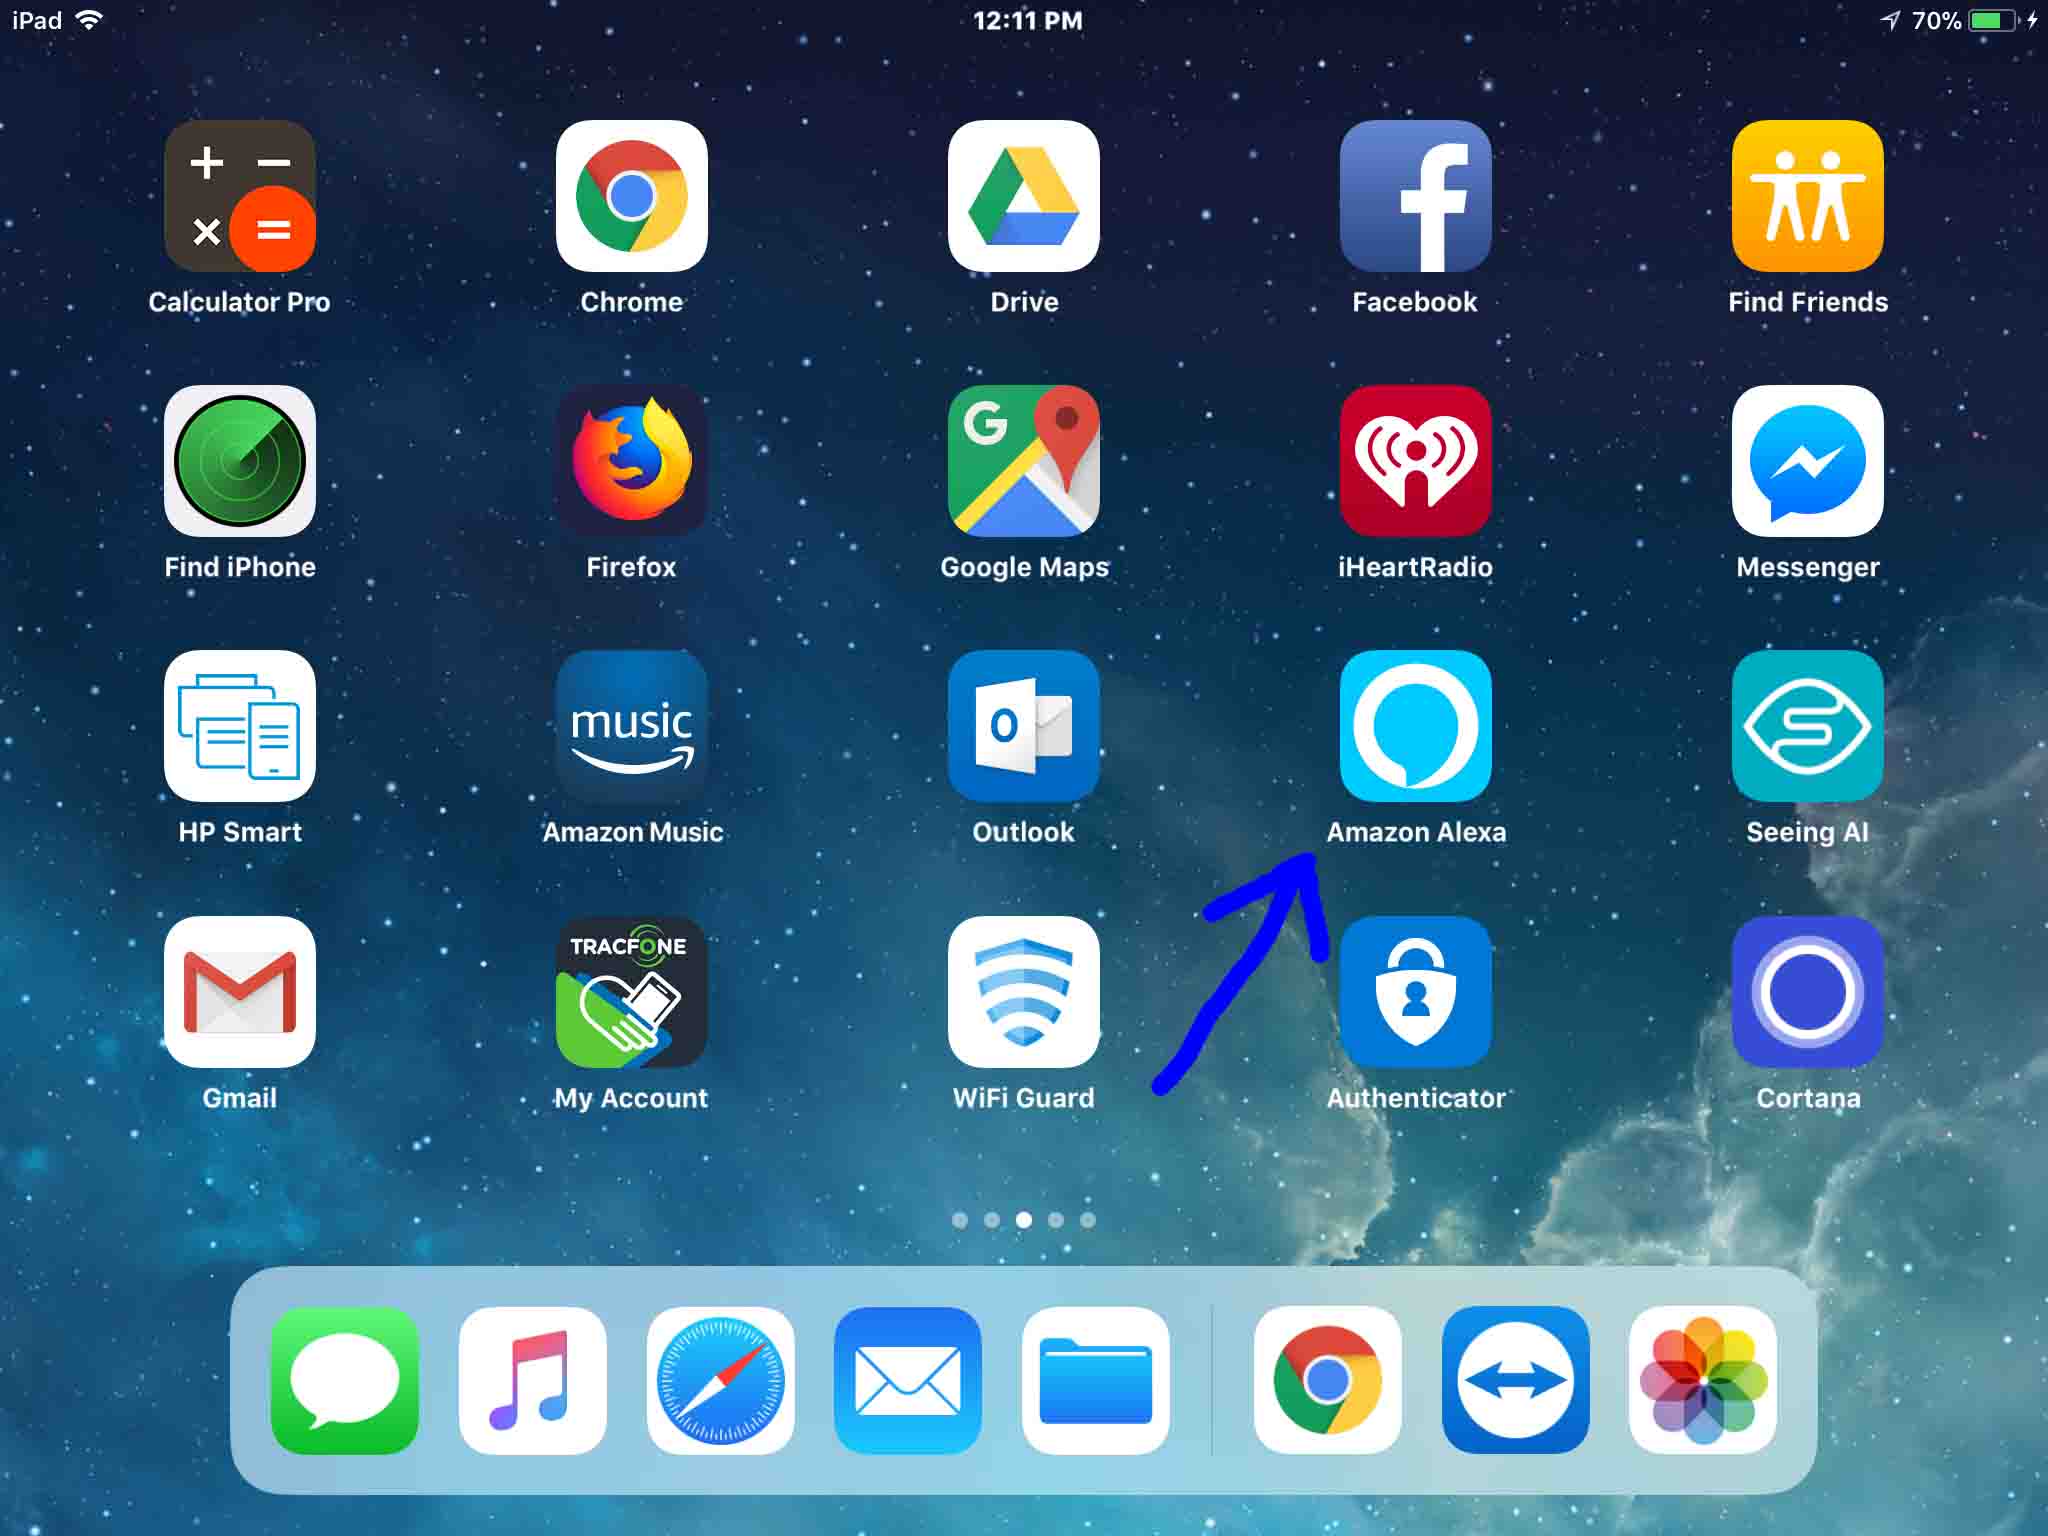
Find the Alexa app on your mobile device, as we did on our iOS based iPad Air tablet, as shown in the next picture.
Tap the Alexa app icon to run it. If this is your first time running the app, the app prompts you for your Amazon account and password.
Plus, if this is your first (only) Echo device, the app will ask you to set up your new device without you have to find that option in the app’s pages. In that case, skip ahead to Step 10.
If the Alexa app prompts, enter your Amazon account credentials. Then you’ll sign in via the Alexa app. Alexa then remembers your Amazon account information whenever you run it. This way, you won’t have to enter your login credentials every time you run the app. Here again, if Alexa asks you to set up a new device, then skip ahead to Step 10.
If this speaker is not your first Echo device, the app displays its Home screen. In this scenario, we’re using the iOS version of the Alexa app.
Find this called out by the green arrow in the last picture.
Hitting the menu button brings up the Alexa app’s main menu, as shown next.
Visit the Settings page by tapping the Settings menu item (left side of screen), highlighted by the green arrow in the previous picture.
The Settings the screen displays as follows.
Get to the Device Settings page by tapping the Device Settings menu item (left side of the Settings screen, near the top), highlighted by the green arrow in the last picture above.
Tapping Device Settings brings up the All Devices screen, which lists all your currently registered Alexa speakers and other devices. Shown next.
Bring up the Set Up New Device menu by tapping the Plus button in the top right corner of the All Devices page, as highlighted by the green arrow in the last picture above.
The Set Up New Device menu then pops up as shown in the next screenshot.
Touching the Add Device option brings up the Setup->What type of device are you setting up? screen, as shown next.
Tapping the Amazon Echo item brings up the first Setup screen for Echo devices, as shown next, where you pick which model of the Echo you’re setting up anew. In this case, we’re setting up and Echo Sub. So, we’ve pointed out that option with a green arrow in the next picture.
If your sub woofer is powered up, as it should be if you did Step 2 above, the Action button on the back is probably blinking light orange. If so, then skip ahead to Step 13. Or if not, then run through this step.
If this is a brand new Alexa Subwoofer that you just unpacked from the box, just plug it into AC power. Then after a quarter minute it automatically enters Setup mode. It does not however, announce this like the other Echo speakers do. So your only indication of Setup mode is the blinking orange Action button.
On the other hand, if this is not a brand new subwoofer Echo, it may not immediately go into Setup mode. In that case, you need to reset it. See our Echo Sub Reset Instructions, How to Reset the Alexa Subwoofer post, that details how to factory reset the Echo Sub speaker. In a few words, press and hold the Action button until the unit begins resetting. After a hard reset, this Amazon subwoofer automatically enters Setup mode.
At any rate, however you achieve it, once you have the sub in Setup mode, proceed on to the next step.
Next. pick up your mobile device again and go back to the Alexa app. You should again see the screen pictured next.
Since we’re setting up an Alexa subwoofer in this demo, we touch the Echo Sub speaker in the displayed list of Echo models shown in the last picture.
This starts the Alexa app scanning for Alexa Sub devices to set up, as shown next.
Now at this point, the Alexa app is waiting to hear from the sub woofer you’re setting up. It will hear it when you place your Echo Sub into Setup mode. It is indeed ready for setup when you see it, such as displayed in the next picture.
If your speaker is indeed in Setup mode, then after a brief pause, Alexa should find your new speaker, as ours did, shown next.
If Alexa does not find your subwoofer, make sure you have Bluetooth turned on on your mobile device that’s running the Alexa app. Check again that your woofer is flashing its Action button orange. Note that the Alexa Sub only stays in Setup mode for several minutes, and times out after that. Its light turns purple then. If that has occurred, then unplug the sub for several seconds. Then plug it back in. This should re established Setup mode after it boots.
This brings up the Select your Wi-Fi Network page, as shown next.
Just prior to Alexa showing this screen, it runs a WiFi scan from your selected Echo Sub speaker, for in-range WiFi networks that the speaker sees. Then, it’s this list that the app displays for you.
Tap the Wi-Fi network you want your Echo Sub to log into. In our case, we’re choosing the 937T681J4059H_2G_Guests network. That one is pointed out by the green arrow in the last picture.
Tapping a WiFi network may prompt you to enter the password for that network. Skip to Step 17 if you don’t see this prompt.
Detail: The Alexa app may not prompt you if you’ve previously saved this network’s information to your Amazon account. This is true for us in this scenario. So Alexa did not ask us for the password.
But if a password prompt pops up, type in the correct password, and then move ahead to the next step.
While your Echo Sub attempts to connect to the WiFi network you selected in Step 15 above, the Alexa app shows the Connecting your Echo Sub to Wi-Fi screen, as pictured next.
After some seconds, and if all goes well, you see the following screen. This shows that the speaker successfully connected to your proposed WiFi network.
But if your speaker does not connect and you get errors, follow any directions given. If you entered the wrong WiFi password, the system prompts you to re-enter it. But if the problem connecting is network related, you may have to investigate and resolve that on your router. In that case, once you’ve fixed that issue, try rerunning this setup procedure again. We suggest that you close the Alexa app and start it anew first. Then, again, be sure that your Alexa Sub is in Setup mode before doing the setup routine again.
Hitting the Continue strip then invites you to watch a short introductory video to the Echo Sub, as seen in the next screenshot.
Tao anywhere inside the blue bar pointed at by the green arrow in the last picture.
The short video then plays.
When the video clip finishes, Alexa takes you back to the Intro to Echo Sub screen. But this time, a blue Continue bar appears at the bottom of the page, as shown next.
Hitting the Continue strip then displays a page showing key setup tips for your Echo Sub, as shown next.
It says that you must make your sub a part of a speaker set before it will play. We will do this below.
The screen also talks about positioning your Alexa subwoofer correctly. Specifically, put it on the floor, the piece instructs. Also, keep the sub away from furniture and walls. Finally, it lets us know that once we’ve created this set of speakers containing the subwoofer, we can then add that set to multi-room groups. Pretty neat!
Touching Continue on the screen above takes us to the Create a Speaker Set screen, as shown in the next shot.
We note here that in order to play your Alexa Echo subwoofer, you must link it to at least one other speaker. As mentioned earlier, this speaker does not work independently. So to make it a part of a functioning speaker set, proceed to the next step.
When you tap Continue on the page pictured last, Alexa then puts up the Select Speakers to Connect screen, as shown next.
When you touch the speaker(s) you wish to add to the set along with the Echo Sub, blue check marks appear on the right side of the screen, as shown next. In this demo, we want Thomas’s 2nd Echo and Thomas’s 3rd Echo to function as a stereo pair along with our Echo Sub.
Note that the Echo speakers you choose must be compatible for pairing with the Echo Sub, as discussed earlier, and to appear as possible choices, they need to be online and connected to the same WiFi network as your sub. If they are not, then take care of this detail. Then return to this step to continue.
We touched the two speakers we wanted, and check marks appeared to the right of each one, as shown in the previous screenshot.
Find the Next button in the top right corner of the Select Speakers to Connect screen, pointed at by the green arrow in the previous screen shot.
Then, the system prompts you to pick which of the two non subwoofer speakers in the set should play the left and right stereo channels. It displays the name of the speaker you’re choosing which channel for. In our case, we’re picking which stereo channel to assign to Tom’s 3rd Echo, as indicated in the next screenshot.
Then, once you tap which channel to assign, that channel button turns white, as shown next.
That is, we’ve assigned the Left stereo channel to the Thomas’s 3rd Echo speaker. That means that when playing music, Thomas’s 3rd Echo will now play the left audio channel in the music.
Pressing Next starts the speaker set building process that can take several tens of seconds to complete. While it’s working, the Alexa app displays the Connecting your Speakers page as follows.
Once the speaker set finishes building, the Alexa app takes you to the Devices screen. This page shows your devices grouped by the names you assigned them to when you set them up originally.
Your Alexa Echo subwoofer stereo pair appears on this page. If you don’t see it, try swiping up to scroll down the page until you find it. We found our speaker set as shown next.
We’ll test it out below. But we wanted to show you the screen for your Echo Sub speaker set first, as shown next. Note that this step is not necessary in order to begin using your Alexa Sub. At this point, if you’re excited to hear your sub, you can leave the Alexa app and jump down to Step 27 from here.
Now if this screen appears without any yellow attention explanation points, then the speaker set was created successfully.
Your subwoofer now can play the bass parts of the music that the other one or two speakers in its speaker set are playing. It always plays in sync with the paired Echos. Test that out for yourself next.
Once you’ve finished the setup procedure itemized above, your sub is ready play along with the paired Echo speakers in the stereo speaker set we just created. The light on the Alexa subwoofer Action button should now be dark. It does not glow normally, even when the speaker is powered ON.
Now make your requests to Alexa to either of the paired Echo speakers. Note that the Amazon Sub does not hear voice commands on its own. So make them to either the left or right speaker, as follows.
Try asking a paired speaker some questions like:
… and so on. Of course, be sure to precede each question with the wake word assigned to your non sub speaker(s) in the set.
Do enjoy your Echo Alexa Sub. It’s an astoundingly big sounding speaker for all the bigger it is. Thus it really adds a new dimension to Alexa audio; that being powerful bass.
The common Honeywell thermostat offers several ways (at least) to cut your heating and cooling…
To check battery on the JBL Go 3 speaker, the status lamp tells about the…
To check battery on the JBL Go 3 speaker, the status lamp tells about the…
We've enjoyed hot instant coffee and tea for more than a score now. So these…
We've enjoyed hot instant coffee and tea for more than a score now. So these…
We've enjoyed hot instant coffee and tea for more than a score now. So these…