The Sony X3 Bluetooth mini speaker has six buttons across its top panel and one button on its back.
Sony X3 Buttons Summary
Here we cover the entire compliment of buttons on this small Bluetooth speaker, and these include the following.
-
- Sound,
- Pairing,
- Audio In,
- Call / Phone,
- Volume UP and DOWN,
- Power,
- Reset.
In the paragraphs and pictures below, we show where each control is on the speaker, explain its meaning and function, what any button combination presses do, when to press them, and how to use the buttons to operate the speaker in general.
Sony X3 Buttons Guide
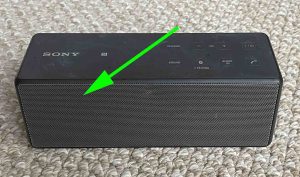
There are two rows of buttons on the top of the X3. They all have a circle shape. We start with the front row of buttons on the speaker top, then the back row, and finally, we work our way around to the rear of the X3 and discuss the button back there.
The Sound Button
Find this button in the first position from the left in the front row of buttons.
Pressing this button expands the stereo soundstage as you listen, making instruments clearer. Plus, their sounds seem to come from places further to the left and right of the speaker than the actual drivers are located. It also appears to boost treble and mid range frequencies, and in so doing, it effectively reduces the bass a bit. On other Sony speakers, they refer to this as LIVE mode.
Activating LIVE Mode
This function is normally OFF on a brand new X3 or after a factory reset.
To activate the fuller stereo sound, briefly press the Sound button. Then the speaker goes silent for a short blip, and when the audio comes back on, you’re hearing the LIVE mode. The Sound lamp, located just behind the Sound button also lights up solid white.
The Pairing Button
Find this button in the second position from the left in the front row.
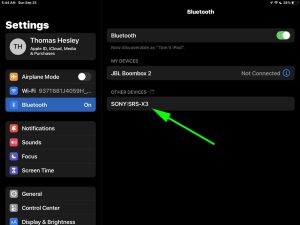
When pressed, the X3 goes into pairing / discovery mode. Then, you can find and connect to the speaker on nearby Bluetooth source devices. So this function lets you pair to the X3, and play your music through it.
Activating Pairing Mode on the X3
With the speaker powered ON, you press and hold the same button until you hear two high beeps. Then release the button. The speaker is now in pairing mode, and the Status lamp pictured above begins fast flashing. When you actually connect to the X3, this lamp stops flashing and glows a steady white.
You need to do this anytime you want to pair the X3 with a never-before-paired Bluetooth source device.
When in this (a.k.a. Discovery) mode, the speaker sends out its name and other connection info over the Bluetooth air channels. Then, this allows nearby BT devices to find and connect to it.
Note that this button starts up pairing mode whether or not the speaker is currently connected to a BT device.
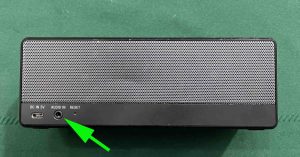
The Audio In Button
To Start Audio In Mode
Briefly press this button to switch the X3 from Bluetooth to Audio Input mode.
In audio input mode, the speaker receives audio via the 3.5mm audio input port on its back panel.
When Audio In mode is active, any Bluetooth connections with this speaker terminate, the Pairing lamp goes out, and the Audio In lamp lights up white as we see in the next picture.
In this mode, you can connect an MP3 player, CD, or other non Bluetooth music source via an audio patch cord. Then the X3 acts as an integrated stereo amplifier, letting you hear your device at room filling volumes.
To End Audio In Mode
To return the speaker to normal operation, where it accepts audio via a wireless Bluetooth connection, briefly press the Pairing button. When you do this, the Audio In lamp goes out, the Pairing lamp begins blinking, and the speaker attempts to pair with any nearby BT device that appears in its recently connected devices list.
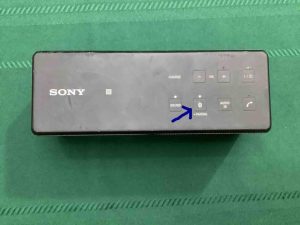
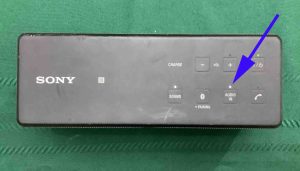
The Phone / Voice Assistant Button
The Phone / Voice Assistant button has an icon of an old style telephone receiver in it. We find it at the third position in the front row of buttons. See it pointed out in the next picture.
Answer a Call with the Call / Phone Button
Press and release the Call / Phone button quickly to answer a call when you have this unit paired with an iOS cell phone.
Rapidly press it again to hang up the call, and resume playback. The item you were listening to pauses when you pick up the call, and resumes when you hang up.
Get a Voice Assistant with the Call / Phone Button
When paired with an Apple device and you’re not currently in a call, you may press this button to get Siri’s attention. Note that you must first enable Siri on the source device (phone, tablet) to use Siri in order for this to work.
Briefly press button. Siri then chimes. Then, make your request via the X3’s built in microphone. Find the mic on the front grill, near the top edge, just to the right of center.
Finally, after Siri responds, the system resumes playing what you were listening to before.
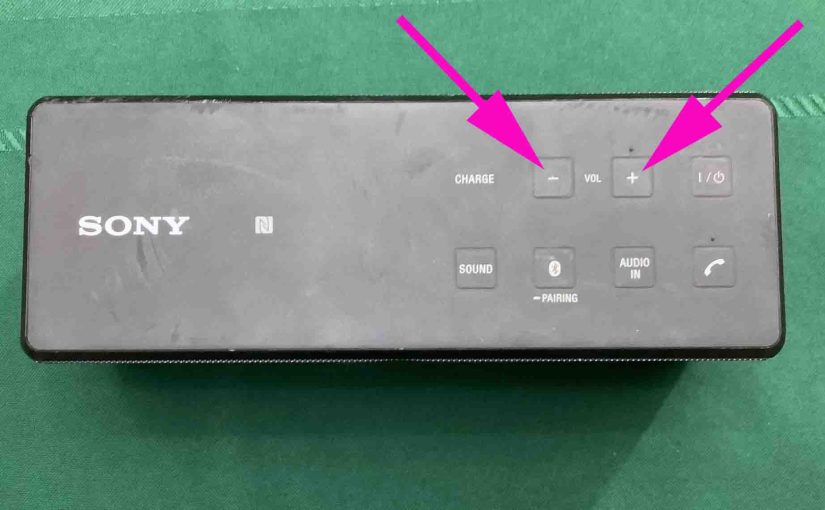
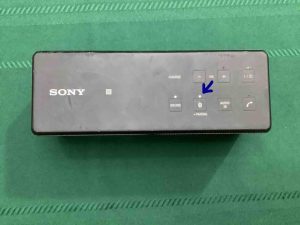
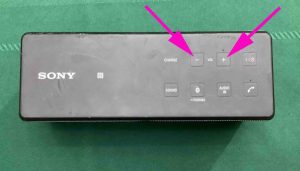
Sony X3 Buttons: The Volume Down and Volume Up Buttons
Now moving to the back row of top panel buttons, the X3 also has volume controls. The Volume UP and Volume DOWN buttons occupy the first two positions in this row. Plus, they have minus and plus symbols embossed in their centers for easy visual identification. Find them pointed out in the next picture.
When pressed, these lower and raise the loudness respectively, by reducing or increasing the volume setting of the amplifier in the speaker itself, but they do not change the volume setting on the source device as some other BT speakers do.
How to Raise (Turn Up) and Lower (Turn Down) Sony X3 Volume
With the speaker paired and playing, press the minus shaped Volume Down button to decrease its audio output level. Press the plus shaped Volume Up button to increase audio output.
Note that these loudness controls have no effect when the speaker is not paired. Also, the volume setting may change from paired device to paired device. That is, each paired device remembers its own volume setting. So you might need to re set the sound output when you unpair the speaker from one source device and pair it to another.
When You Hit Min and Max Volume Settings
No lights change on the speaker during volume adjustment, except when you reach the lower or upper ends of the volume range. Then the Power lamp fast flashes a few times. Moreover, no beeps or other accessibility sounds play when you change the volume.

Note that you can also change X3 volume by adjusting the controls on your source BT device. But be aware that this does not change the volume setting on the speaker. This can cause some confusion if, for example, you set the volume on the speaker very low. Then you turn up your source device to maximum and notice that the speaker isn’t playing nearly as loud as you expect. When this happens, be sure to set the control higher on the speaker.
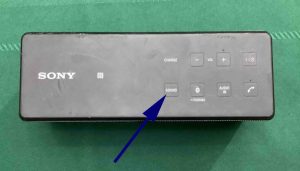
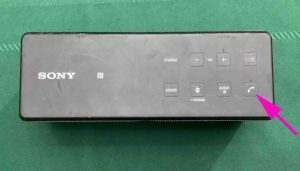
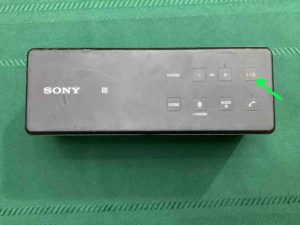
Sony X3 Buttons: The Power Button
The Power button is the last button on the right in the back row of buttons, as we point out with the green arrow in the next picture. Note power symbol shape embossed on it.
Turning the X3 ON and OFF
Press and release the button when the speaker is OFF, to power it on. Press and release it again, to turn the X3 back OFF.
The Power Status lamp lights up green when the speaker powers up, as we see next.
Plus, the speaker makes a two rising musical tones as it boots, and two falling tones when you switch it off. Furthermore, it plays these sounds whether or not it automatically pairs with a device upon startup.
When the speaker is OFF, no lights on it should glow, except in the case where you’re charging the unit. When OFF in that scenario, the CHARGE lamp still glows solid orange.

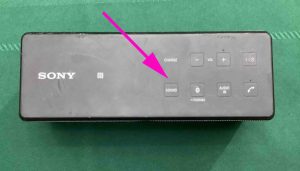
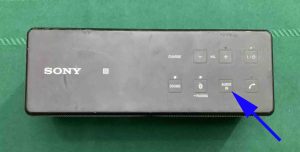
Sony X3 Buttons: The Reset Button
Find this recessed button on the speaker back, just to the right of the Add button. To work it, insert a paper clip end and gently press.
Now unlike reset buttons on many other speakers, this button does NOT restore the unit to its factory default state. Instead, you press this only when the speaker becomes unresponsive or otherwise misbehaves. E.g. It won’t power ON or OFF, or the other buttons do nothing when you press them. Thus, pressing Reset does not clear the stored Bluetooth pairings from memory.
It does appear however, to disconnect the speaker from its battery by brute force. So pressing it causes a hard shutdown to occur. Further, releasing it applies battery power again. You can then turn the speaker on with the Power button.
The hope with this design is that the unit will again respond to other button presses when cold started after a Reset button press.
How to Use the Reset Button
Should the speaker lock up or become non responsive to button presses, press and release this button. If the Power lamp is ON, it should shut OFF right away.
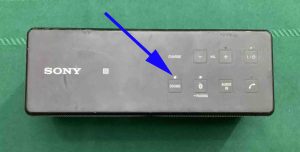
The Reset / Initialize Code Combination
Note that this is different from the Reset button described in the last section. This method is how to actually hard reset the X3 to return it to factory default settings. The Reset button described earlier does not do this though. But it is possible to run a complete factory reset on the X3, as follows.
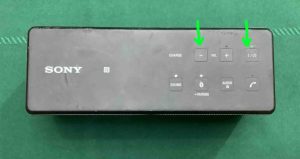
With the speaker running, press and hold Volume DOWN and while holding that button down, press and hold the Power button. Hold them both until the Power lamp starts fast flashing. See these buttons pointed at by the green arrows in the next picture.
You may wish to reinitialize the speaker to correct any weird behaviors you notice from it such as failing to pair, sound distortion, failure to power off when you press the Power button, pressing the Reset button does not solve your issue, and so on. Note that resetting invalidates any saved connection info about this speaker on your source Bluetooth devices. So you’ll have to forget those connections on these devices, and re pair the speaker after a reset in order to play your audio content through it once again.
Summary of the Lights on the Sony X3
Additionally, there are six lights in the button area. These lamps tell you what the speaker is doing as you work each of the buttons, as follows.
-
- The Sound lamp glows white when this speaker is in LIVE Mode. This light is OFF when the speaker is in standard sound mode, which gives it an essentially flat audio response.
- The Pairing Status lamp, found immediately above the Pairing button, flashes or glows solid white to tell of the speaker’s connection status. It glows steadily when a connection is in progress, and it blinks slowly when nothing is paired to the X3. It flashes rapidly when the X3 is in discovery mode.
- The Audio In lamp glows white when the speaker is receiving input from the 3.5mm audio input port rather than via a Bluetooth connection.
- The Power lamp just above the button of the same name, lights solid green, to show that the speaker is ON. It also flashes when you change the volume.
- The CHARGE lamp is on the top panel, just above the CHARGE label, above and to the left of the Volume Down button. It behaves as follows.
- It glows orange when the X3 is recharging and the speaker itself is powered OFF.
- Plus, it flashes orange when you’re not charging, and the speaker is ON, to tell you that the battery is pretty low and that you should charge the unit shortly.
- Note though that when you connect a power source, this lamp only glows steadily when the X3 is OFF.
- The light goes out, regardless of charge status, any time you power on the speaker.
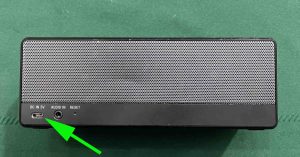
Sony X3 Ports Summary
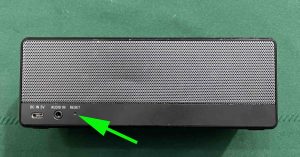
Both ports on the X3 we find on the back panel, near the bottom edge. First, we have the audio input port as we see next. It’s the round port jus to the left of the Reset button.
Then, there’s the micro USB power input port just right of the Reset button.
Related Posts to Sony X3 Buttons
Other Sony X3 Posts
References
Revision History
-
- 2023-03-08: First published.