Here we detail Gosund Mini WiFi Outlet setup instructions. In short, you plug it in, create a Gosund account, and finally, connect the plug to your WiFi network. Once all that is done, you can turn the plug on and off in the Gosund app from anywhere in the world that has internet. You may also set up your plug in Google Home or Alexa so that you can actuate it with voice commands to your smart speakers. Note though, that you must set up a Gosund account and connect your plug to it first, before you can link that plug to Alexa or Google Home. In this piece, we show you how to accomplish the first part of that. E.g. How to get your smart plug going in the Gosund app. We will cover how to link it to smart speakers in future posts.
Gosund Mini WiFi Outlet Setup Requirements
To get your Gosund Smart Mini Plug up and running on the internet, you’ll need the following.
- A smart phone or tablet that has Bluetooth and WiFi internet enabled.
- The Gosund app.
- A 2.4 Ghz. WiFi network and its password. This plug only talks on 2.4 Ghz.
- A working AC outlet that is in range of your 2.4 Ghz. WiFi network.
Summary of the Gosund Smart Mini Plug Setup Procedure
- Connect your phone or tablet to the same 2.4 Ghz. WiFi network that you wish to connect the smart plug to.
- Next, download and Install the Gosund app for iOS or Android, depending on the smart tablet / phone you’re using here.
- Run the Gosund app.
- Create a Gosund account.
- Then, plug the Gosund smart mini plug into a working AC outlet.
- Tap the Add Device button in the app.
- Make sure your mini plug is quickly flashing blue.
- Find the plug in the app once it finishes scanning for new devices.
- Connect the mini plug to WiFi.
- Make sure you can turn the plug on and off from your phone / tablet.
Gosund Smart Mini Plug Setup, Detailed Instructions
1. Connect your phone or tablet to WiFi.
Log into the same 2.4 Ghz. WiFi network that you wish to connect the smart plug to. Note that this plug cannot connect to 5 Ghz. WiFi networks. So make sure you connect your phone to a 2.4 Ghz. network. You won’t be able to use this plug if you do not have a 2.4 Ghz. wireless network. Also, if you’re in range of many networks that you normally connect to, disable auto-join on all but the 2.4 Ghz. one you wish to connect your smart plug with. This prevents your smart device from automatically switching to another network when you don’t want it to.
2. Next, download and Install the Gosund App for iOS or Android
Go to the App Store (Play Store for Android), and search for Gosund. You should then get something like the following screen.

Tap the Get button to install the Gosund app.
3. Bring up the Gosund App to Continue with Gosund Mini WiFi Outlet Setup
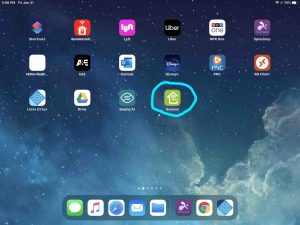
Once you’ve installed the Gosund app, it should appear on your home screen, something like ours did in the next picture. Note the Gosund app, circled in aqua.
4. Create a Gosund Account
When you run the app, it prompts you to either register or log in, as shown in the next screenshot. To complete Gosund Mini WiFi Outlet Setup, you must have a Gosund account. See the following steps for how to make one.
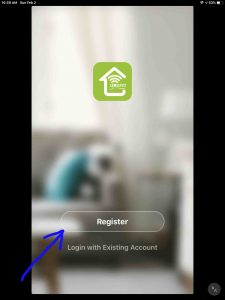
In this demo, we’re going to create a new Gosund login Id, since most of you’ll need to do this if you’ve you’ve never set up a Gosund account before.
4a. Press the Register Button
Find this highlighted in the previous picture.
You then get the Privacy Policy page, as shown next.
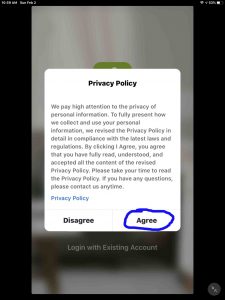
4b. Tap the Agree Button
Find the Agree button in the lower right hand corner of the Privacy Policy window, as circled in the last picture.
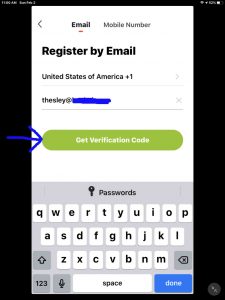
4c. Enter your Preferred Email Address to Continue with Gosund Mini WiFi Outlet Setup
This will become your user Id for future logins to the Gosund app.
4d. Next, Tap the Get Verification Code Button
Find this large green button in the center of the screen, as pointed at by the blue arrow in the last picture.
The app then sends an email to the address you gave above with a six digit verification code. You’ll need this in the next step. So go to your email, and when the code arrives, jot it down.
4e. Enter the Verification Code you Received
Once you get the email, come back to the Gosund app and enter the code, as we did ours in the next screenshot.
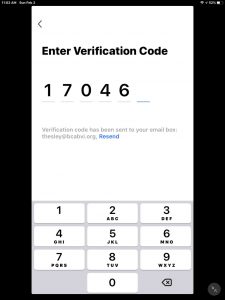
Note that once you enter the last digit of the code, the app takes you to the next screen, as shown next.
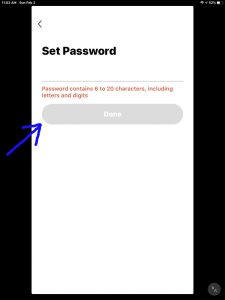
4f. Enter the Password you Want for this New Gosund Account
Type the desired password into the edit field, just above the red text, as shown in the last picture. Note that the password must be between six and twenty characters, and may be a mix of letters and digits.
Also, be sure you type the password correctly, because as of this writing, the app does not prompt you to type it in again for confirmation. If you type it wrong here, you won’t be able to log into the app later, and will have to request a password reset.
Finally, once you’re done, tap the Done button.
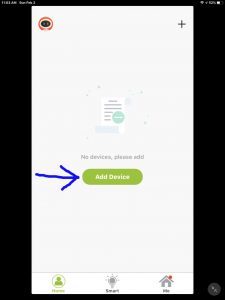
Then, if all goes well, you will see the empty Devices List page as shown next.
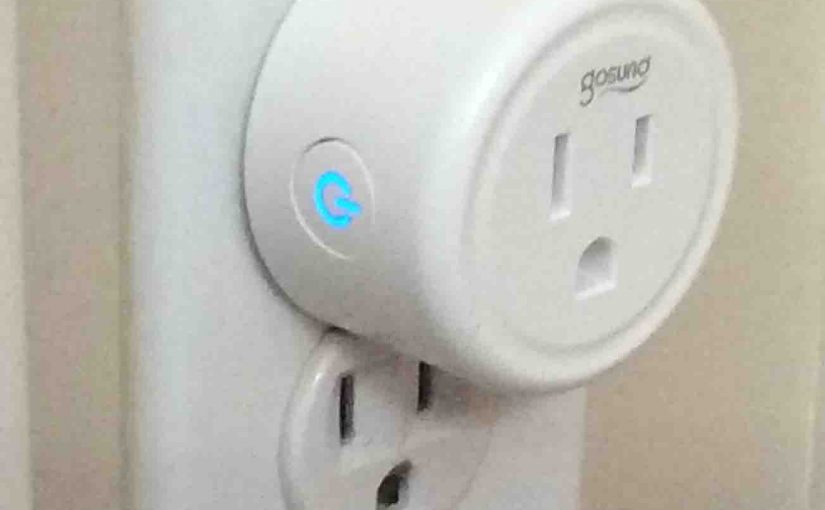
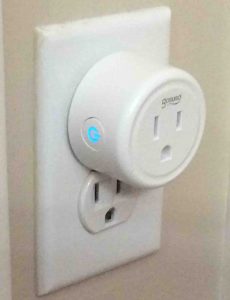
5. Then, Plug the Gosund Smart Mini Plug into a Working AC Outlet
Once connected to AC power, the lamp on the mini plug, located in the Action button, should rapidly flash blue, as shown next.
6. Tap the Add Device Button in the App to Continue with Gosund Mini WiFi Outlet Setup
With the smart plug blinking blue, go back to the Gosund app, and tap the Add Device button.
You then see the following screen, that prompts you to pick the sort of device you wish to add.
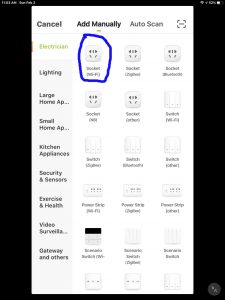
7. Tap the Socket Button
Find the Socket (Wi-Fi) button in the first row of devices, circled in blue, near the top left corner of the screen shown in the last picture.
You should then see the Reset the Device First page, as shown next.
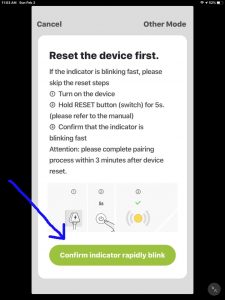
Check one more time that your mini plug is quickly flashing blue.
If it is not, press and hold the Action button for at least ten seconds. Release when the button starts flashing blue.
Once the plug flashes blue, tap the Confirm Indicator Rapidly Blink button.
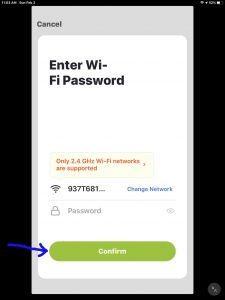
You should then see the Enter Wi-Fi Password page come up, as shown next.
8. Check that you’re Still Connected to your 2.4 Ghz. WiFi Network
You most likely still are joined with it, especially if there are no other in-range WiFi networks that your phone / tablet automatically connects to. But to be safe, we strongly suggest that you check again anyway. Do that by tapping the Change Network link on the Enter Wi-Fi Password page, as shown in the last picture.
Tapping Change Network takes you to your smart device’s WiFi settings screen, where you can switch networks. Ours is shown next.
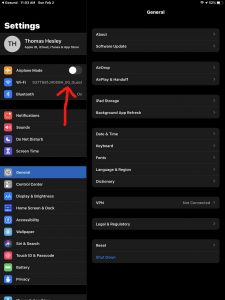
Note that our tablet is currently connecting with a 5 Ghz. network. So we must change it to our 2.4 Ghz. WiFi version before trying to connect the plug to it.
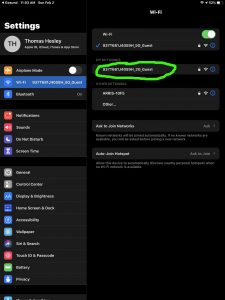
The next screenshot shows that we’ve now switched our tablet to our 2.4 Ghz. WiFi.

Once we’ve finished that, we go back to the Gosund app, which should still be showing the WiFi Password entry page. This is shown again next, for your convenience.
9. Enter the WiFi Password for the 2.4 Ghz. Network to Continue with Gosund Mini WiFi Outlet Setup
Type in the WiFi password for your 2.4 Ghz. network, and then tap the Confirm button.
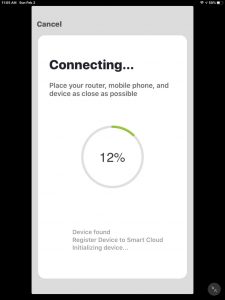
The app then downloads the WiFi network name and password to the plug, and the plug then attempts to connect to that network.
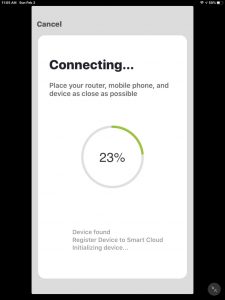
10. Wait for the App to Connect the Plug
This takes perhaps fifteen seconds, and all the while, the app shows you a progress circle, as shown in the next few screen shots.
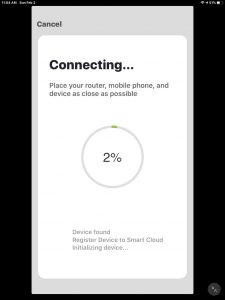
Note that it says that the device was found and that it’s initializing.
After some seconds, plug setup finishes, and you get the Device Added Successfully screen, as shown next.

11. Test out the Gosund Mini WiFi Outlet Plug
Tap the Done button on the Device Added Successfully screen.
This takes you to the smart plug’s home page in the app, as shown next.
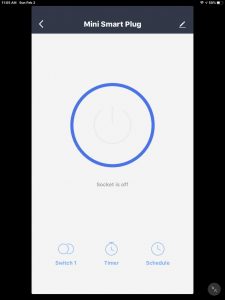
From here, you can turn on the smart plug by tapping anywhere inside the blue circle on this screen. So tap there.
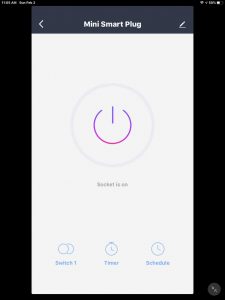
Then, if you’re nearby, you’ll hear the mini plug click. The circle in the app just mentioned also changes, as shown in the next picture. The outer blue circle turns gray, and the inner power circle, that was gray, turns varying shades of purple, as shown next.
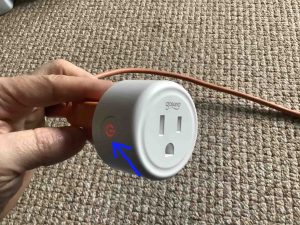
Any device plugged into this smart plug will now receive power. Plus, the Action button on the mini plug also glows red, to show that power is on, as shown next.
Tap the power circle in the app several times. The light on the plug should go off and on, and the plug should click.
12. Gosund Mini WiFi Outlet Setup is Now Done !
If it does, then you’ve successfully set up your Gosund Mini WiFi outlet. Congratulations!
You may now link your plug to your Alexa and Google Home smart speakers if you so desire. We’ll cover how to do that in future posts.
Related Posts to Gosund Min WiFi Outlet Setup Instructions
- Ultimate Ears Wonderboom 2 Setup Instructions
- Belkin F9K1106v1 WiFi Booster Setup Instructions
- Honeywell Thermostat WiFi Setup RTH8580WF
- Echo Dot 3 Setup Instructions for Amazon Alexa 3rd Generation Dot
- Belkin F9K1122v1 N600 Plug In WiFi Range Extender Setup Instructions
Other Posts About Gosund Mini WiFi Outlet
References for Gosund Mini WiFi Outlet Setup
Revision History
- 2020-05-08: Added more tags.
- 2020-02-02: First published.