The setup routine for the Belkin range extender model F9k1106v1, defines simple itself. The http belkin range setup web site on this booster makes setting it up a breeze. So below, we provide screen shots from an actual setup scenario on this admin site. We took these, while installing the F9K1106v1 to extend our wireless networks here at the office.
The Belkin firmware automates much of the procedure in a wizard style web interface at the http://belkin.range/ website as you’ll see below, so that nearly all you need do is answer a few questions; most of which they supply with acceptable default values. Then, you find your primary networks t in a list they provide, enter their passwords, and this extender takes it from there. The F9K1106v1 range extender connects to your chosen wireless networks and repeats them; extending their range as advertised.
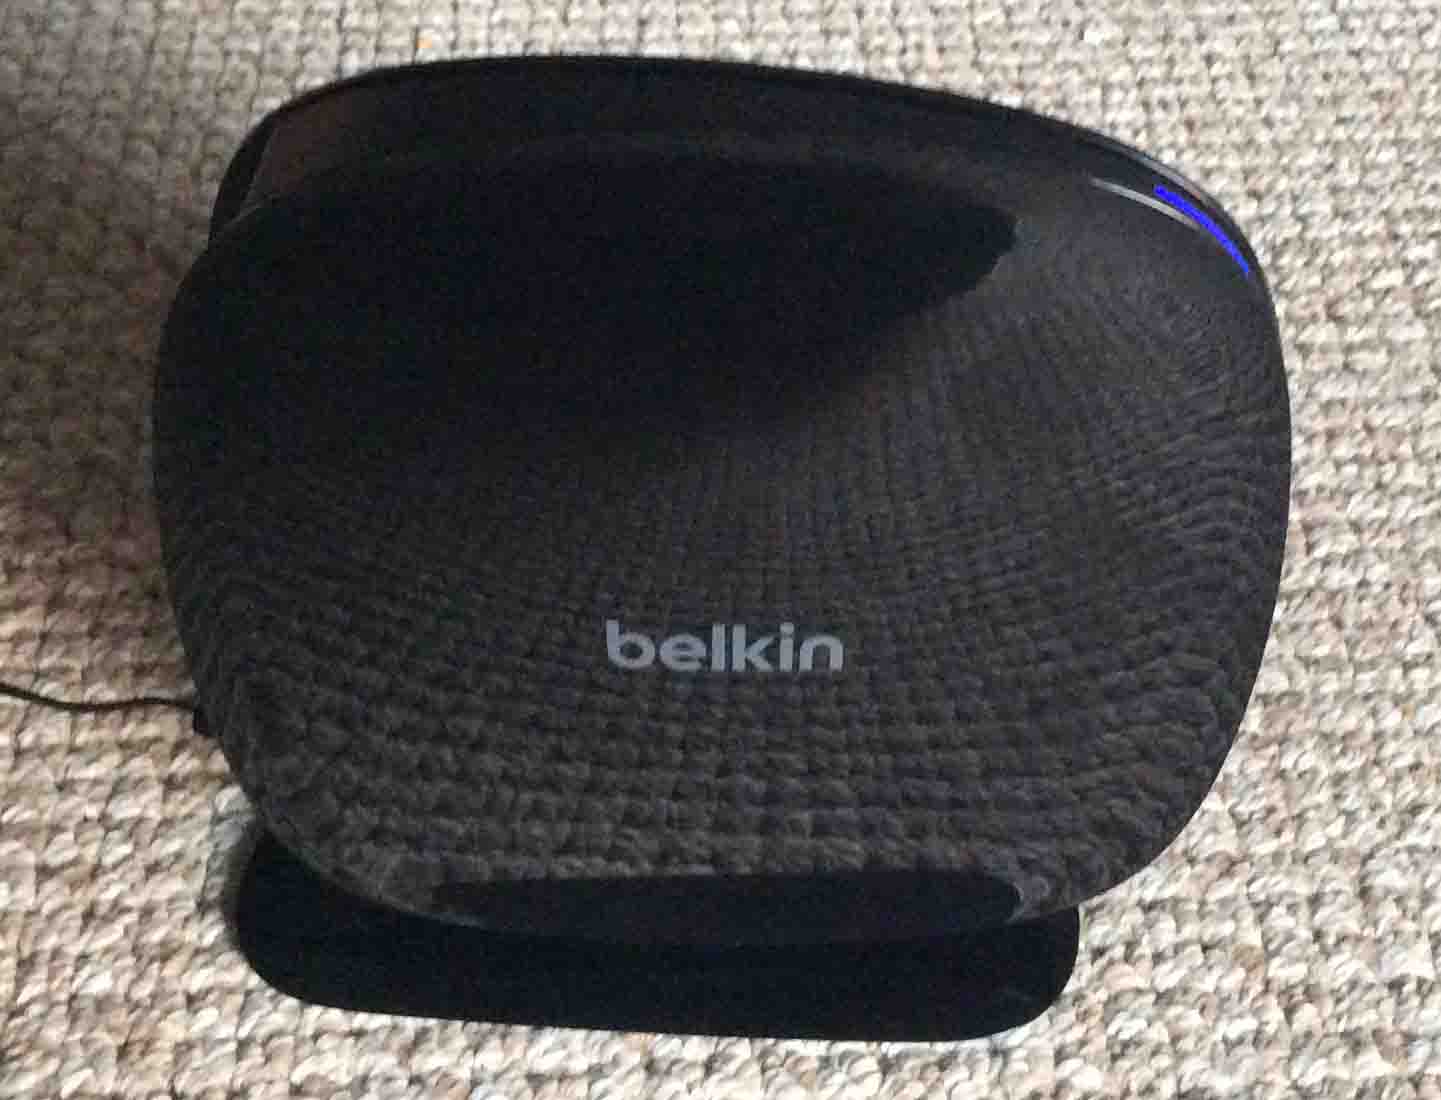
The picture above shows the F9k1106v1 Wi-Fi range extender, connected to and extending our wireless networks. The status lamp on the front (top right corner in this picture), glows a solid blue, indicating that this device is receiving good signal from the primary network(s) previously programmed into it, and repeating them successfully.
http belkin range/Setup Instructions for the F9K1106v1 N600 Belkin Wi-Fi Extender
In this procedure, we’re going to wipe the range extender clean of any user-programmed settings, and show you how to program it, to extend the networks in your particular environment.
1. Connect the Belkin Extender to Power
2. Reset the Belkin Wireless Range Extender F9k1106v1 to Default Factory Values
Jump ahead to step 3 if you purchased this extender brand new.
But you’ll want to RESET this device if you bought a used one, just in case the seller did not clear out their changed settings. Follow the instructions in our Belkin Wireless Range Extender Reset Instructions article.
3. Log Into the Wireless Range Extender to Configure It and Continue with http belkin range Setup
Then, go to your computer or mobile device and scan for the “Belkin.setup” wireless network. We found it on our iPad Air, as pictured next. This access point is only active during the setup process, and will disappear once you’ve finished configuring the F9K1106v1.
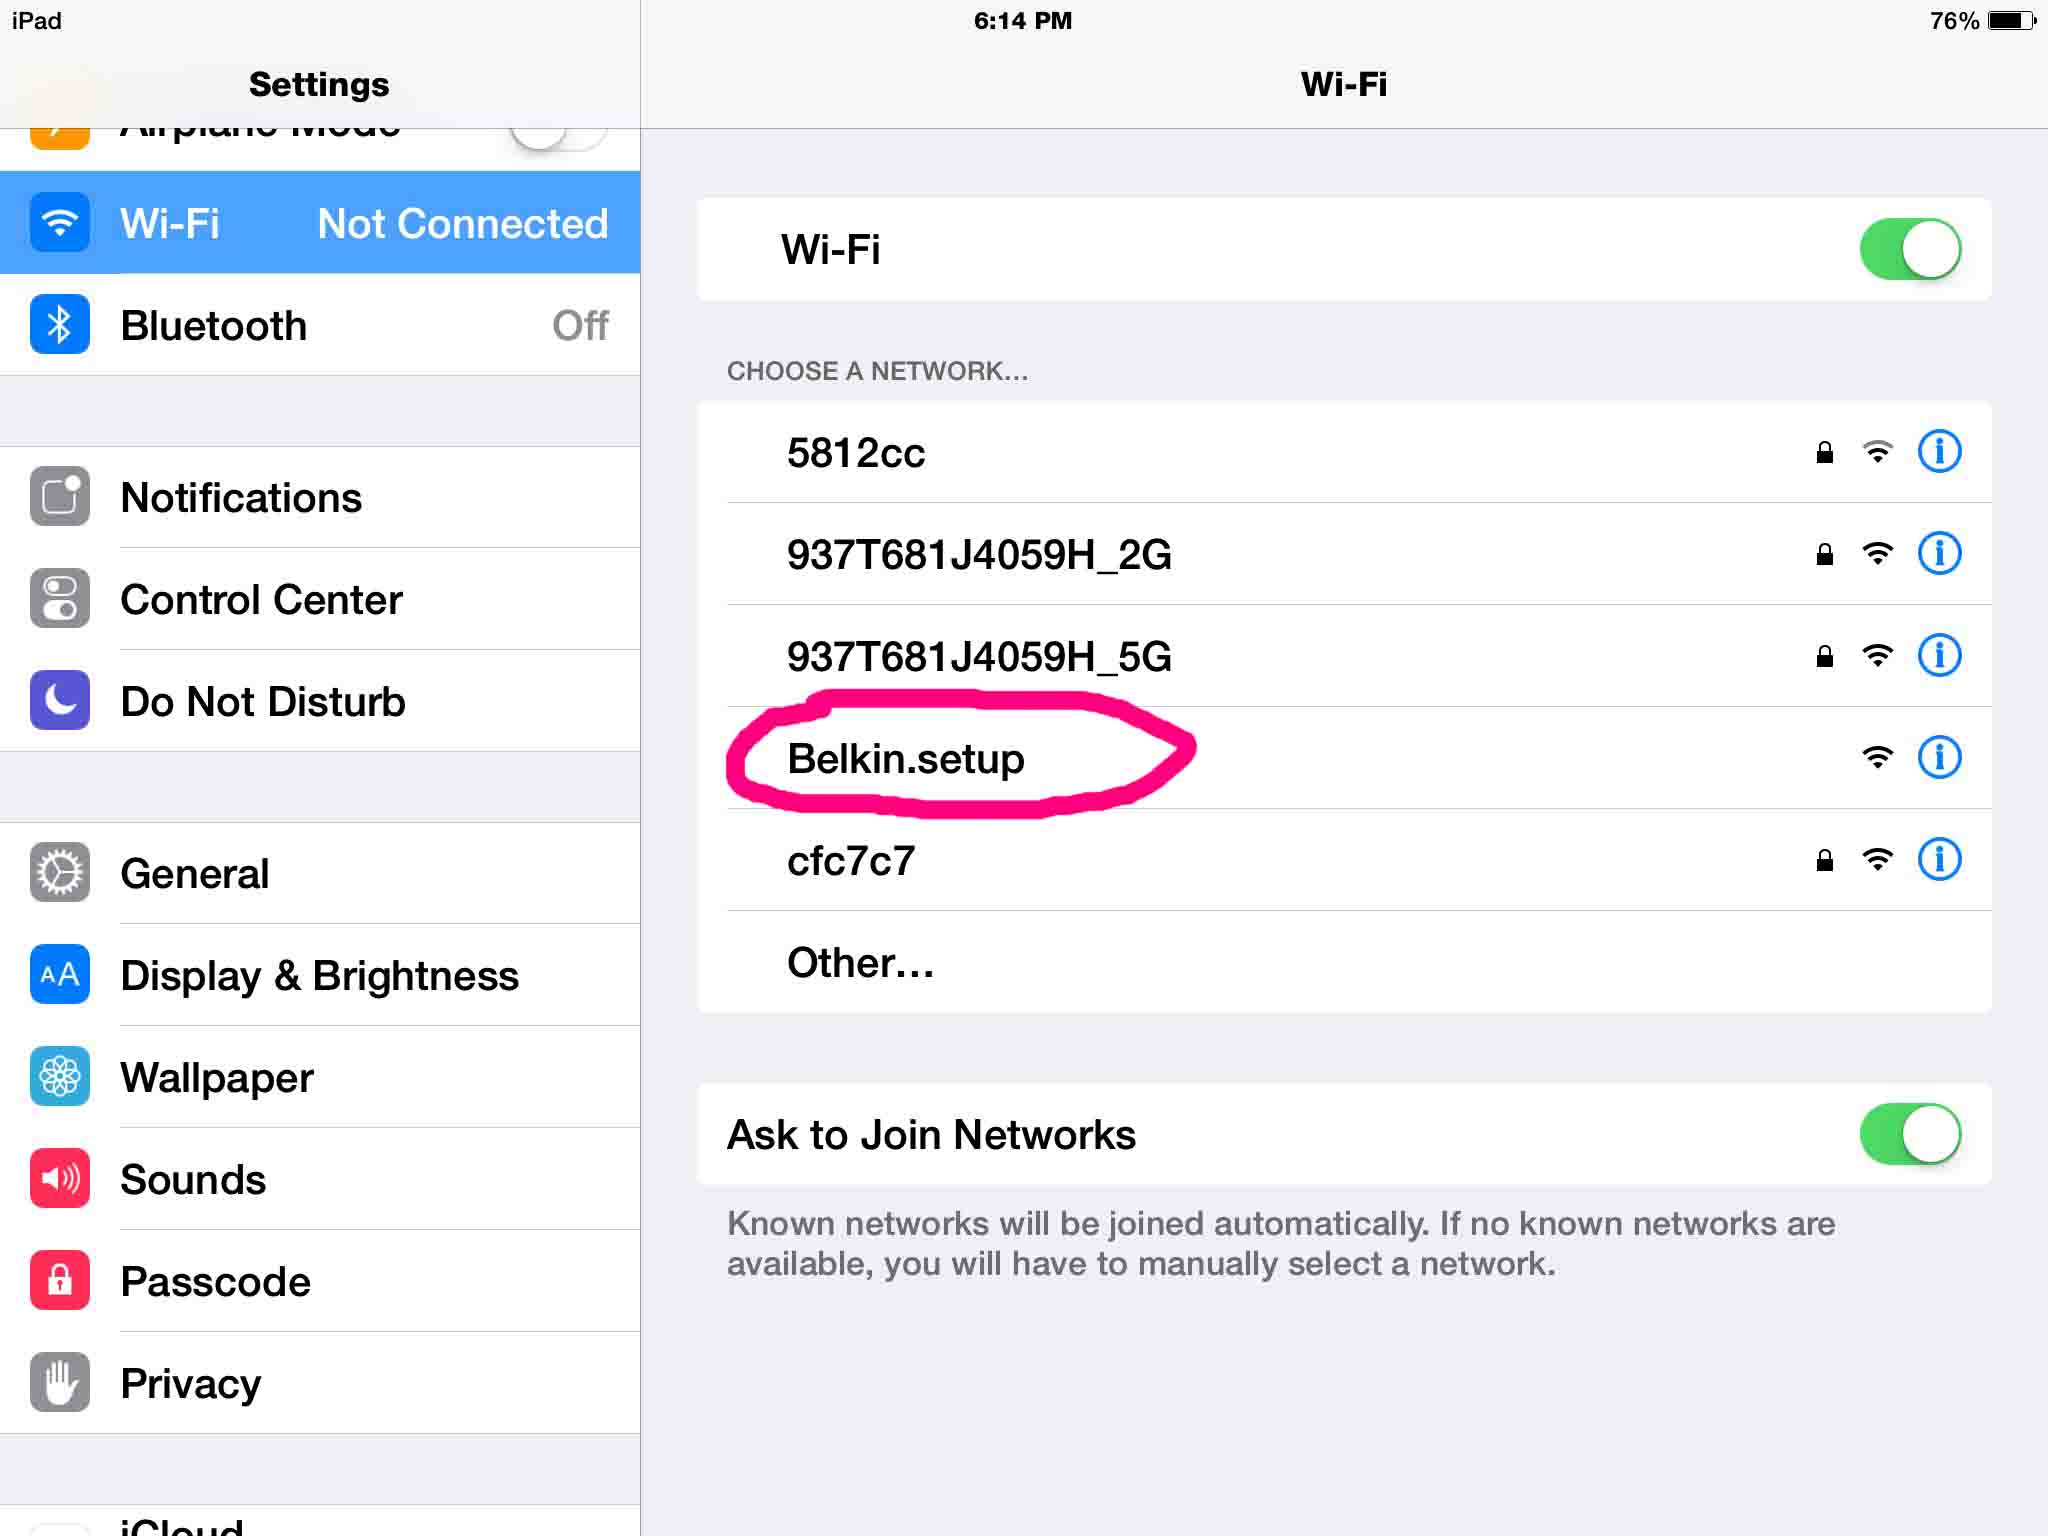
Next, join the Belkin.setup network. Since it is OPEN, you will not be prompted for a password. On the iPad Air, we join it simply by single-tapping it.
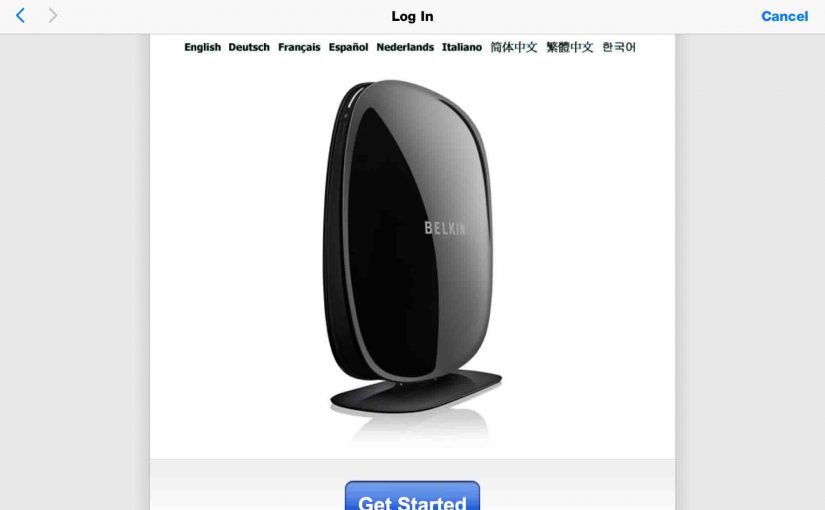
Once connected, the Belkin.range front page comes up automatically, your computer assumes the default IP address of the range extender (which is 192.168.206.2), as shown next. If the setup start screen does not appear, then direct your web browser to http://belkin.range/

Tap the “Get Started” button on the http://belkin.range page. This instructs the extender to scan both the 2.4 and 5 Ghz. bands for eligible wireless networks to extend and repeat. After a short pause, your browser displays the “Choose the wireless network you’d like to extend” screen, as pictured in the next step.
4. Choose the 5 Ghz. Wireless Network to Extend
On the screen below, choose the 5 Ghz. primary wireless network, whose range you wish to extend. In our scenario, we’re extending the 937T681J4059H_5G network; the first network in the list below, and the one that is highlighted in blue. If on the other hand, you’re only extending a 2.4 Ghz. wireless network, skip ahead to step 6 below.
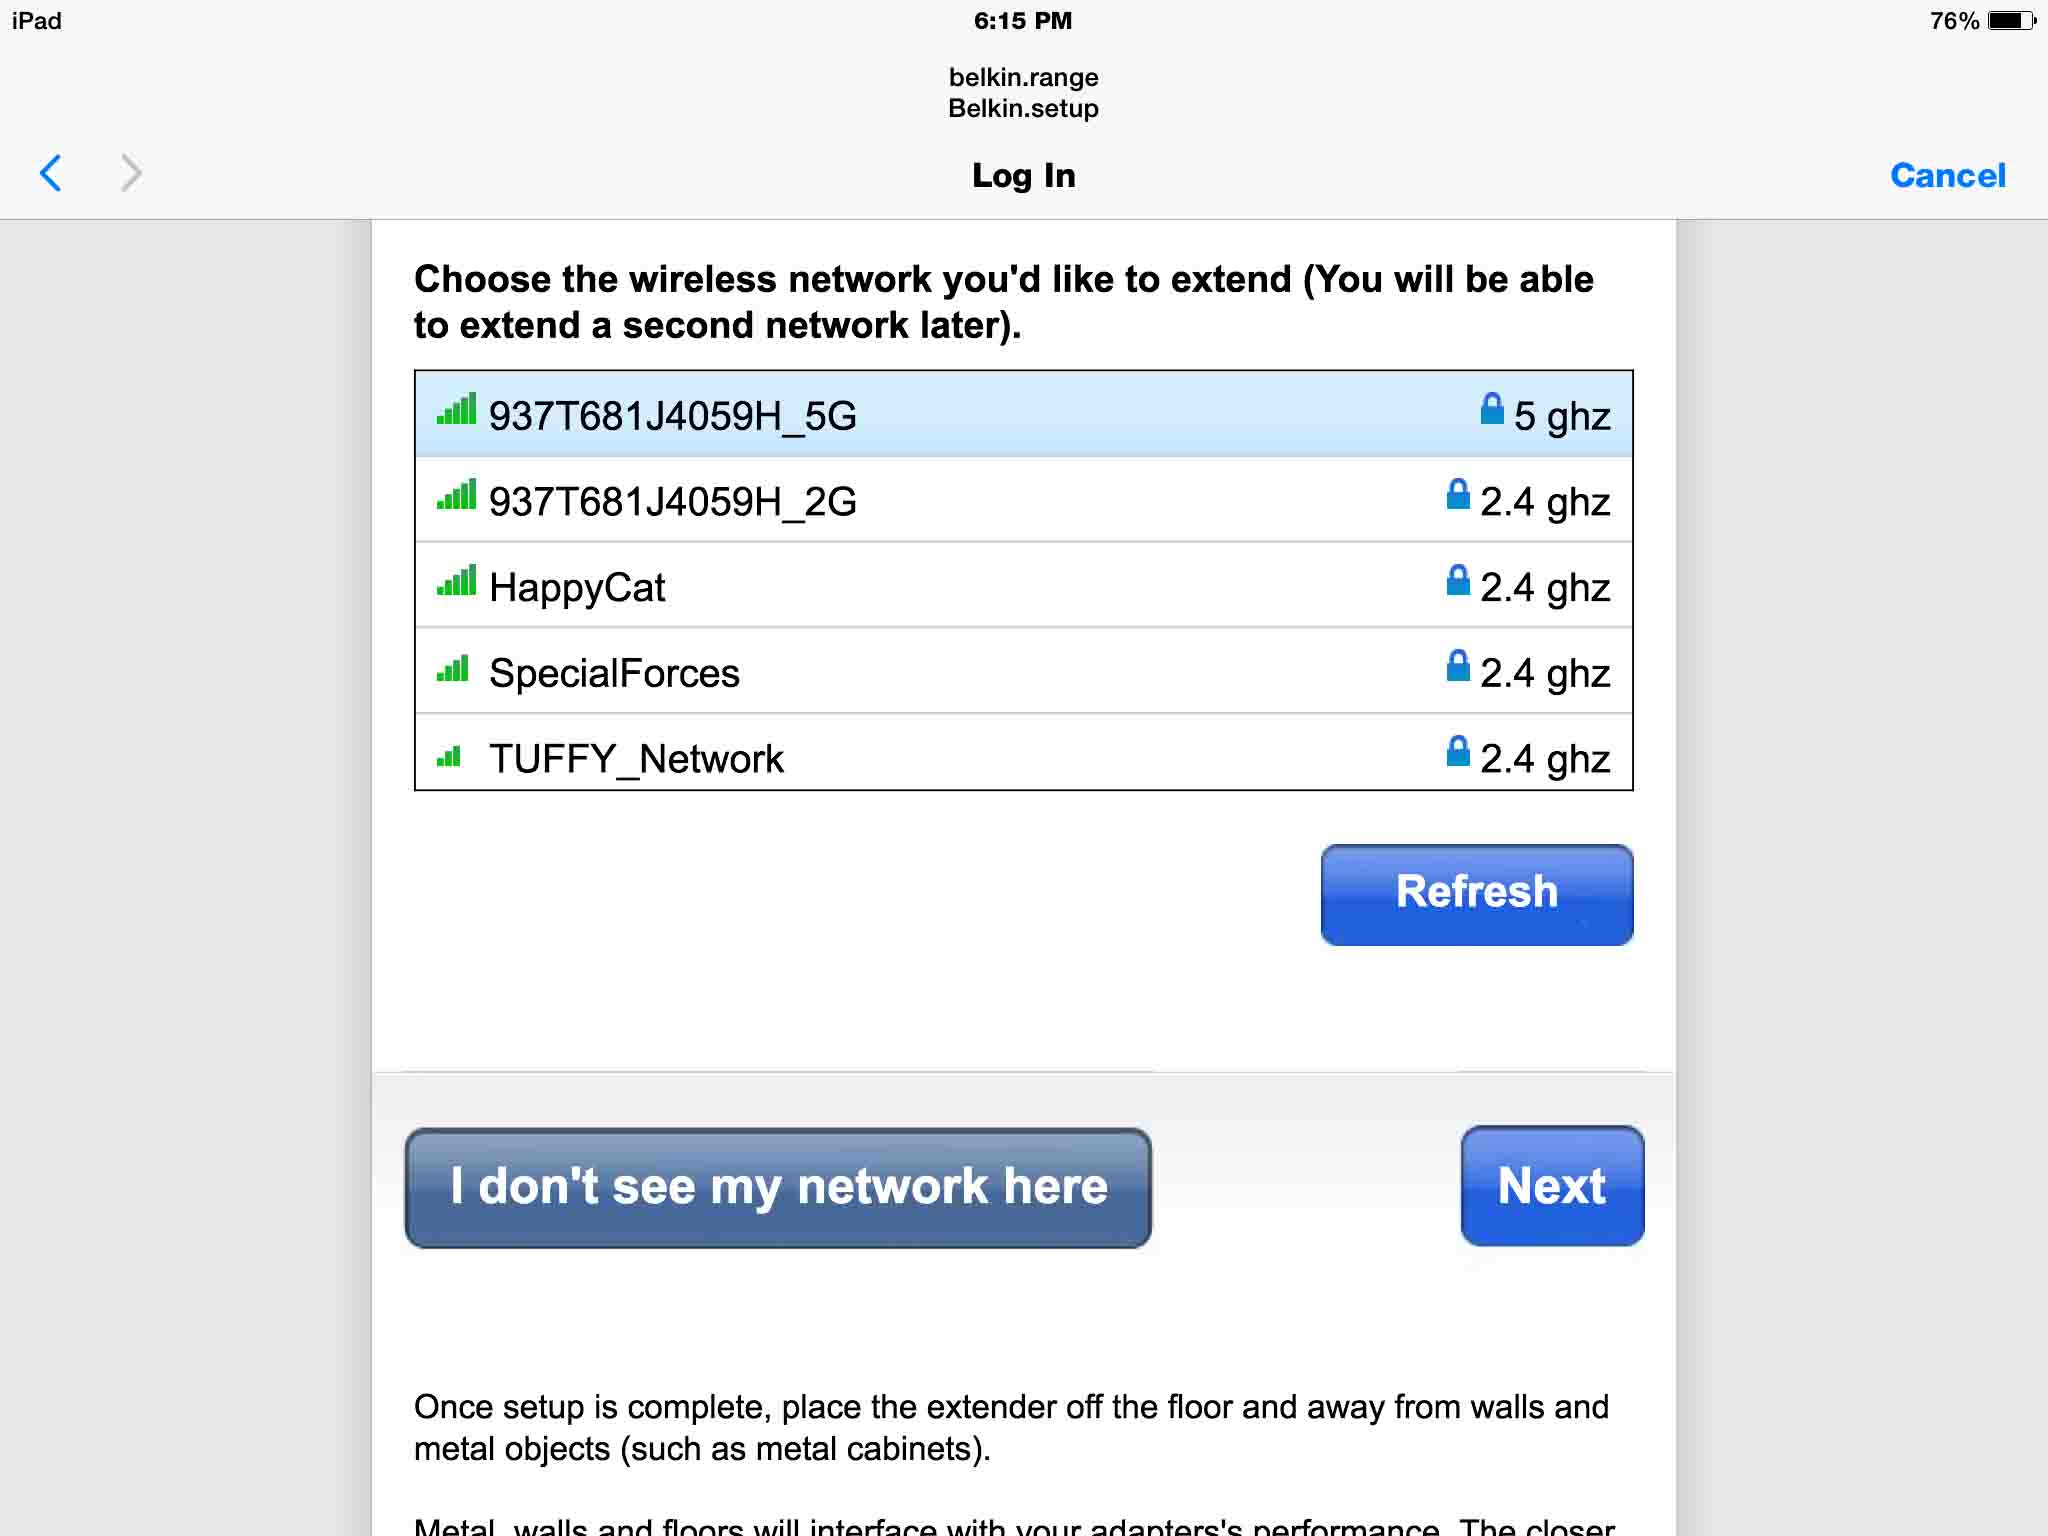
Note that if your network does not display in the above list, it may be hidden. In that situation, press the “I don’t see my network here” button, and follow the instructions for manual entry of your network’s SSID, security type, and password. When that data has been entered, skip to step 5.
Your network(s) may also fail to appear here if they’re physically too far away from this range extender. Their signals may therefore be too weak. To solve this, move the F9K1106v1 closer to your primary wireless access point. Then, tap / click the “Refresh” button above, to force the extender to re scan for eligible networks to extend.
However, if you do see your network, as we see our 937T681J4059H_5G network above, tap its entry in the list to select it, and then tap the “Next” button. The password entry screen then appears, as displayed in the next screen shot.
5. Enter the Password for your 5 Ghz. Network
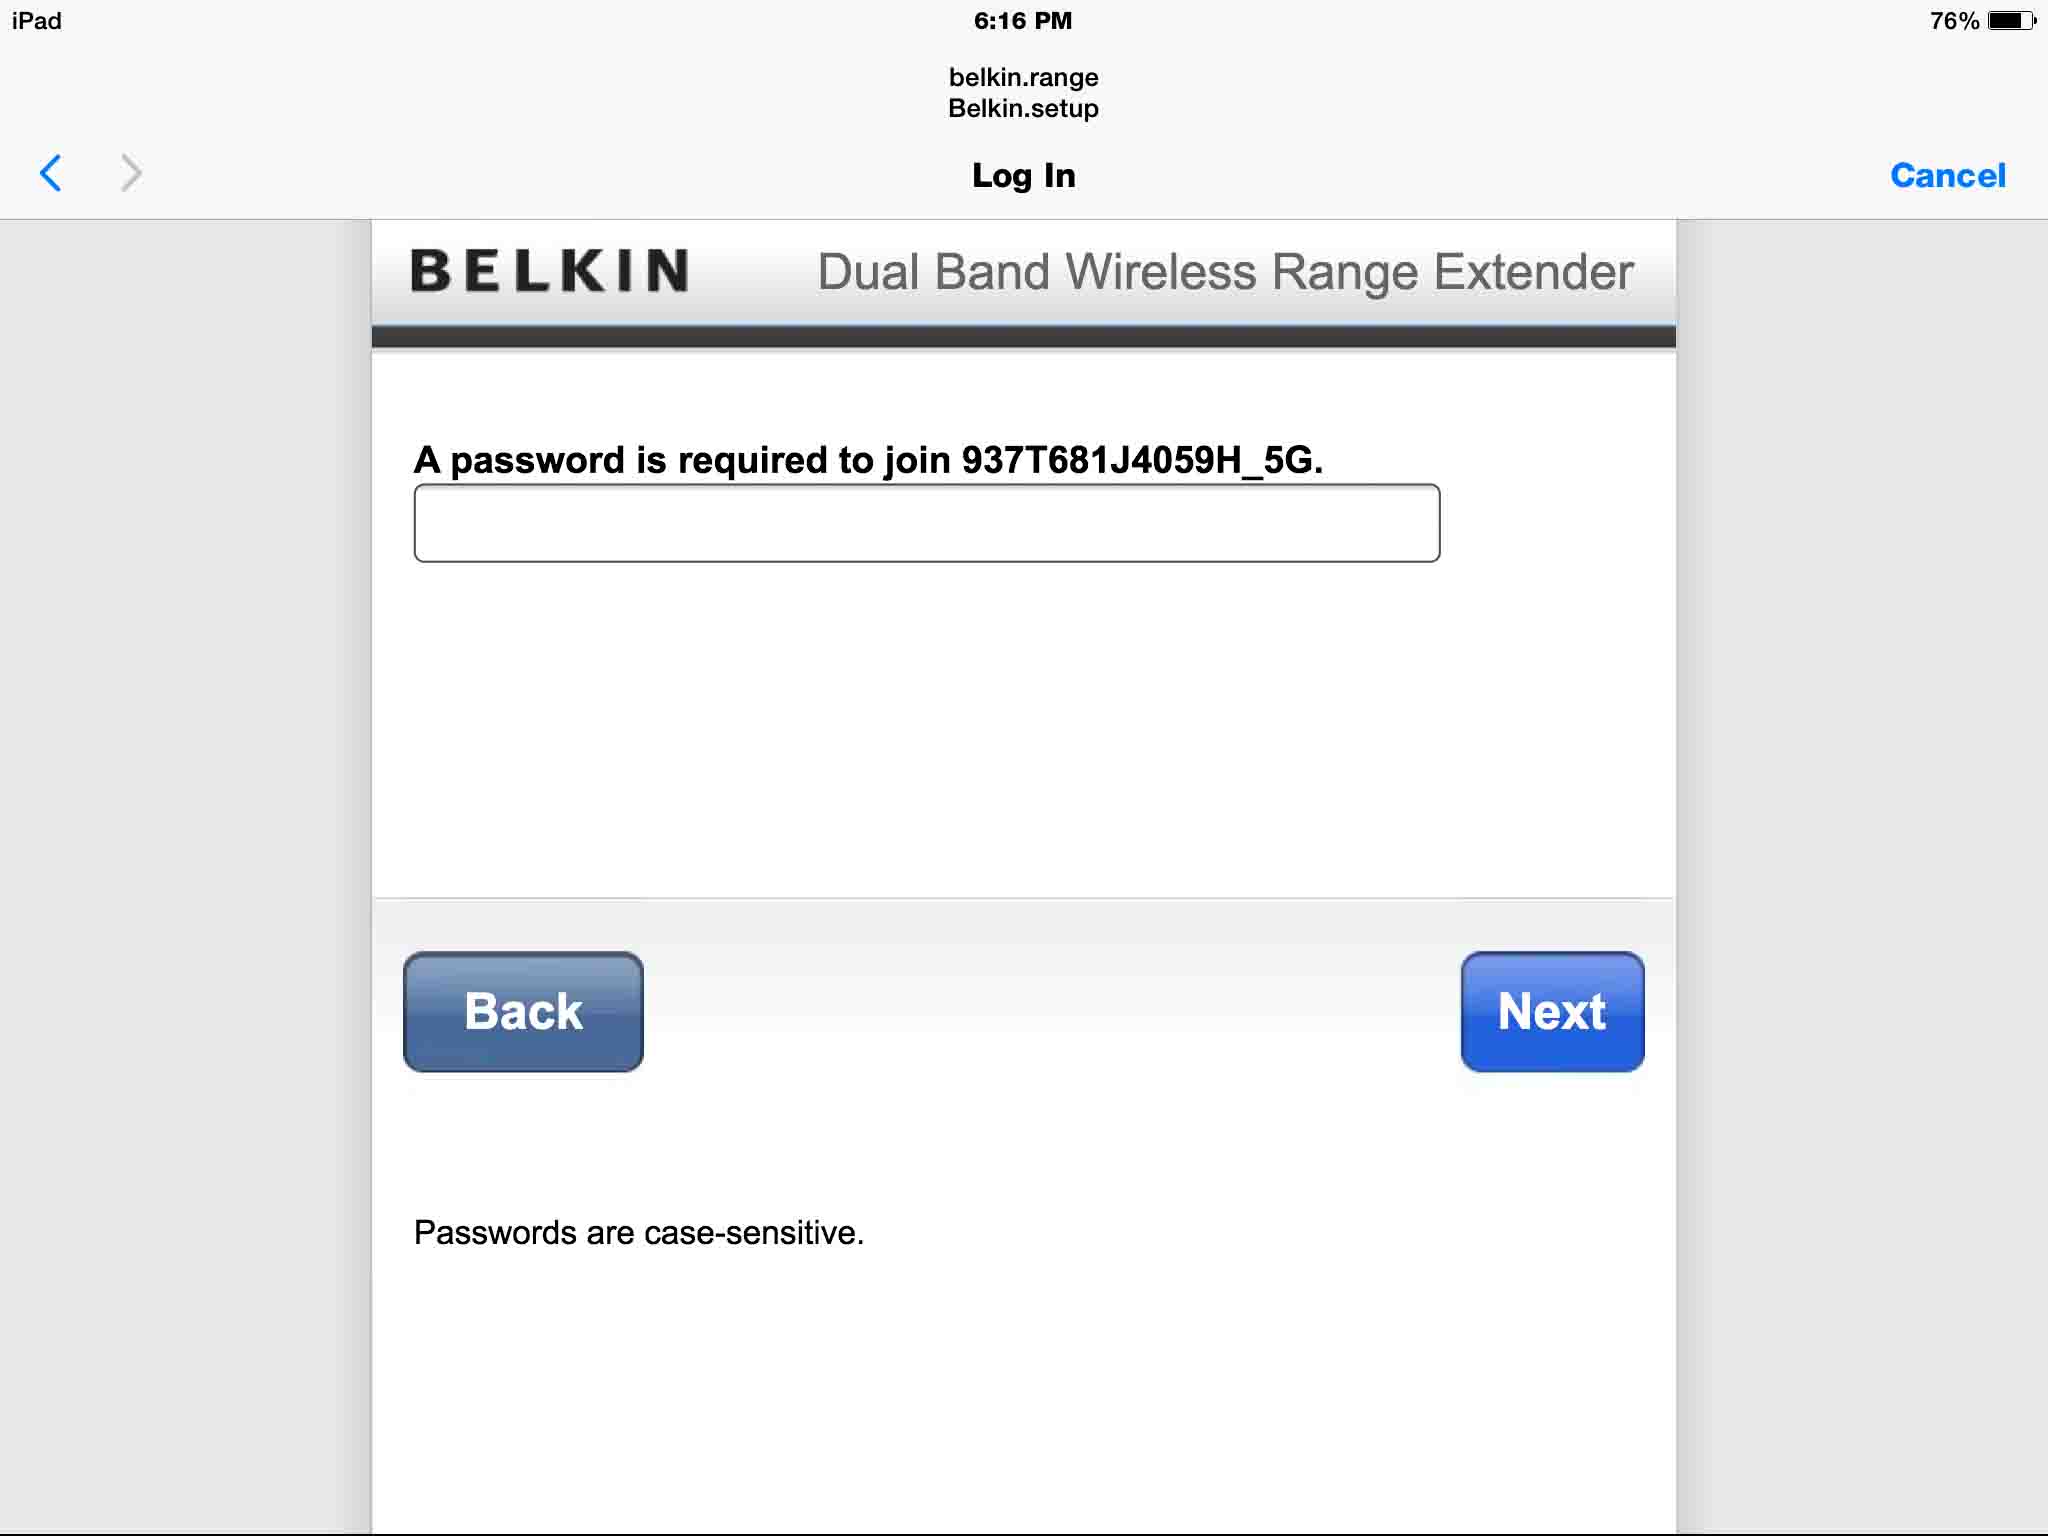
Enter your primary network password for the 5 Ghz. wireless network that you’re extending. Warning: Your password will clearly display on this screen as you enter it, so do this step where no one will see it that you’d rather NOT have see it.
When all password characters have been entered, examine closely what you typed in for correctness.
Warning!
Be sure the password is correct before pressing the “Next” button above. Our experience with the 1.00.16 version of this firmware, using our iPad Air to configure this, is that if the password is wrong, you’ll be disconnected from the Belkin.setup wireless network. When you try connecting again, you’ll be repeatedly disconnected, and will be unable to finish the setup, forcing you to start over by pressing the hard RESET button on the back.
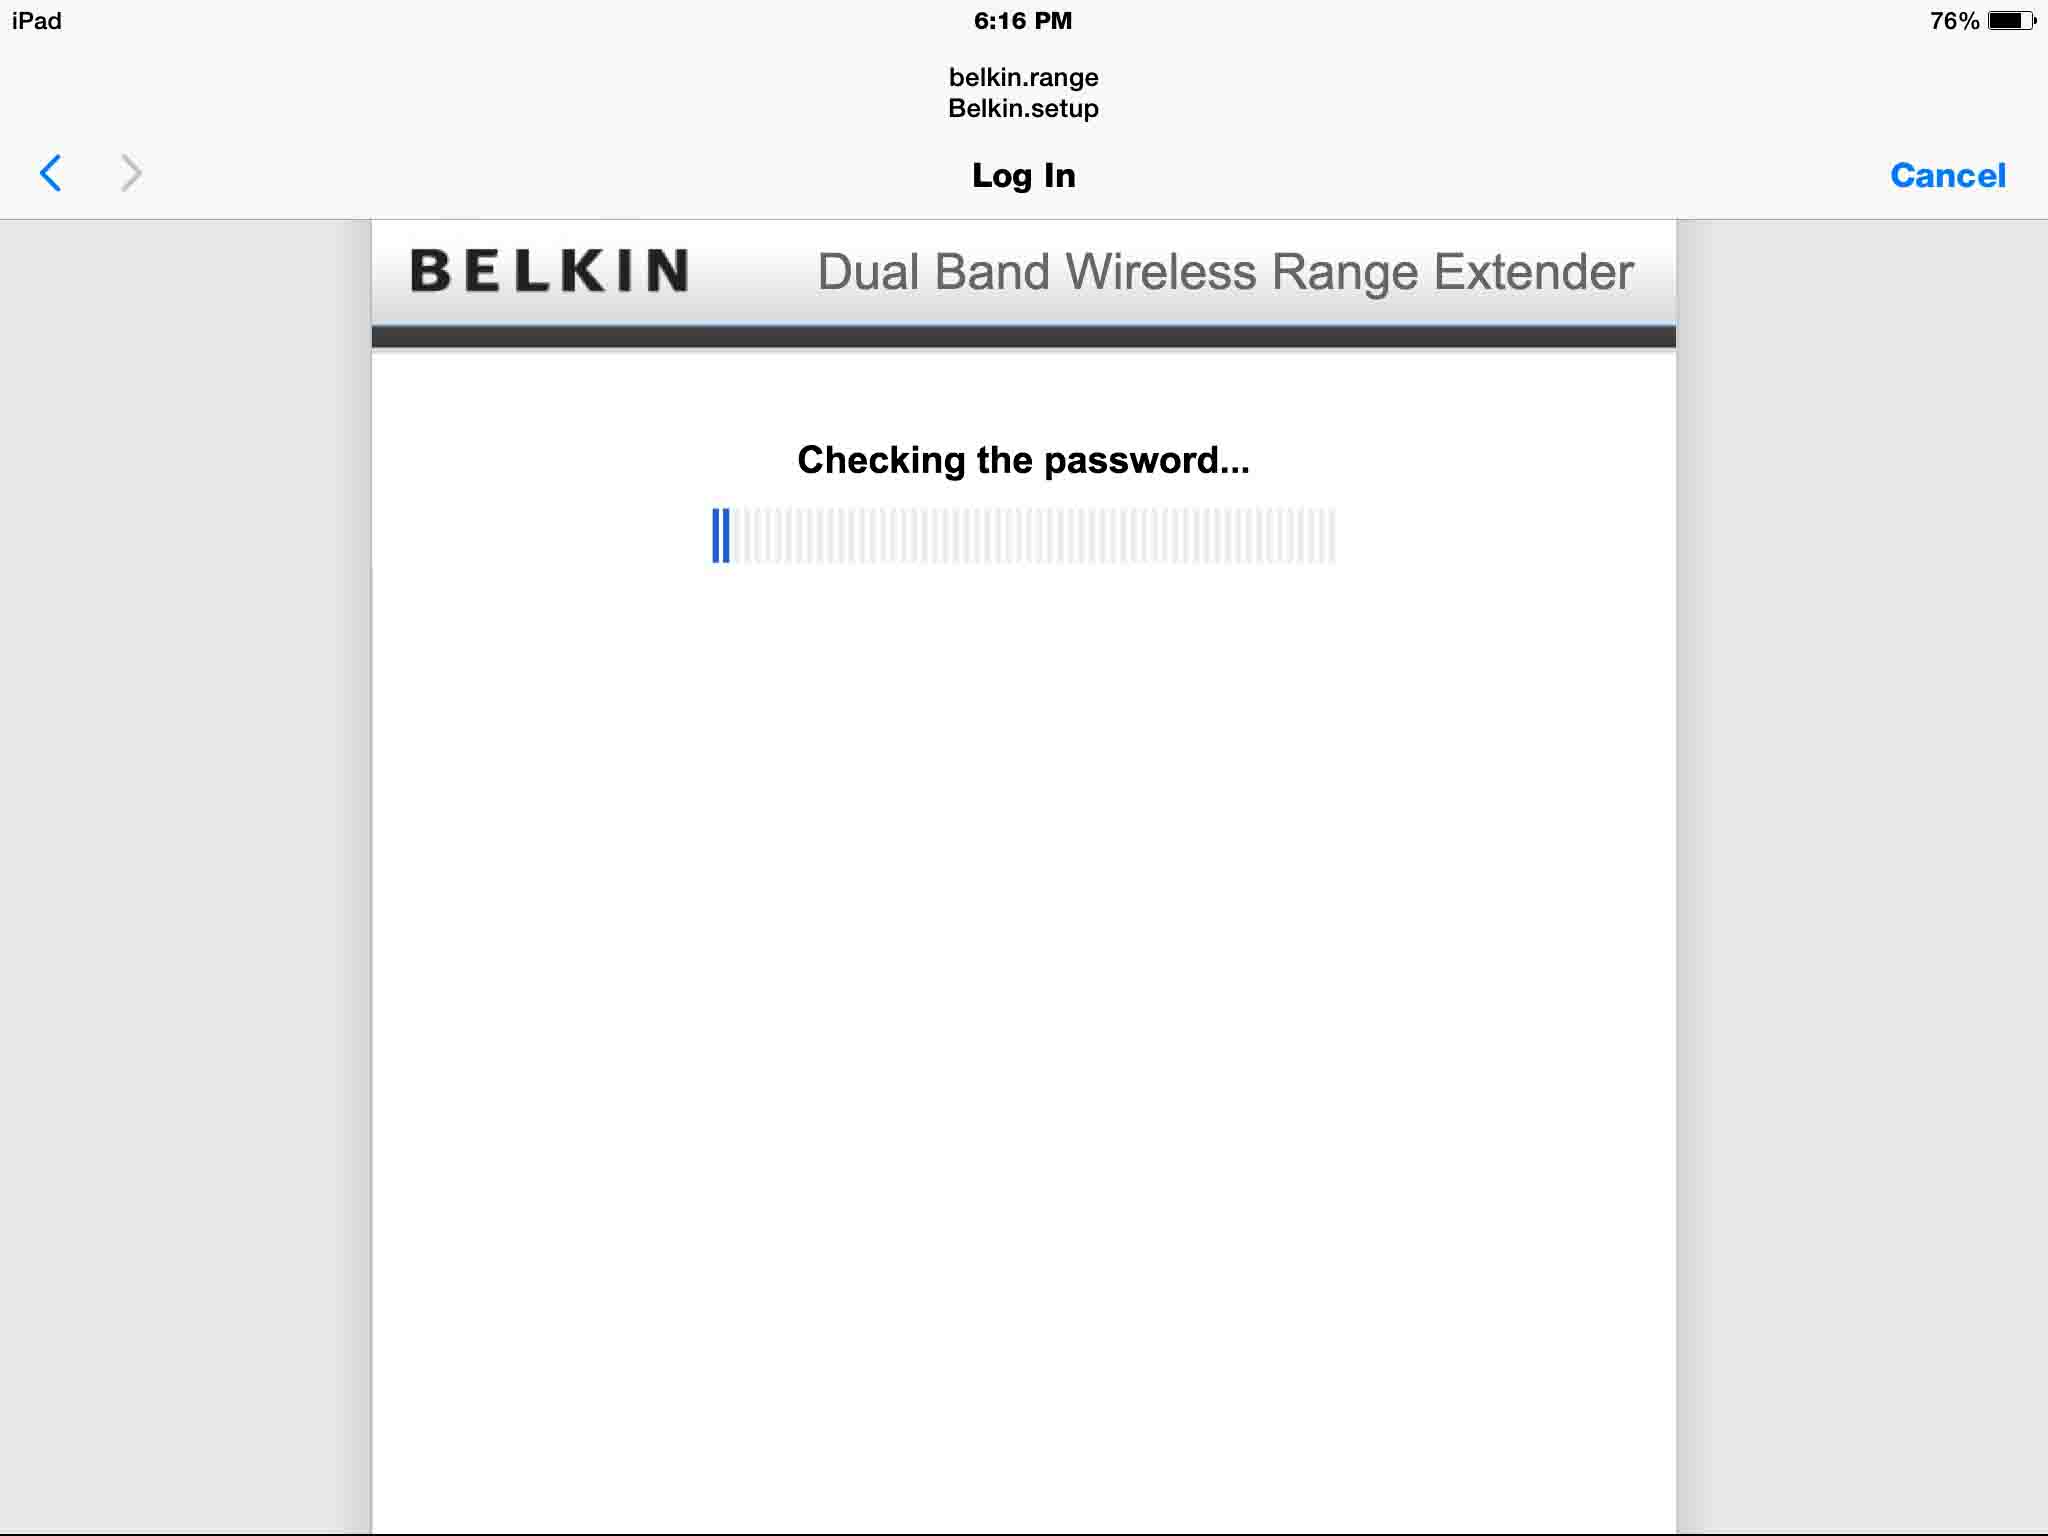
Then press the “Next” button. This displays the “Checking the password” screen, while the F9K1106v1 tries to connect to the primary 5 Ghz. network that you’ve selected previously. A progressing bar displays while these behind-the-scenes operations occur, again, as shown next.
6. Select the 2.4 Ghz. Wi-Fi Network that you Want to Extend (If Any), to Continue with http belkin range Setup
After the “Checking the password” screen clears, and assuming that you’ve entered the correct password above, you’re taken again to the “Choose the wireless network you’d like to extend” screen, as shown next. However THIS time, the screen only shows the in-range 2.4 Ghz. wireless networks, since we’ve already extended a 5 Ghz. one above. Note that this range extender can only extend ONE 2.4 Ghz. network, and ONE 5 Ghz. network at a time.
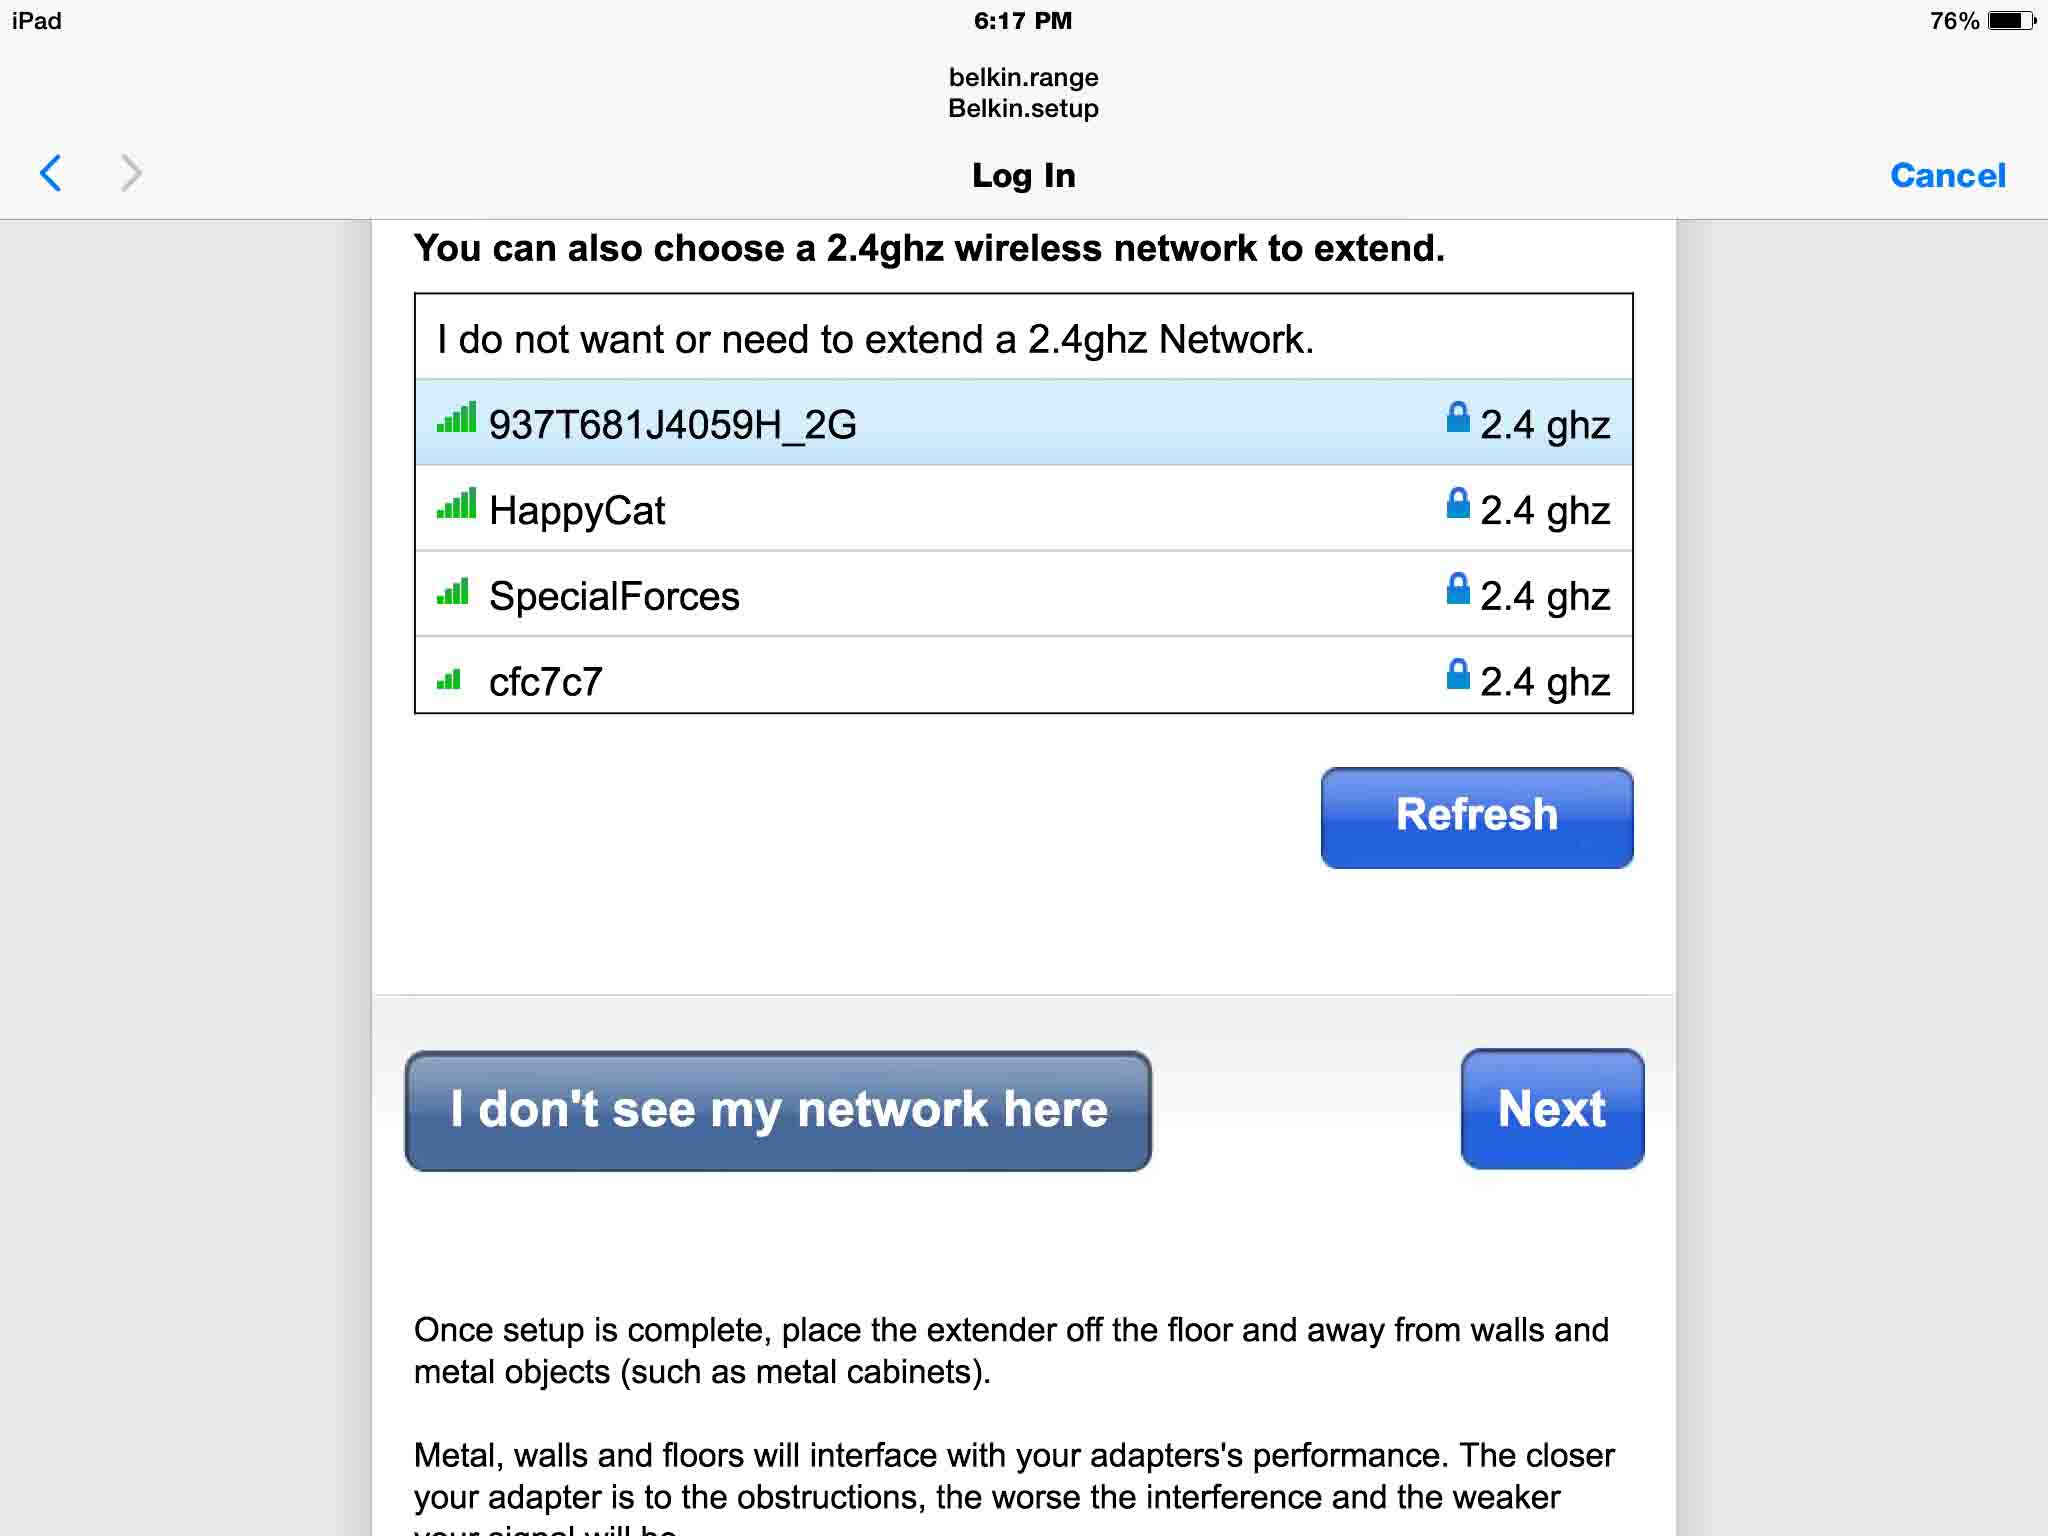
Find the 2.4 Ghz. network you wish to extend in the displayed list and tap / click it. You’ll then be prompted for its password, as displayed next.
7. Enter the Password for your 2.4 Ghz. Network

Type in the password for the primary 2.4 Ghz. network you’re extending.
Warning: Again, make sure you enter the correct password here, before pressing “Next”, lest you have to press RESET and start all over.
As with the 5 Ghz. password entry, you’ll see the “Checking the password” screen, as pictured above. After a short delay, and assuming you entered the right password, you’ll receive the “Extended Network information” screen, as shown in the next step.
Note that this extender does not support cross-connecting of extended and extension Wi-Fi networks. That is, you cannot extend a 2.4 Ghz. network with the 5 Ghz. extension SSID on this extender. The 2.4 Ghz. extension SSID can only be set up to repeat a 2.4 Ghz. primary wireless network. Also, the 5 Ghz. extension network can only re-broadcast a 5 Ghz. Wi-Fi network. Would be nice if you could “cross wire” the 2.4 and 5 Ghz. primary networks and extensions. However, such a feature might confuse novice users as well as network admins.
8. Check your Extended Networks Info
Note that we’ve covered our entered passwords with “pink paint,” to keep them secure. Check the presented net data one final time, just to make sure all is right.
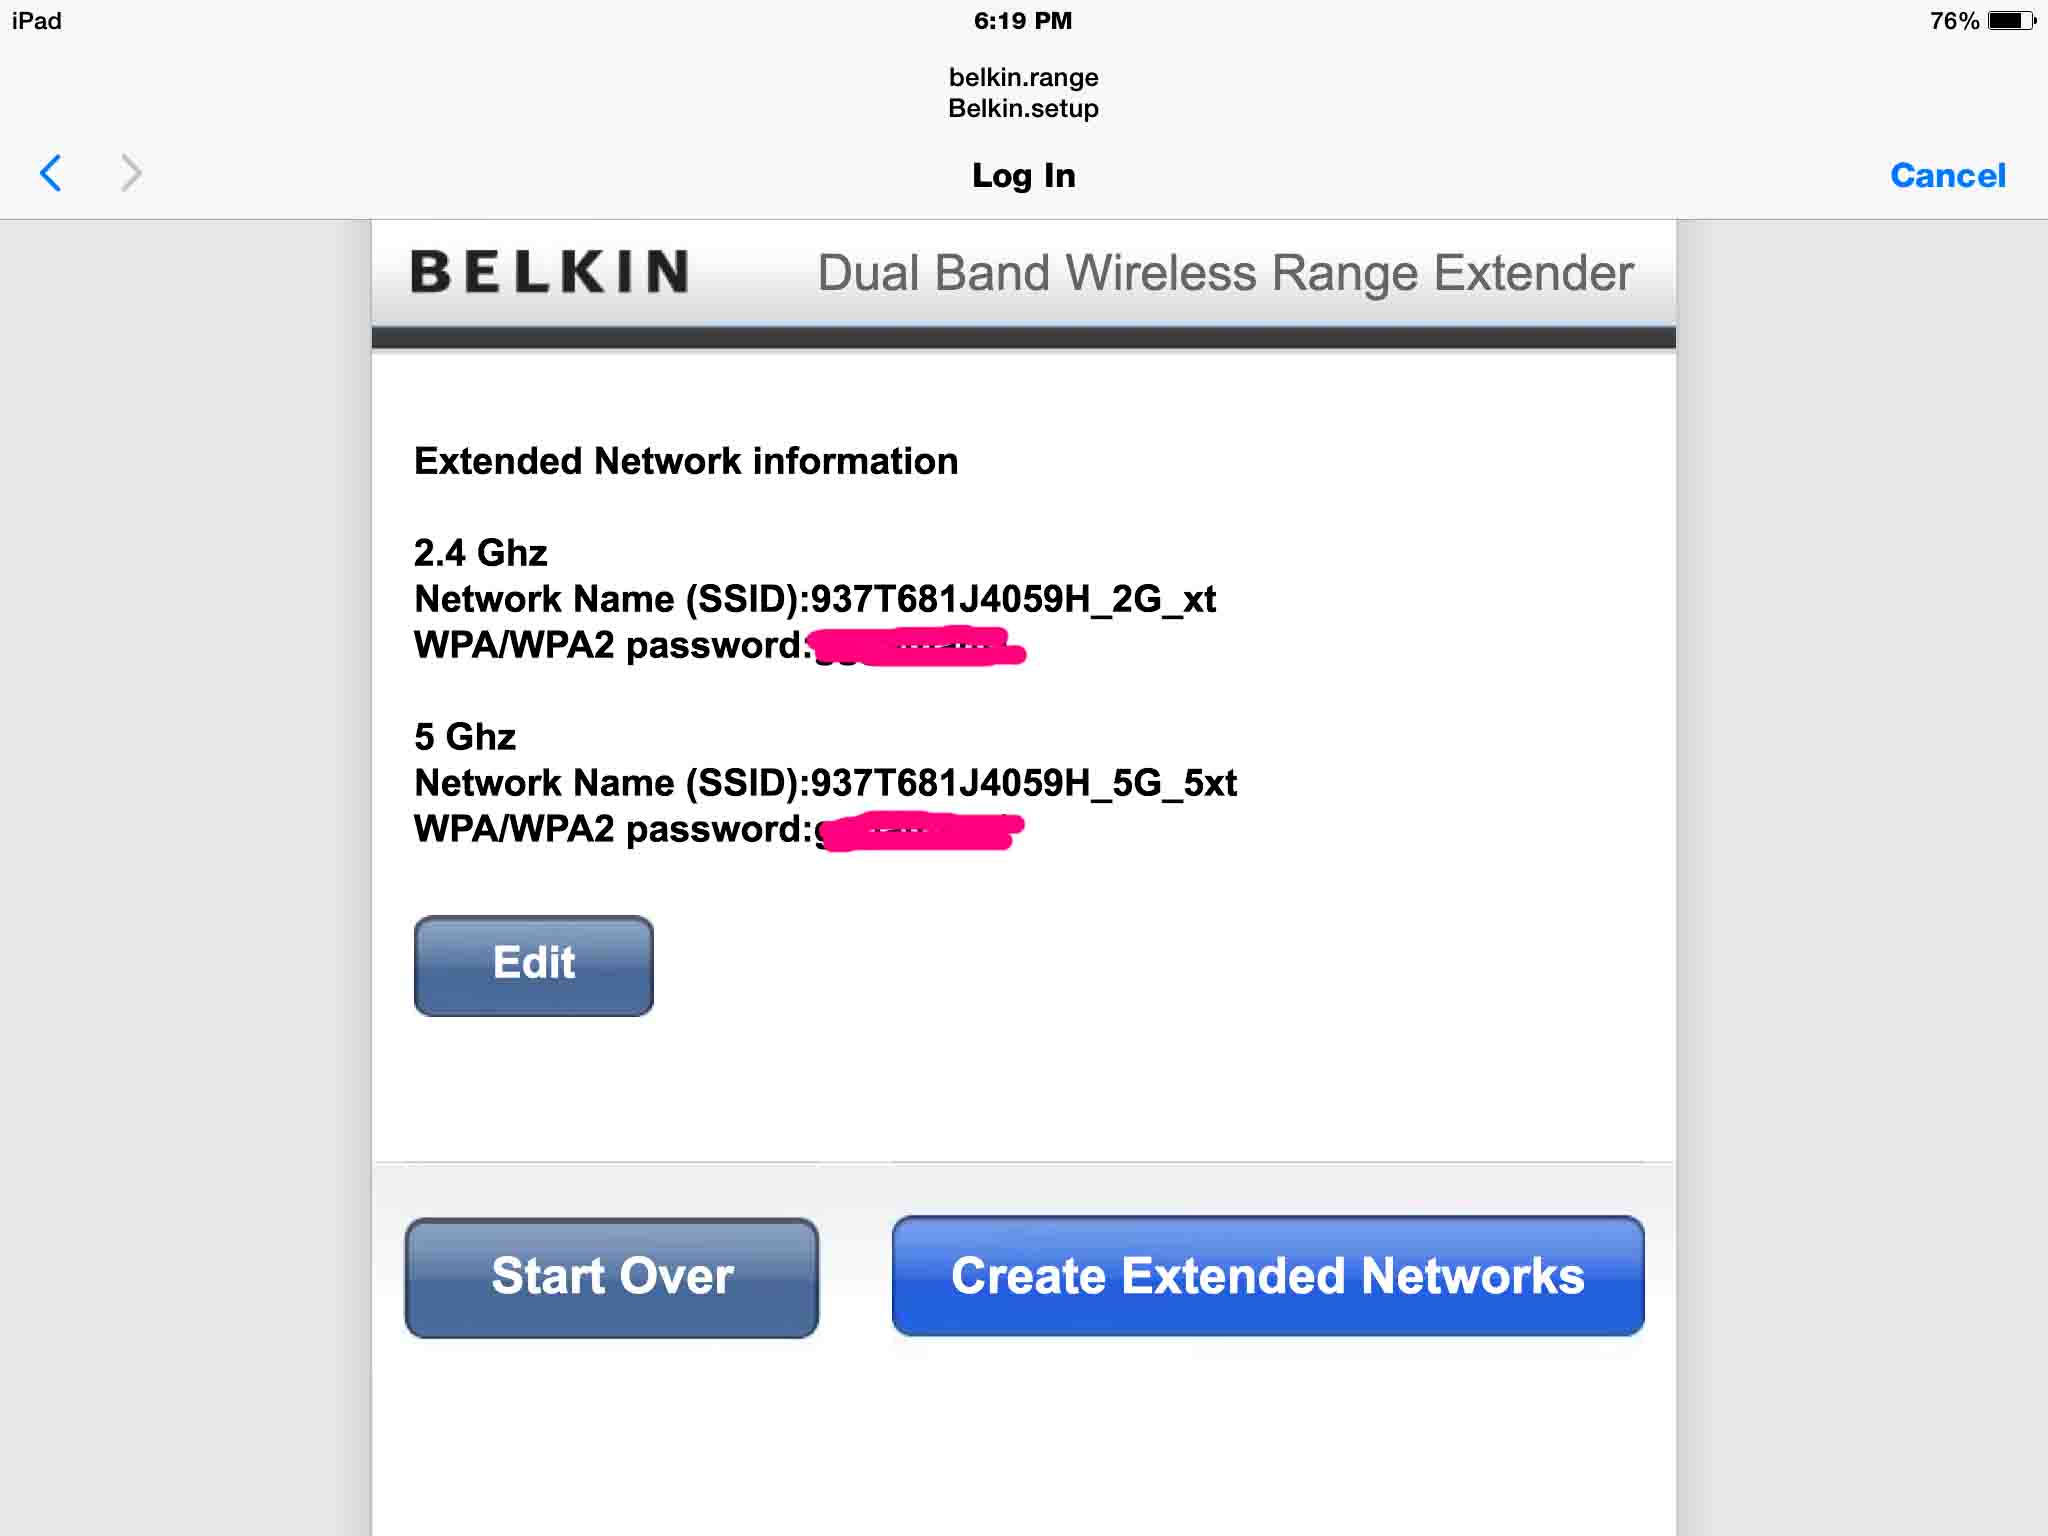
You may choose to edit this data (change the SSIDs of the network extensions for example) by pressing the “Edit” button and then, following the instructions.
Or, you can choose to completely scrap all the information entered in this entire procedure, by tapping the “Start Over” button, and then jumping back to step 2 to re enter everything.
However, if the 2.4 Ghz. and 5 Ghz. network information displayed in the “Extended Network information” screen looks okay, then tap the “Create Extended Networks” button. This brings the new wireless networks “on the air,” and takes you to the final screen in this Wi-Fi range extender setup.
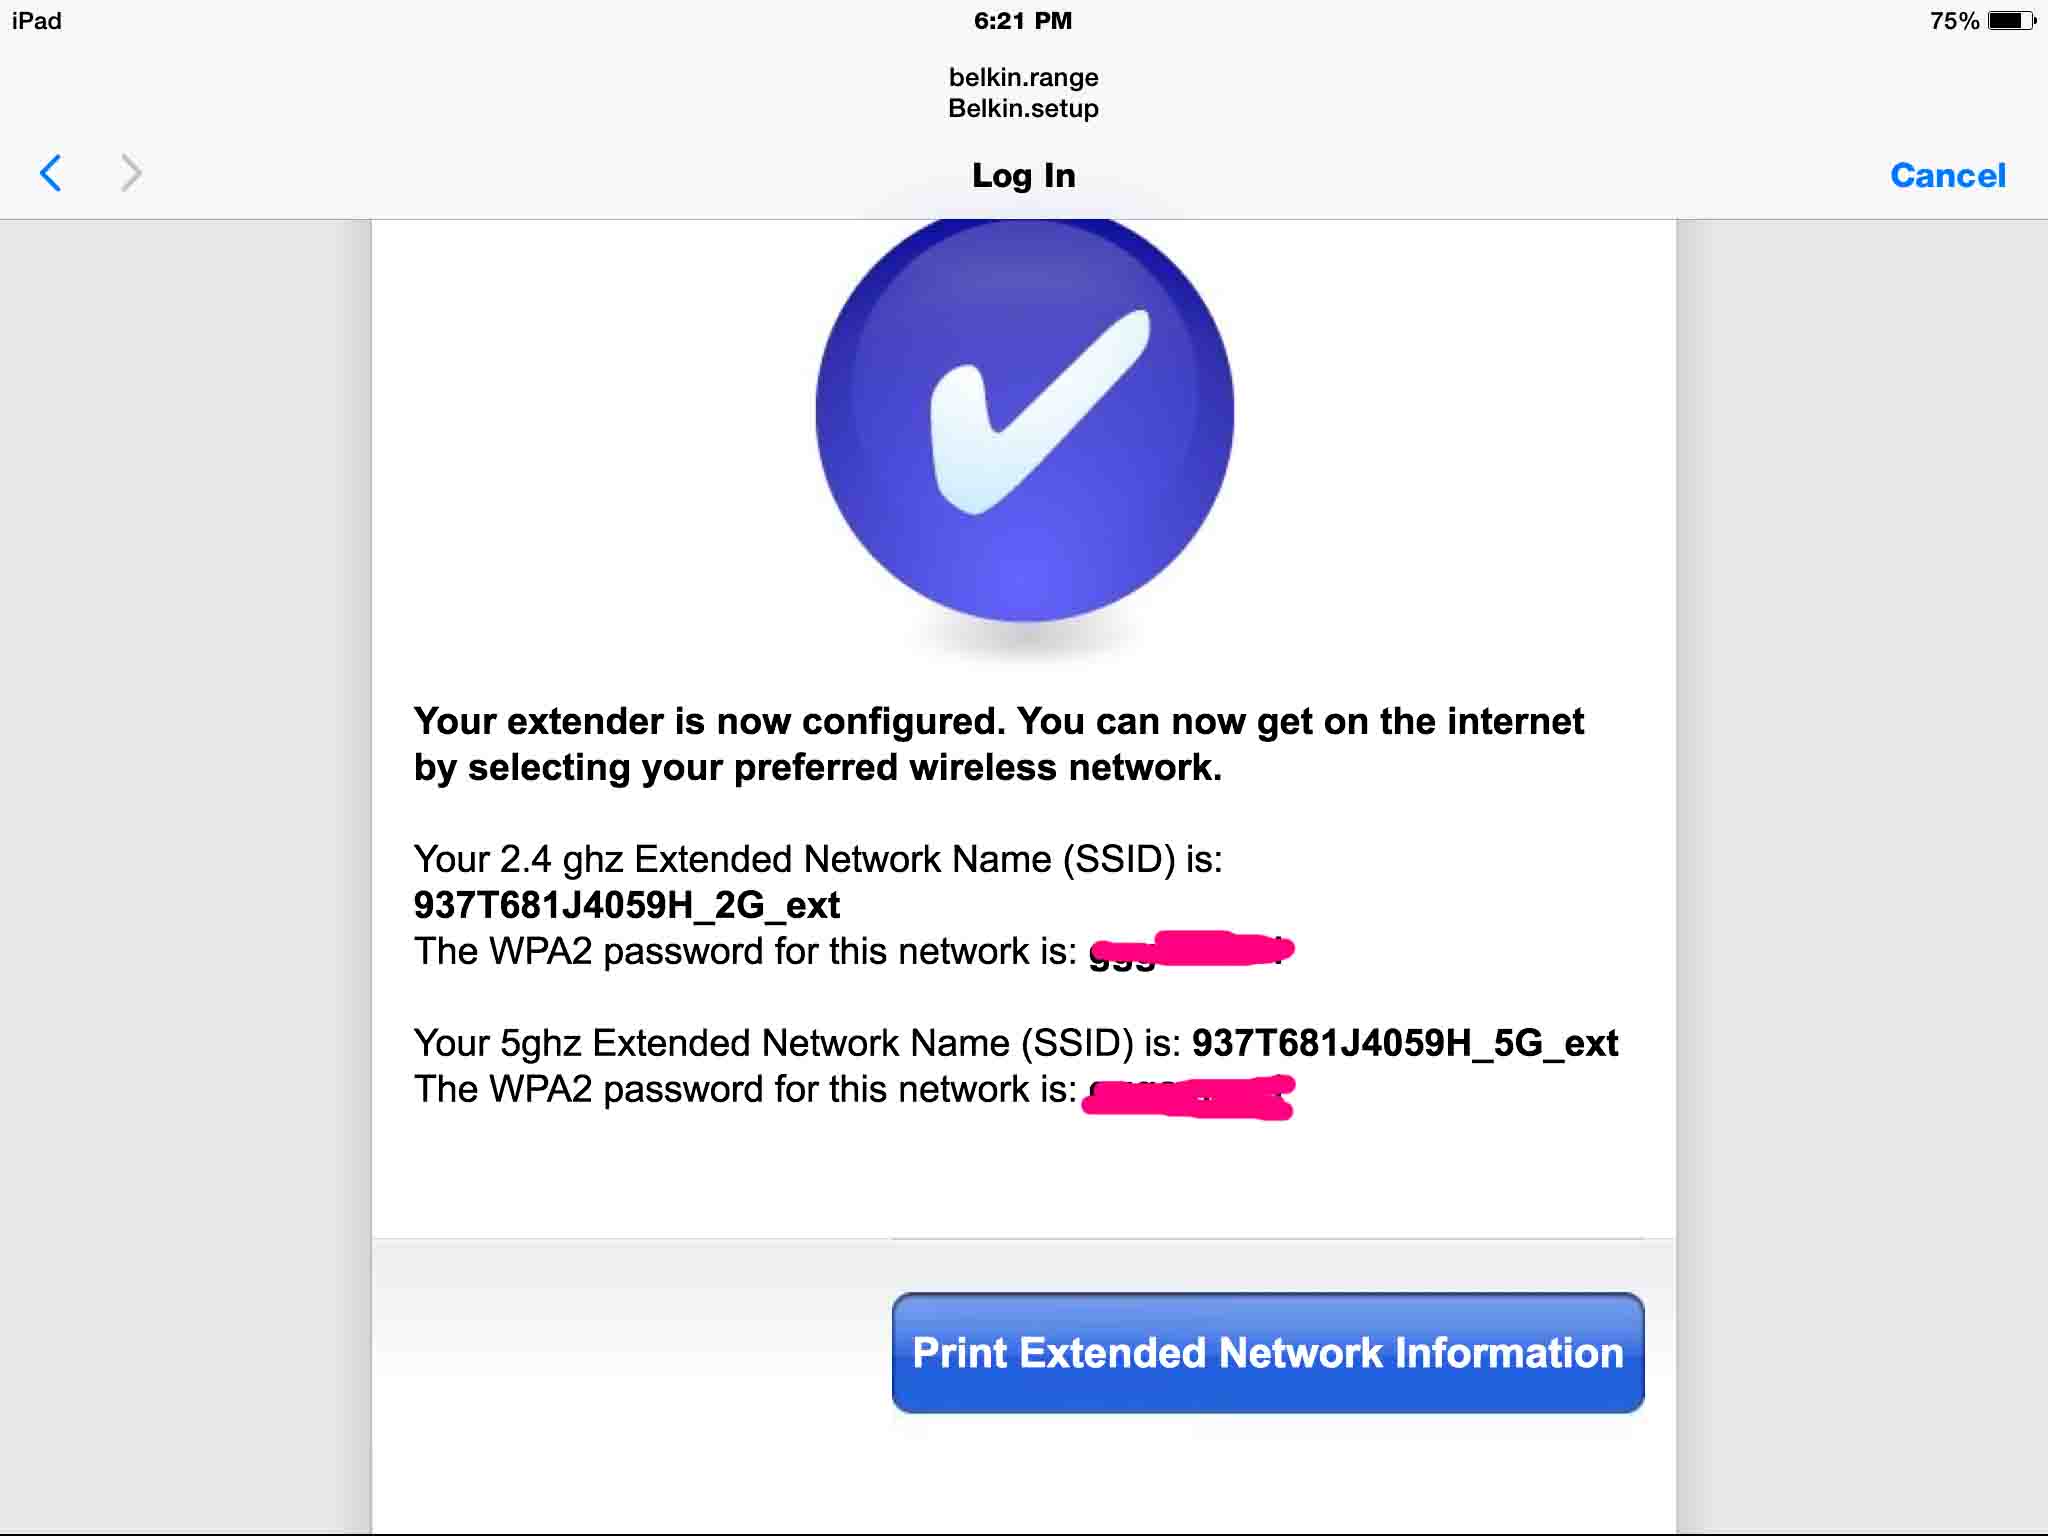
9. Check for the “Your extender is now configured…” Screen to Continue with http belkin range Setup
If all went well, then after a short pause, the “Extended Networks Configuration Done” screen appears, as shown next. This page shows you the SSIDs, security types, and passwords of the extended networks you just set up.
You may print this information by pressing the “Print Extended Network Information” button.
Do this rapidly though, as this screen times out after approximately fifteen seconds, and disappears along with the Belkin.setup temporary network, which again, is supplied by the extender only during setup.
10. Check that your Extended Networks are Now Up and Running
To do this, we pulled up the Settings->Wi-Fi screen on our iPad air, which scans for in-range wireless networks and displays the ones nearby that it finds. Ours looks as follows, now that this range extender has been properly set up. The network SSIDs provided by the extender end in “xt”, which are the 937T681J4059H_2G_xt, and the 937T681J4059H_5G_5xt networks.
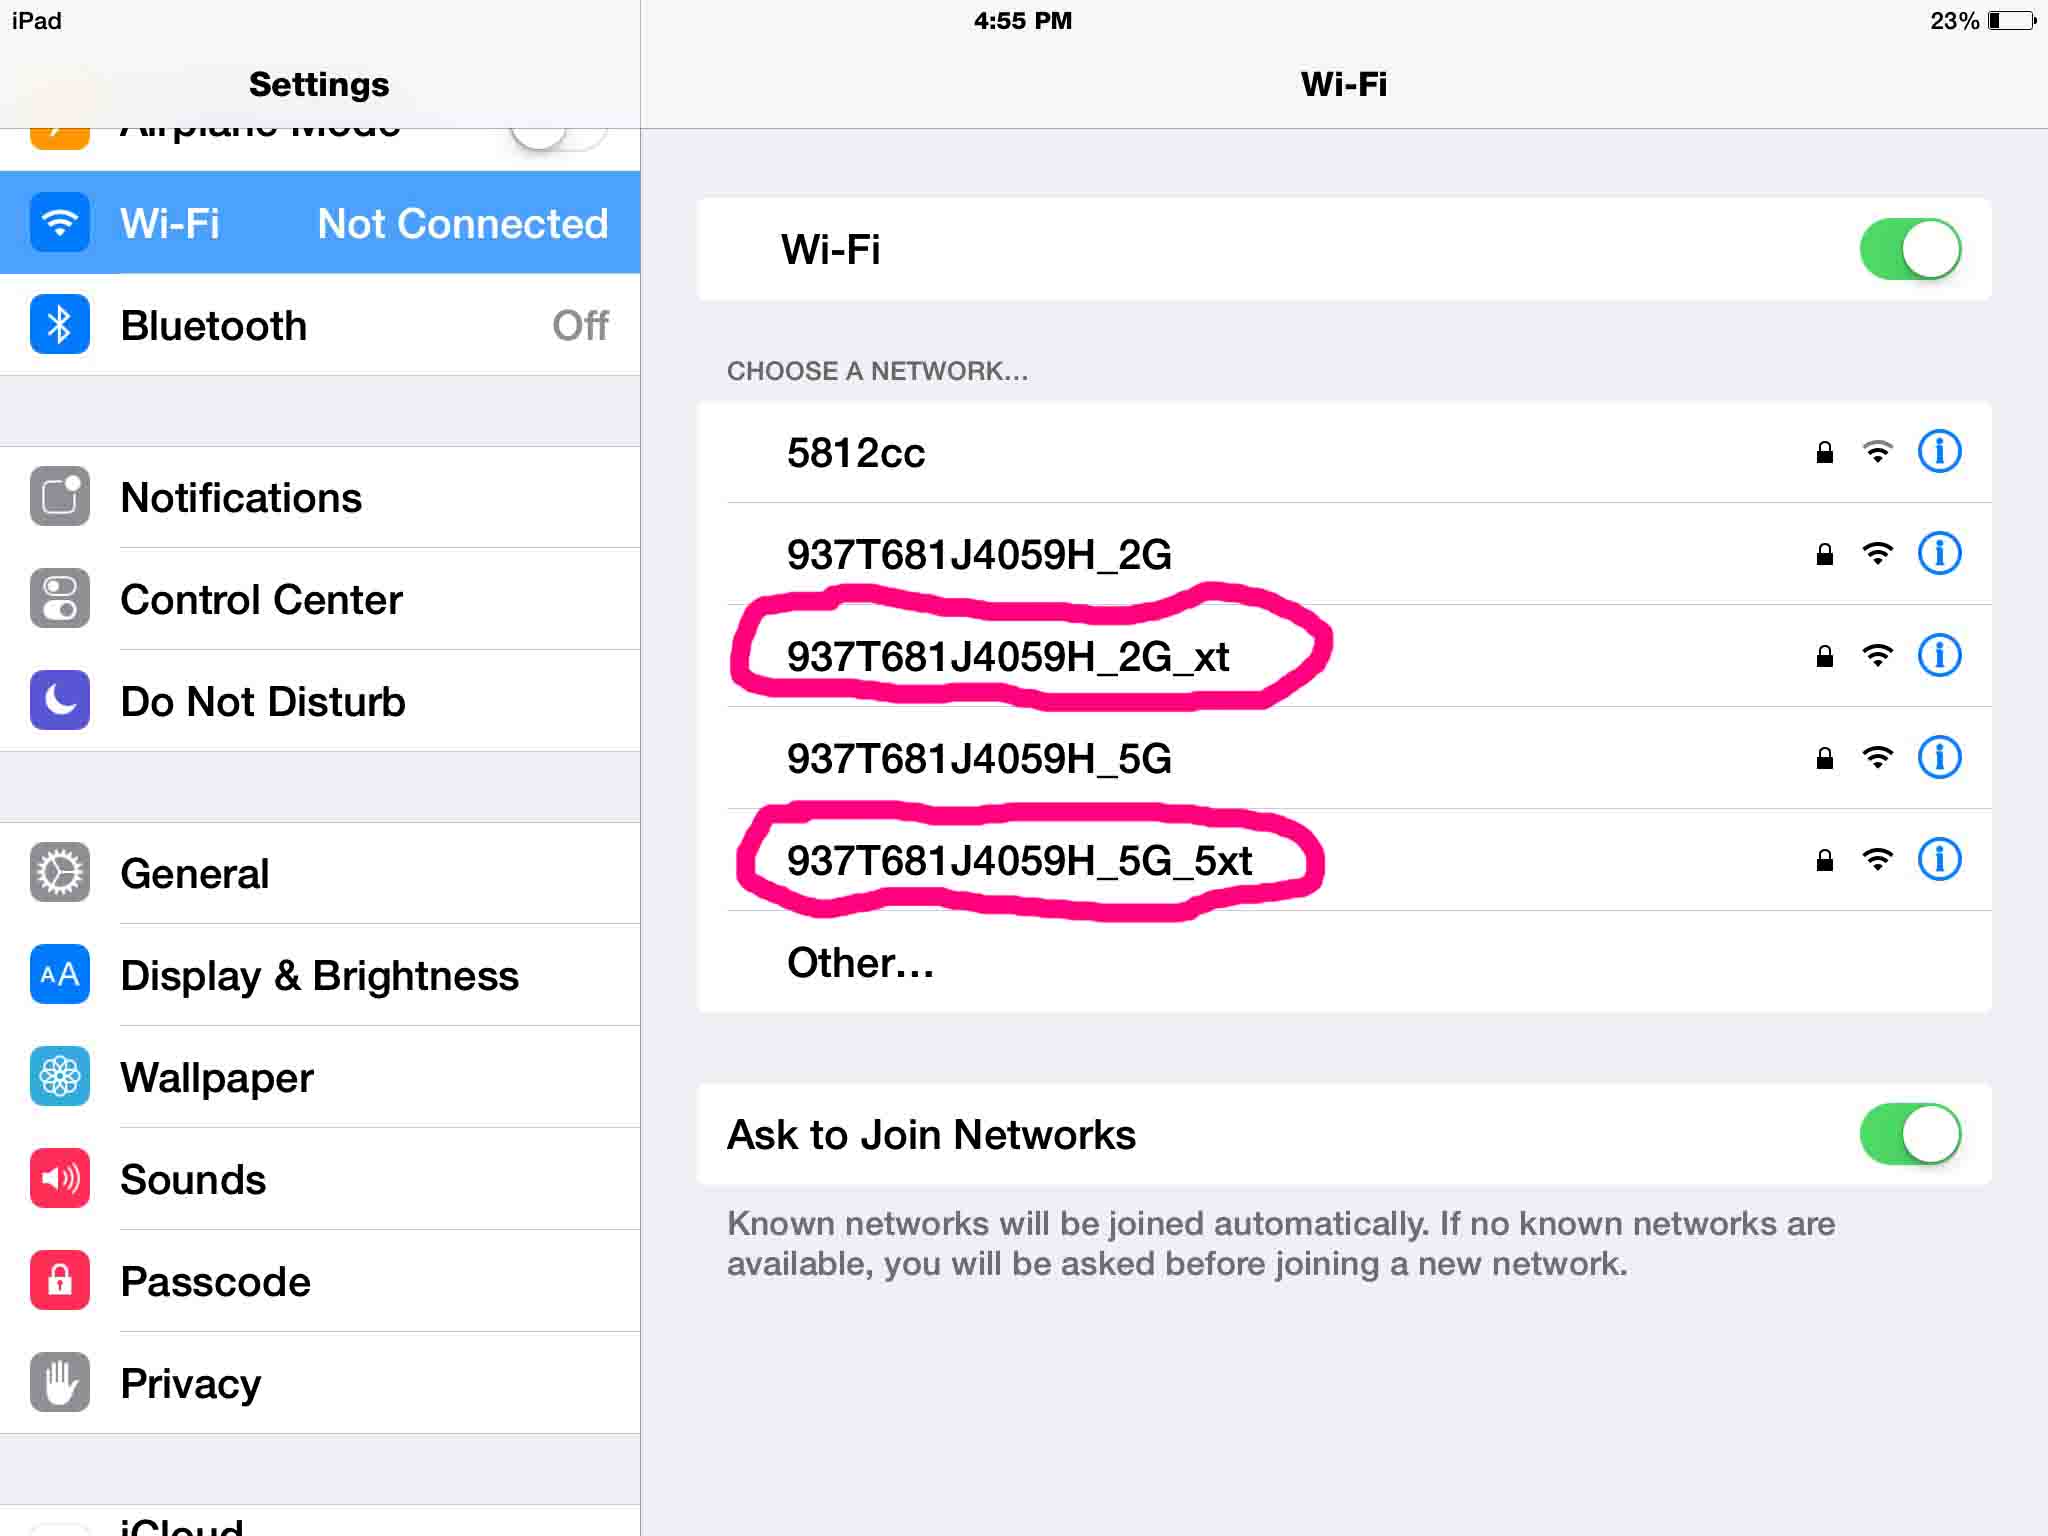
You may then connect to either one of the “xt” networks, and you should obtain the same access that the primary networks offer, albeit just half as fast.
11. Done with HTTP Belkin Range Setup !
Enjoy. You’ve now successfully setup your Belkin Wireless Range Extender model F9K1106v1. Have fun!
Qualifiers and Disclaimers
-
- We developed this post running Belkin firmware 1.0.16.