When you get a new Instant Pot, it’s so tempting to just dive right in and make the best tasting recipes around, in the shortest time. But note that this electric pressure cooker need some preps before you can use it to fullest advantage. If you take the time to learn how to connect it to the internet, you’ll then be able to monitor and control the cooking remotely, from anywhere that you have internet access. So in this piece, we show how to set up Instant Pot smart WiFi pressure cooker, covering how to get it online using its companion Instant Pot app.
Summary of How to Set Up Instant Pot Smart WiFi Pressure Cooker
- Plug your Instant Pot into AC Power
- Put it into APP Mode
- Connect Mobile Device to 2.4 Ghz WiFi Network with Internet Access
- Install the Instant Pot App
- Run the Instant Pot App
- Select your Instant Pot Model
- Create a New Instant Pot Online Account in the App
- Allow the App to Send you Notifications
- Name your Pot and Create a Password for It
- Connect your Smart WiFi Instant Pot to your WiFi Network
- Select your Instant Pot Model — Pick the Smart WiFi Cooker
- Begin Using your Pressure Cooker
How to Set Up Instant Pot Smart WiFi Pressure Cooker, Detailed Instructions
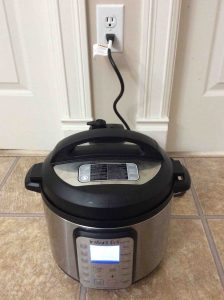
1. Unpack your Instant Pot and Connect it to AC Power
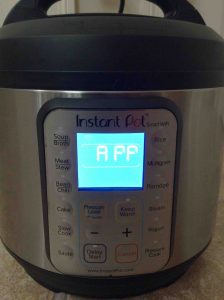
2. Put the Cooker into APP Mode
Set the Instant Pot to APP (ready for setup) operation by pressing the Pressure Level button for approx. ten seconds.
You should then see the the word APP on the LCD display, as shown next.
3. Connect Your Mobile Device to the Same 2.4 Ghz. WiFi Network you Plan to Connect your Instant Pot To
The Instant Pot app transfers the WiFi network credentials for the network your mobile device is currently connected to, to the Instant Pot’s memory during setup. The pot does not scan for available WiFi networks the way many other smart devices do. Instead, it relies on your mobile device to do the scanning, and then to tell it which network it should log into. This means that your mobile device as well as the Instant Pot, must be in range of the WiFi network you desire. It also means that before you begin the Smart WiFi Instant Pot setup proper, you must connect your mobile device to that same wireless network.
Note also that this Instant Pot can only connect to 2.4 Ghz. wireless G WiFi networks. So, be sure to log your mobile device into 2.4 Ghz. WiFi before you proceed to the next step.
The network you choose should also have internet access.
4. Install the Instant Pot App to your Mobile Device to Continue with How to Set Up Instant Pot Smart WiFi
The app is named Instant Pot, and is available on both the Apple App Store and Google Play Store. Note that the app that controls this Instant Pot is a different app than that for the Bluetooth version of this pressure cooker. So be sure you install the correct app. We’ve included an App Store screenshot next, that shows exactly what the download page for the Instant Pot app looks like.
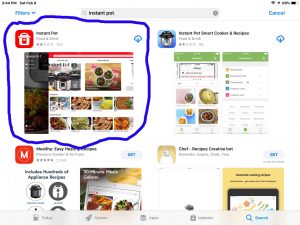
The right app has a red and white icon with a picture of an Instant Pot inside its red boundary.
5. Find the Instant Pot App Once Installed
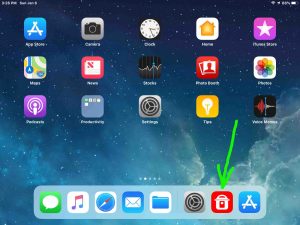
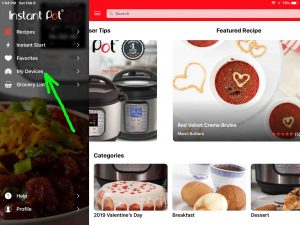
You may run it right from the App Store page after installation finishes. Or, yo can pick it up later by finding in your mobile device Home pages. We’re running this demo on an iPad Air tablet, and we found the Instant Pot app on the recent used app shortcuts bar, as pointed at by the green arrow in the next picture.
6. Run the Instant Pot App
Tap the Instant Pot app icon to start it up.
You then should see the app’s Welcome screen, as shown in the next picture.

7. Tap the Continue Button to Move Forward with How to Set Up Instant Pot Smart WiFi
Touching Continue brings up the Select Model screen, as shown next.
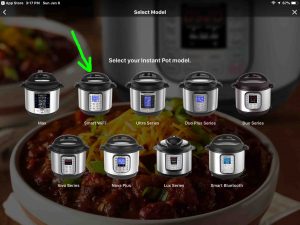
8. Tap the Smart WiFi Icon
Find the Smart WiFi cooker in the list of Instant Pots that the app presents to you, as shown in the last screenshot above. The Smart WiFi Instant Pot is pointed at by the green arrow in that picture.
Touching the Smart WiFi model brings up the Connect Smart WiFi screen, as shown next.
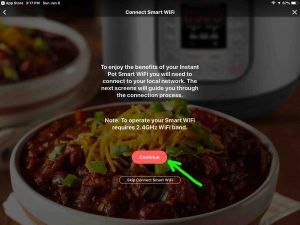
9. Tap the Continue Button
Find the Continue button near the center of the screen, but just a little bit closer to the bottom.
Touching Continue then brings up the first Your Account screen, as pictured next.
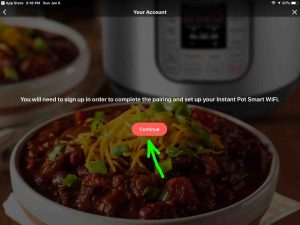
The Your Account page tells us that we must sign up to connect your Instant Pot to the internet.
10. Again, Tap the Continue Button to Continue with How to Set Up Instant Pot Smart WiFi
This time, the Continue button is almost exactly in the center of the Your Account page.
When you tap it, you should get the Create Your Account page, as shown next.
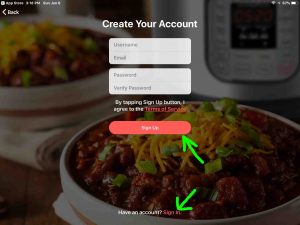
Now if you already have an account, tap the Sign In link near the bottom center of the Create Your Account page shown in the last picture. Then, skip ahead to step 14. If not though, continue on with the next step.
11. Enter your Name, Email Address, and Password you Want for the New Account
After you type in this info, your screen should look something like the following. Note that we’ve blanked out the name and email address we used. But you can till that these fields are indeed filled in.
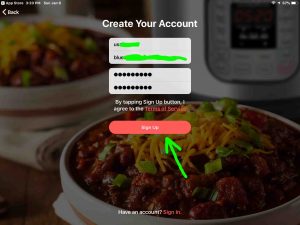
12. Tap the Sign Up Button
Once you enter your preferred email address, password, and name to use to create the new Instant Pot account, touch the Sign Up button, found just beneath the center of the screen, as pointed at by the green arrow in the last screenshot.
The app then displays the Consent Notice page, as shown next.
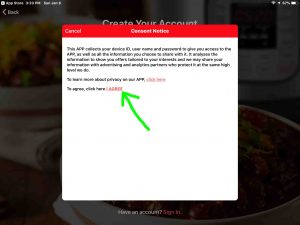
Read over the agreement, and if you do agree with the terms of service documented, then move on to the next step. If you don’t, then exit the app. Note that you’ll still be able to use your Instant Pot. But if you don’t complete setup, you won’t be able to use the remote access features that agreeing to these terms affords you.
13. Tap the I Agree Link to Continue with How to Set Up Instant Pot Smart WiFi
This link is red in color, formed from rather small print. So it may be difficult to find if you’re vision impaired or using a screen reader. However, you can find it just left of center screen, about one third the way down from the top of the screen.
At any rate, touching the I Agree option brings up the Signup Complete window, as pictured next.
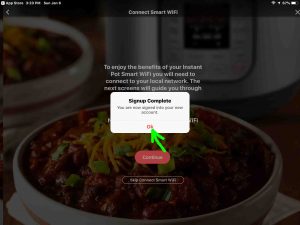
14. Tap the OK Link
The OK link is very close to center screen, but just a hair beneath it.
Touching OK then brings up the Instant Pot Would Like to Send You Notifications window, as shown next.
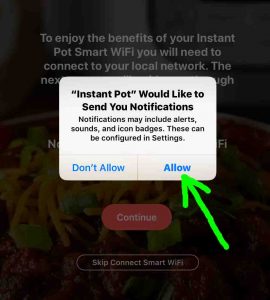
15. Tap the Allow Link
Find the Allow link a little to the right of center screen in the screenshot above, pointed at by the green arrow.
Following the Allow link brings up the Secure and Name Pot page, as shown next.
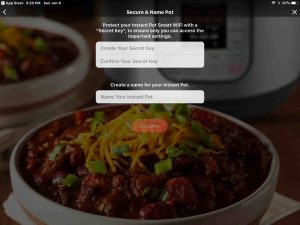
16. Enter a PIN code for your Instant Pot Smart WiFi Cooker
Enter a security key that’s at least six characters long. We made the mistake of entering just four characters, as shown next. The Continue button remained unavailable.
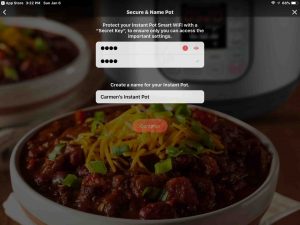
But once we chose a six character password, the button brightened, as shown next, and we were then able to move on to the next step.
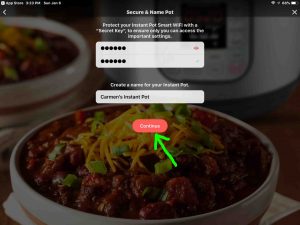
17. Touch the Continue Button to Continue with How to Set Up Instant Pot Smart WiFi
Find the Continue button exactly in the center of the screen above, as pointed at by the green arrow.
Tapping Continue on the screen above takes you to the WiFi Password page, as pictured next.
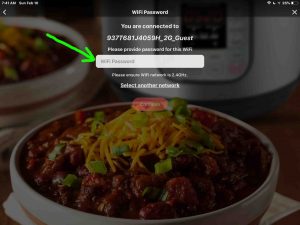
The WiFi Password screen prompts you for the password of the WiFi network you want to sign your Instant Pot into. It’s also the network that your mobile device is connected to at this time.
18. Enter WiFi Password
The edit box you enter the WiFi password into is horizontally center on the screen, and vertically half way between the top of the page and its center.
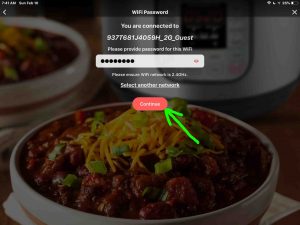
19. Touch the Continue Button
Again, find the Continue button exactly in the center of the screen above, as pointed at by the green arrow.
Tapping Continue takes you to the AP Mode page, as pictured in the next screenshot.

This pages tells you to make sure your Instant Pot is in APP mode. So, now is a great time to do that. If your display panel is not showing the letters APP, then your pot is not in APP mode. So, to get it into APP mode, press and hold in the Pressure Level button for around ten seconds, until the pot sounds a single long beep, and the APP letters appear on its screen.
Here is what our smart WiFi Instant Pot looked like when we put it in APP mode.
Now, go back to the Instant Pot app on your mobile device, and continue with the next step.
20. Tap the Continue Button
This time, find the Continue button near the bottom but in the center of the AP Mode screen.
Touching that button then brings up the Connect to Instant Pot page, as shown next.
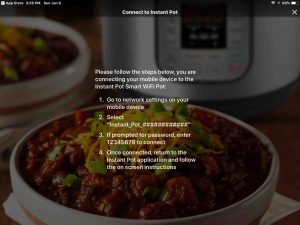
21. Visit your Mobile Device’s WiFi Settings Page to Continue with How to Set Up Instant Pot Smart WiFi
When the Instant Pot is in APP (setup) mode, it established an ad hoc WiFi network that you need to connect to with the same mobile device you’re running the Instant Pot app on, before proceeding to the next step.
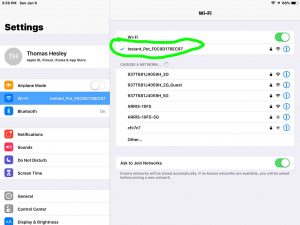
In our demo here, we went to Settings->WiFi on our iPad Air, and spotted the Instant Pot’s wireless network, as shown in the next screenshot. We circled that network in green. That network is named Instant_Pot_F0C9D17BEC97.
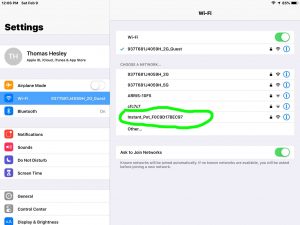
22. Connect to the Instant Pot WiFi Network
Tap the pot’s wireless network to connect to it. It’s unsecured, so you won’t have to enter a password.
When we touched the Instant_Pot_F0C9D17BEC97 network on our iPad Air, the Air connected within a couple seconds, and the Wifi Settings screen changed to show this connection successfully made, as pictured next, circled.
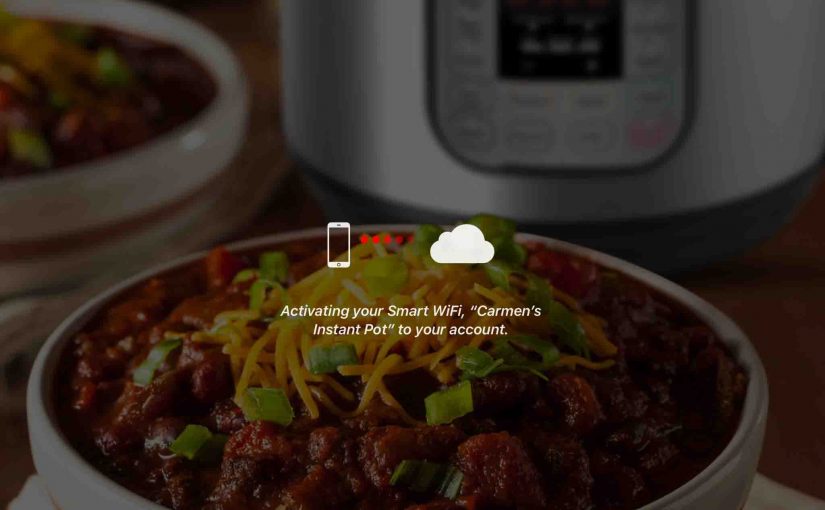
23. Go Back to the Instant Pot App
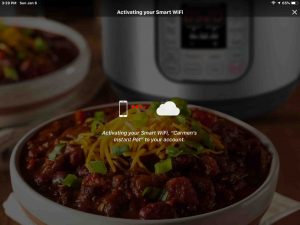
Once you’ve connected your mobile device to the Instant Pot ad hoc network, close the Settings app and again bring up the Instant Pot app. You’ll notice that now, the app is trying to activate your Instant Pot on your Instant Pot account. See this pictured next. This page shows a mobile phone and a cloud, with a line between them where a blip of light is running back and fourth between them. Presumably, this means that your mobile device, the Instant Pot, and the cloud servers at the Instant Pot company, are exchanging data to establish the linkage.
After perhaps fifteen seconds, your smart WiFi cooker connects to the WiFi network you picked when you connected your mobile device to it in step 3 above.
When that happens, you get the Connection Successful page in the Instant Pot app, as shown in the next screenshot.

24. Tap the Next Button
Find the next button near the bottom center of the Connection Successful page, pictured just above.
Touching Next brings up the Initial Test Run screen, as shown next.
Now, if you tap Continue on this page, you’ll receive instructions on how to conduct this test run. In short, they ask you to put a bit of water in the inner pot, lock the lid, and start the Instant Pot to heating. Eventually, the steam pressure builds up inside, and you can then observe the float valve on the lid to pop up, and get a feel for what it’s like to use an electric pressure cooker such as this one.
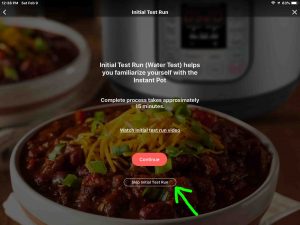
However, we did not run through that exercise for this demo, since you don’t need to do that in order to get your Instant Pot online, which our focus in this post. So instead of touching Continue, we move on to the next step, where we tap the Skip Initial Test Run button.
25. Tap the Skip Initial Test Run Button to Continue with How to Set Up Instant Pot Smart WiFi
This button is found near the bottom and in the center of the page, as pointed at above with the green arrow.
Touching the Skip Initial Test Run button brings up the Before You Begin page, as shown in the next screenshot. Here, you can browse through several screens that talk about how to verify cooker status and some of the actions you can take with it using the Instant Pot app. We will not however, show all these windows here.
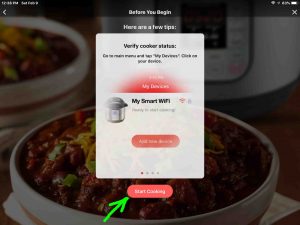
26. Touch the Start Cooking Button
Find this option near the bottom and horizontally in the middle of the screen, as pictured above.
When you tap the Start Cooking button, this takes you to the Instant Pot app’s Home screen, as shown next.

27. Check your Smart WiFi Instant Pot’s Cooking Status
To see what the pot, now online, is doing, tap the main menu hamburger control in the top left corner of the app’s Home page, as pointed at above by the blue arrow.
This brings up the main menu, as pictured next.
28. Touch the My Devices Option
We find the My Devices item near the left edge of the screen, about a third of the way down from the top.
Tapping this menu item brings up the My Devices page, as pictured next.
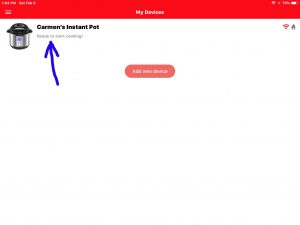
This screen lists all the Instant Pot devices that you’ve configured on your mobile device using the Instant Pot account. Our cooker, named Carmen’s Instant Pot, appears as ready to cook.
29. You’re Finished with How to Set Up Instant Pot Smart WiFi !
If you see the screen in the last step, then your Instant Pot Smart WiFi pressure cooker has now been completely set up. Thus, you can now cook with it via the Instant Pot app.
One final warning though. You can only access your Instant Pot with one mobile device at a time. A surprising limitation to be sure, especially since so many internet-enabled devices these days allow multiple devices to log in and access the appliance in question. But we hope they’ll code away this limitation in the app at some point later.
Related Posts to How to Set Up Instant Pot Smart WiFi Pressure Cooker
- How to Set Up Echo Dot 3rd Generation
- Setting Up Alexa Echo Spot Touchscreen Speaker
- How to Set Up Spotify on Google Home Mini
- Set Up Cortana App for Microsoft Invoke Speaker, How To
- How to Set Up Invoke Speaker, Setup Cortana Smart Speaker
- Help with How to Set Up Pandora on Alexa Speakers
- How to Set Up Google Home Mini
References for How to set up Instant Pot Smart WiFi
Revision History
- 2019-07-16: Added more links and tags.
- 2019-05-02: Tuned the targeting for ‘How to Set Up Instant Pot Smart WiFi’.
- 2019-02-09: Originally published.